
 |
|
|
|
|
#1 |
|
Registered User
Join Date: Jun 2012
Location: Houston, TX
Posts: 320
|
Bucket seat swap
I have the original bench seat in the truck now. it looks good but i have been wanting the buckets for awhile now and i want to bring a center console through the two seats from the dash. Anyone have any pictures of their swaps? i have been looking at the Procar rally smooth back seats. It's the brackets im worried about. will the buckets sit higher with procars brackets or the same height? Any help
|
|
|

|
|
|
#2 |
|
Cruzzzn' Vet
Join Date: Jan 2005
Location: Porterville,Ca.
Posts: 1,918
|
Re: Bucket seat swap
I have ProCar low back seats in my 83 and I don't care for them, the seats are uncomfortable and the mounting brackets sit too high, later on down the road i'm gonna yank'em and go back to the bench

|
|
|

|
|
|
#3 |
|
Registered User
Join Date: Jul 2007
Location: Tucson, AZ
Posts: 3,195
|
Re: Bucket seat swap
Take a look at Chrysler Sebring convertible bucket seats with console. I got this setup for my 83 and will probably install them one day. The seats are narrow enough to fit in the truck with the console.
The big plus is that they have integral seat belts, so if you secure the seats to the floor and/or frame you can get rid of the stock belts which are often not functioning correctly or at all in these old trucks. Just be sure to give the integral seat belts a tug to make sure that they work. Earlier Sebring convertible models (pre 2001?) might have seat belts that only work with the ignition on, so I would avoid those. I got a pair of seats and console out of a 2001 from the local pick and pull for about $100. You can see these type of seats listed on Ebay as "hot rod" seats because of the integral seat belts. Late model Chevy/GMC pickups also have integral belts but they are taller and wider than the Chrysler seats, so installation will be more of a challenge, and if you are a 6 footer like me, your head may be bumping against the roof. Unless you cut holes in the floor, and drop the mounting surfaces. |
|
|

|
|
|
#4 |
|
Registered User
Join Date: Apr 2014
Location: Bloomington Indiana
Posts: 1,041
|
Re: Bucket seat swap
For about the same money, I got a 40-20-40 set from http://www.discountvantruck.com/disc...ries/truck.htm. Center seat is a jump seat with a console back that folds down. It comes with a mounting frame that bolts right up to the existing hard points.
I did a write-up on another forum 3-4 years back. I repost it here: ============================== I just installed leather 40-20-40 buckets from discountvantruck.com, so here's some pics and a review. They sell a bunch of different kinds, so this only applies to the 500 Series, and only to an install in a 1978 K-10. Adjust accordingly. Also, I have no connection with this outfit, just my opinion after putting these in my truck. Quality: The seats and frame and all are built like a tank. The leather is good quality and the sewing is superb. The seats are all leather everywhere, not leather seating surfaces and vinyl elsewhere, or in the back, or where you can't see, etc. It's all leather, period. The foam and springing appears top-notch and is very comfortable. Dimensions, features, look, etc. are all as per description and photos on the web site. Riding position: The seating position ends up a couple inches higher and an inch or two closer to the wheel. When I put the seat back more vertical than stock (which is better for my back problems), what I saw centered in the unadjusted rear-view mirror was the inside of the tailgate. Some of that rise is the seat height and some is the seat back being more vertical. Also, the springs and foam in the new seats are new, and the old seat, while reconditioned, was probably lower than stock from sag. Ordering and delivery: Linda was easy to work with. I wanted a brighter red than their stock colors to better match the stock interior, and she offered further samples. The stock color was more burgundy and looked brown next to the stock interior. The red sample she sent after talking it over with her is a better match. (It looks orange in the flash, but it's bright red.) Delivery was "three to four weeks"; it actually shipped four and a half weeks after order, and took a week to get here. Thanksgiving intervened, however, and they shipped 20 business days after order. The order was filled correctly, with the right colors in the right places, heaters and lumbar supports included as per order, the correct brackets, etc. Instructions: Instructions are rudimentary but sufficient. The instructions said to mount seats, console and brackets to the frame and put the whole thing in as an assembly. That looked pretty difficult, as the whole setup is larger and bulkier than the stock seat. We put the frame in the truck, then put the brackets on and left the bolts loose, then mounted the console (take the little tray out to get at the mounting bolts), then mounted the seats, then got the floor bolts started, then tightened the brackets up. To mount the seats on the frame inside the truck, we put a small piece of 4x4 under the frame to hold the whole thing up so we could get access to the hardware underneath. Overall value: At under $1500 delivered for this setup, it's a tremendous value compared to what else is out there. Fitment and tweaks: If you just put everything together as they say to, it will work fine, but there are some tweaks. The brackets for the 73-87 Chevys has a weld seam on the inside of the angle that holds the frame away from the bracket about 3/16". Now, the brackets end up in the right place to bolt into the floor, but I didn't like that gap, so I put washers in to fill it so I could torque them down without distorting the frame or bracket. The seating position is a little close to the wheel, and at the same time the seat didn't go all the way back -- it hit end-of-track. Also, the seat of the jump seat was far enough forward that the transfer case shift lever on the modded NP203 was just against the jump seat in 4HI. We drilled two new holes in each bracket 1-3/4" behind the existing holes, which moved the whole seat assembly back 1-3/4". This allowed the seat to go back all the way until it hit the rise in the floor behind the seats, and still had plenty of adjustment forward, and also gave me a 1-3/4" gap to the transfer case lever. The headrests would only go down half way before they seized up, but each of the mounting rods individually went all the way down easily. A bit of measurement showed that the rods were 0.090" further apart than the holes. I put a couple of blocks between the rods and then cinched down across the rods right up against the headrest with a pony clamp until they were correctly spaced. There is a latch release for the jump seat back. The release lever was pressed into the drivers seat bolster and it had a tab on it that dug pretty deep. I removed the jump seat back latch and release lever, as I won't be driving around with the jump seat open unless there is someone sitting in it. We also added washers to the seat mounting bolts where they went through slots, and replaced the provided nuts, which have the locking teeth on the bottom, with stainless steel nylon-insert locking nuts. So, basically, we did a bit of tweaking, which I think is well within the capabilities of most people on FSC, and there were no major gotchas, missing parts, re-machining or fabricating or anything serious like that. On to the pics! Stock seat:  What you get. Frame, brackets, seats, center console/jumpseat, headrests. 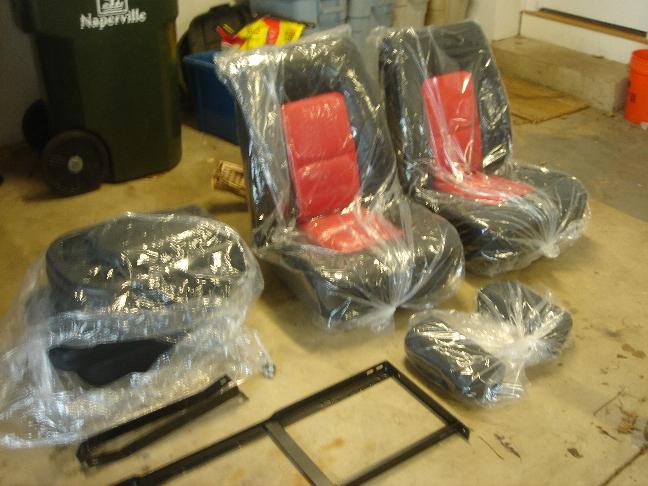 Test-fitting the frame and brackets: 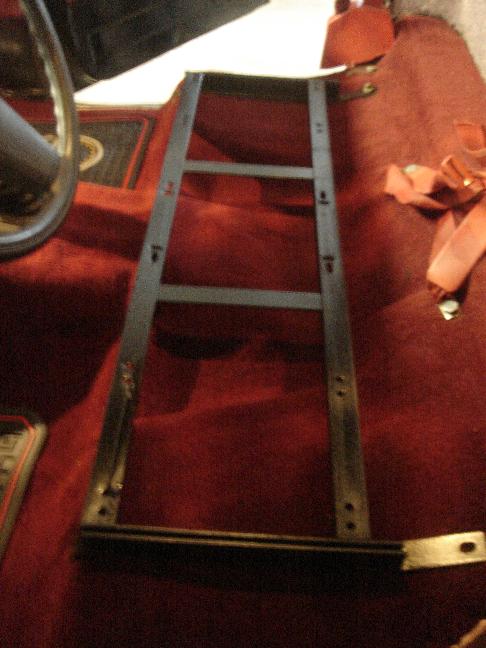 Bracket modification. We drilled two new holes 1-3/4" behind the existing holes.  Installed, console down: 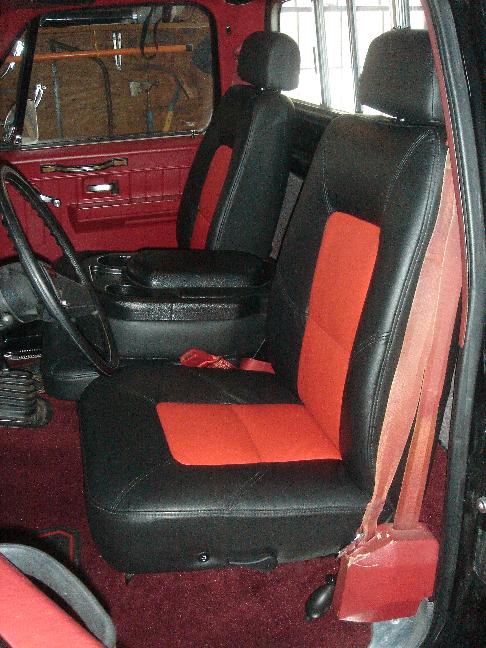 Installed, jumpseat open: 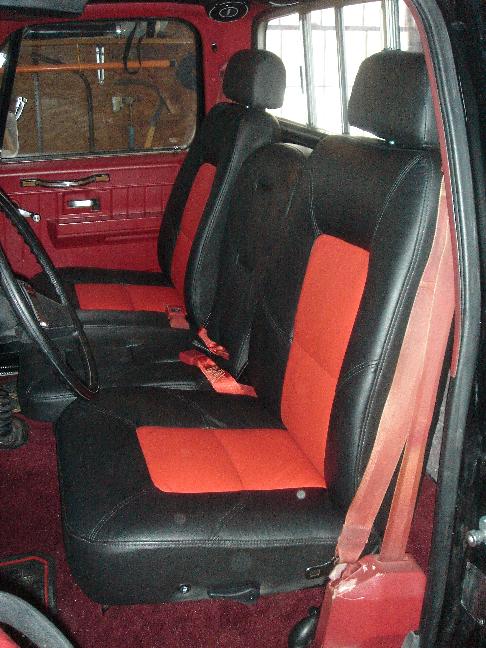 Console storage compartment: 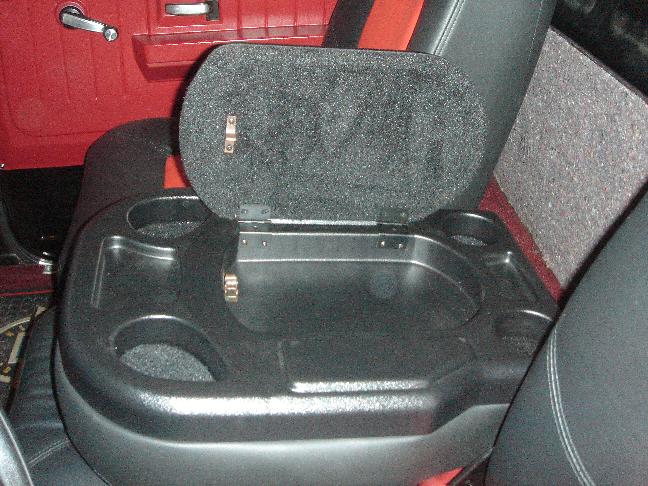 Jump seat storage compartment (without flash, you can tell the color better): 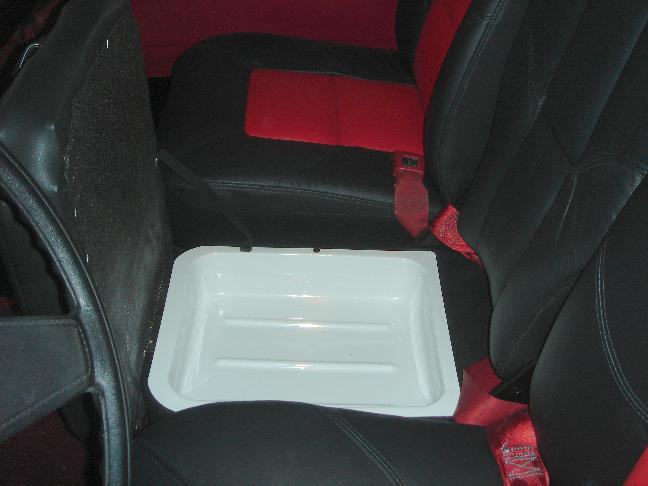 Close up of the leather and stitching detail. The quality is very good: 
__________________
Rich Weyand 1978 K10 RCSB DD. |
|
|

|
 |
| Bookmarks |
| Thread Tools | |
| Display Modes | |
|
|