 |
Register or Log In To remove these advertisements. |
|
|
|
|||||||
 |
|
|
Thread Tools | Display Modes |
|
|
#1 |
|
Registered User
Join Date: Mar 2005
Location: Melissa, TX
Posts: 799
|
Fuel filler behind tail light on 67-72 Fleet
I have seen pictures of this mod but no details on how to do it. Anyone have any experiance with this? Need to know the obvious. How is the lens hinged, how the housing is modified and still work and last but not least, how to route the filler house. Any help is appreciated.
|
|
|

|
|
|
#2 |
|
Senior Member
 Join Date: Nov 2003
Location: Brookings, SD
Posts: 10,499
|
Here you go: http://67-72chevytrucks.com/vboard/s...d.php3?t=77104
This is jorgensensc doing it on his step, but there are a lot of similarities. I did it on my short fleet. I used the same S-10 gas door, and S-10 filler. My tank sits toward the front of the truck a few more inches, to make room for my hitch. I had to cut my S-10 fuel filler and put a bit of an angle in it.
__________________
Some people are like slinkies, they aren't good for anything, but you can't help but smile when you see one tumble down the stairs. |
|
|

|
|
|
#3 |
|
Senior Member
 Join Date: Nov 2003
Location: Brookings, SD
Posts: 10,499
|
Sorry - Welcome to the board!!
Where are you located?
__________________
Some people are like slinkies, they aren't good for anything, but you can't help but smile when you see one tumble down the stairs. |
|
|

|
|
|
#4 |
|
Registered User
Join Date: Mar 2005
Location: Melissa, TX
Posts: 799
|
Thanks for the info. I will update my profile now with my info, I was in a hurry to get this post out there. I am in Melissa, TX. I am about 50 miles N. of Dallas.
|
|
|

|
|
|
#5 |
|
Registered User
Join Date: Mar 2005
Location: Melissa, TX
Posts: 799
|
Do you have pics of your install? Right now my truck has the step bed on it. I am looking for a fleet bed. I have my eye on 2 right now that someone has made trailers out of. I have a 74 short bed that I can put on the trailer for them so I'm hopefully looking at a trade instead of purchase.
|
|
|

|
|
|
#6 |
|
Registered User
Join Date: Feb 2005
Location: SD_Ca
Posts: 26
|
That guy still had the origianl filler on the cab.lol It must be the decoy.
|
|
|

|
|
|
#7 |
|
Registered User
Join Date: Nov 2000
Location: Huntsville Ontario Canada
Posts: 4,051
|
I tried it. .........
I guess I am too dumb. I could not get a hinge with a zero clearance and the housing hit the inside of the tail light housing. Sorry I am no help.
__________________
1968 Suburban numbers matching all original truck now equipped with 6.0/4L80 on Accuair http://67-72chevytrucks.com/vboard/s...d.php?t=625017 1967 C/20 6.0/4L80 Roofing Truck 1990 V2500 Suburban "Plow Truck" 2005 TAHOE DD |
|
|

|
|
|
#8 |
|
TOTY 2006
 Join Date: Dec 1999
Location: Magalia CA USA
Posts: 2,270
|
different idea...
I will jump in this as well. I tried to figure a easy yet clean way to get the filler behind the lens. Even went back and forth in talking with 72Mario (messages), and I was not comfortable with the different things that I looked at. Not enough space to work in, the only way I could see that happening was to cut out a section of the bedside, perform the work, then weld the cut panel back in. Just did not want to do that.
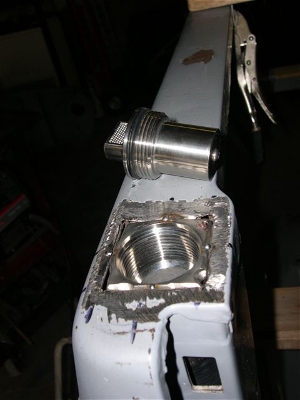
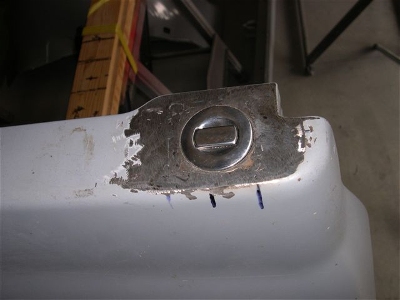
I instead welded in a filler at the top the stake pocket. This was still tricky and took about 3 days of work and about $100 to do. (hoses, filler). More pictures on my website...  
Last edited by John Fabris; 03-11-2005 at 05:08 PM. |
|
|

|
|
|
#9 |
|
Registered User
Join Date: Mar 2005
Location: Melissa, TX
Posts: 799
|
Hey John, where did you get that trick looking cap?
|
|
|

|
|
|
#10 | |
|
Car O'Holic
Join Date: Jan 2005
Location: Austin, Tx.
Posts: 692
|
Quote:
That is really tight I want to do this. Anymore pictures |
|
|
|

|
|
|
#11 | ||
|
Questionable
Join Date: Mar 2005
Location: Atlanta
Posts: 13,373
|
Quote:
 Quote:
I think if you look at his signature, you'll probably find a link. If not, a link should be in his profile (click on his name or avatar next to his message)
__________________
If I've got anything up for grabs, it'll be here: 7-hole gauge cluster for a 67-72 p/u FREE (link) I can't check the forum daily. If I don't reply to you within 24 hours, drop me a PM! I'm (hopefully) still alive and will reply faster to a PM. |
||
|
|

|
|
|
#12 |
|
TOTY 2006
 Join Date: Dec 1999
Location: Magalia CA USA
Posts: 2,270
|
more info
Shifty is right, but I could have put a link in.
Click on the "GAS TANK" link when you get to my page (the 67 SWB Truck link in my sig). The gas cap and fitting are around $50, and you can get them from most Boat supply shops (they will have to special order it most likly). Make sure you get both the cap and it housing, cause they also sell just the cap for $50 (go figure!) There are several kinds of this style cap, most have two holes for a special key to fit into to open or close. I choose to go with a push button type. You push down on the square part, then it pops up, you then can grab that and unscew the cap out. The one I got is mild stainless, so it was not too hard welding or cutting the housing. What you don't see is that I also drilled a hole in the housing above what would be the end of a gas nozzle, and have a small hose from the tank vent up to the new hole for the purpose of giving the displace air somewhere to go instead of it trying to get past the incoming gas. Only other mod was to cut open the rear bed panel to give room for the metal tubing (from local muffler shop). |
|
|

|
|
|
#13 |
|
Questionable
Join Date: Mar 2005
Location: Atlanta
Posts: 13,373
|
Oops! I meant to put a winky-face after my last statement. FTR, I was only joking with my last comment - dont' take me seriously (I'm the usually the biggest joker in the world)
__________________
If I've got anything up for grabs, it'll be here: 7-hole gauge cluster for a 67-72 p/u FREE (link) I can't check the forum daily. If I don't reply to you within 24 hours, drop me a PM! I'm (hopefully) still alive and will reply faster to a PM. |
|
|

|
|
|
#14 |
|
WTB this ad
Join Date: Sep 2004
Location: Lafayette Georgia
Posts: 5,074
|
Tailight
How about behind the tailight not the side marker light. I have a pic of this setup on my computer from an Ebay auction but I really don't know how to post it.
|
|
|

|
|
|
#15 |
|
Registered User
Join Date: Nov 2000
Location: Huntsville Ontario Canada
Posts: 4,051
|
John,
That's one trick setup. I like it.
__________________
1968 Suburban numbers matching all original truck now equipped with 6.0/4L80 on Accuair http://67-72chevytrucks.com/vboard/s...d.php?t=625017 1967 C/20 6.0/4L80 Roofing Truck 1990 V2500 Suburban "Plow Truck" 2005 TAHOE DD |
|
|

|
|
|
#16 |
|
Registered User
Join Date: Feb 2003
Location: JENKS OK
Posts: 34
|
that was the way i had come up with too but you beat me to it glad to know it can work that way in top of stake pocket i wanted to use a smooth cap were can i get one
|
|
|

|
|
|
#17 |
|
TOTY 2006
 Join Date: Dec 1999
Location: Magalia CA USA
Posts: 2,270
|
see ten,
Is this the picture you are talking about?  I had planned on doing this. Several ideas that I tried, 1. using a gas door hinge (from a ford truck) to flip the light outward. Not enough room for the hinge at the bottom of the light opening. No room to get in there with a welder so welds would be weak and more then likely break after a while. 2. Simple piano hinge, with a chain to limit the open swing, magnet at top to hold it closed. Wiggled side to side too much, and again, not able to get good coverage with welding. For me it was just too small of an area to work, that is why I said in ealier post that to do this properly, I would have to cut the whole back of the bed off, weld the hinge in good, and then weld the sheetmetal back onto the bed. I know Mario had a lot of trouble with this, to the point where he told me he was getting a new bedside to start over. (Not sure if he did this). So, Kudos to anyone else that wants to try a filler behind the taillight. It can be done, but for me, I did not see a way that I would be proud of. |
|
|

|
|
|
#18 |
|
Senior Member
Join Date: Jun 2003
Location: Westminster, CO
Posts: 3,071
|
This is the cap I am using from ECE and putting it in the same place as John Fabis did:
__________________
Alex 1971 Lil' Red 350 SBC 700R4 |
|
|

|
|
|
#19 |
|
Registered User
Join Date: Nov 2000
Location: Huntsville Ontario Canada
Posts: 4,051
|
I ended up drillign a couple of holes thru the light housing and into in the lip that the taillight sit up against. I used fender clips on the lip and put 4 screw thru the light housing To fix my hack job. You can tell at all. I am really lucky.. I tried hinges from Mustangs ford truck balzers a honda windstar. You need that 1/4" around the taillight opening for clearance just like any gas door on a car truck or van. But that's not possible.
Chevy Dude, I got a filler just like that from a marine shop here in town it's going in the wood floor to fill my fule cell.
__________________
1968 Suburban numbers matching all original truck now equipped with 6.0/4L80 on Accuair http://67-72chevytrucks.com/vboard/s...d.php?t=625017 1967 C/20 6.0/4L80 Roofing Truck 1990 V2500 Suburban "Plow Truck" 2005 TAHOE DD |
|
|

|
 |
| Bookmarks |
|
|