
 |
Register or Log In To remove these advertisements. |
|
|
|
|||||||
 |
|
|
Thread Tools | Display Modes |
|
|
#1 |
|
Registered User
Join Date: Oct 2003
Location: OC CA
Posts: 1,374
|
Timing cover crankshaft seal replacement
Well, here we go.........
As the title says I have to tackle timing cover crankshaft seal replacement. In the past I always had the 'luxury' of having timing cover off the engine, on the workbench when replacing crankshaft seal. Couple of 2x4 cut-offs and some gentle taps quickly persuades seal to seat into its prescribed spot. This time around engine is in the truck and I have a slow drip leak when engine is running. The engine is a fresh, bottom up 350 rebuild - which upsets me even more, with a brand new balancer, stock replacement sheet metal timing cover (Dorman IRC) covering Cloyes double roller timing chain and NATIONAL 9845 crankshaft seal. I do have the right tools to pull harmonic balancer (6-3/4") and press it back on without resorting to hammering. Question - are there any tricks or tips for removing old seal without damaging sheet metal timing cover? I would like to know what others have used to perform the same job. Thanks! //RF
__________________
"The Beast" 1975 Chevrolet C20 longbed 350/700R4! with 3inch body lift Dual Flowmasters Super 40's! TBI retrofit completed (2007-07-29)  New 383CID (+030) 08-304-8 9.5:1CR x36,005 (2012-12-17) |
|
|

|
|
|
#2 |
|
Active Member
Join Date: Oct 2006
Location: Ohio
Posts: 1,643
|
Re: Timing cover crankshaft seal replacement
FWIW - you have to pull the damper, water pump, fan etc
Might as well pull the 10 bolts out and do it on your bench - you will be happy you did It looks like the timing chain cover is new - if so and you have a leak I would look very hard at the crank shaft and make sure it does not need sleeved - many releaks occur at this contact point because the crank shaft OD is worn down
__________________
1968 SWB 454 + .040, 490HP x 540 FT pounds of Torque 10-1 Kb Forged pistons, recon rods w/ ARP wave loc bolts 781 heads Ported with 2.19/1.88 SSTvalves Lunati 60204 cam, Micro Trol lifters, Ported Edelbrock Performer Rpm manifold armor coated, Pertronix Triple Strike Ignition Holley 770 Street Avenger carb,Headers armor coated Built by Watson Ruppel Performance in Sarahsville Ohio. Hardshift Tranny Built Turbo 350,TSI 10" 3000 stall 12 Bolt Eaton Posi 4.10 Richmond Gears moser axles  18.5" x 31" Hoosier Pro Street Radials  ET Classic 5 Wheels - polished Power Steering, Power Brakes,Disc Brakes,Tach & Gauge Dash, Tilt,Factory Air (gone) Custom Paint & Body Work Special thanks to my wife, my son and my money tree 
|
|
|

|
|
|
#3 | ||
|
"I ain't nobody, dork."
Join Date: Sep 2007
Location: Whidbey Island, Washington
Posts: 8,977
|
Re: Timing cover crankshaft seal replacement
You can't do it with the engine in the vehicle. You have to have something behind the cover to brace it. You'll cave the cover in tryin' to beat the seal in with the cover on the engine.
Sorry mang... but it has to come off. But... you sure it's the crank seal? and not the front cover to pan seal? You could have installed a thin gasket when needing a thick gasket for that seal. Just something to consider before having to pull everything off the front of the engine. Then again... pulling an oil pan isn't any fun either...  Gary
__________________
'cuz chicks dig scars... My 1972 GMC 1500 Super Custom (Creeping Death) "long term" build thread. The Rebuild of Creeping Death after the wreck Quote:
Quote:
|
||
|
|

|
|
|
#4 |
|
Registered Truck Offender
Join Date: May 2008
Location: hells training ground (aka Ariz)
Posts: 3,118
|
Re: Timing cover crankshaft seal replacement
Guess he's going to find out if its the pan or the front seal. It really SUCKS @$$ that you have to pull the pan to pull the timing cover. Some have just removed the bolts and pry'd the pan down, then trimmed the corners off the lip to get the front cover back in. Globs of chile-cone and just hope it doesn't leak. Myself I never had any luck doing it that way... fixed the timing cover leak only to create a pan gasket leak.
To all our boys serving worldwide,, THANK YOU and Happy 4th of July 
__________________
Still playin with trucks, even at my age! When you're dead, it's only a problem for the people around you, because you don't know you're dead. .....It's kinda the same when your STUPID. I just did my taxes and reviewed my SS statement. Thanks to the current administration it looks like I will only have to work till noon on the day of my funeral. |
|
|

|
|
|
#5 |
|
Registered User
Join Date: Oct 2003
Location: OC CA
Posts: 1,374
|
Re: Timing cover crankshaft seal replacement
For oil pan I used a single piece FelPro Q1880 thick (late style) driver side dipstick. The corners are bone dry. The leak is clearly visible - right at the bottom of the seal. The PVC valve is installed and functioning so there should not be crank case back pressure. I have a suspicion that a double roller timing chain crank gear is causing excessive oil splatter right on the back of the timing seal.
FSM states that timing seal replacement is doable without timing cover removal. Balancer is brand new, and before final assembly I trial fitted oil seal on the balancer shaft - appeared to be a good fit. I may cut piece of 1/4" aluminum sheet with a semi circle to allow a seal pry bar to rest on vs. timing cover. Replacement oil seal installation requires gentle taping. I have a core engine sitting on the stand - something to practice on tonight before jumping on a real job. //RF
__________________
"The Beast" 1975 Chevrolet C20 longbed 350/700R4! with 3inch body lift Dual Flowmasters Super 40's! TBI retrofit completed (2007-07-29)  New 383CID (+030) 08-304-8 9.5:1CR x36,005 (2012-12-17) |
|
|

|
|
|
#6 | ||
|
"I ain't nobody, dork."
Join Date: Sep 2007
Location: Whidbey Island, Washington
Posts: 8,977
|
Re: Timing cover crankshaft seal replacement
Let us know how your trial run with the engine on the stand goes... this would be nice to be able to do with the engine in the vehicle.
Gary
__________________
'cuz chicks dig scars... My 1972 GMC 1500 Super Custom (Creeping Death) "long term" build thread. The Rebuild of Creeping Death after the wreck Quote:
Quote:
|
||
|
|

|
|
|
#7 |
|
Dino burner
Join Date: Nov 2002
Location: Calgary, Alberta, Canada
Posts: 602
|
Re: Timing cover crankshaft seal replacement
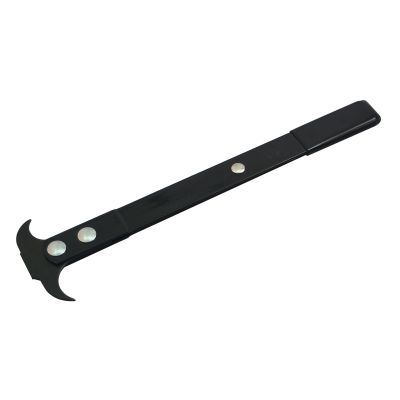
I've had quite good luck with this style of seal puller:
 When I assemble my timing cover, I will put the bolts in and just barely snug them up with my fingers. Then, I'll install the harmonic damper/balancer and finish tightening the timing cover bolts to the proper torque specification with an offset crowfoot style wrench. Or, since it's just a timing cover and I've done a couple hundred of them, I just torque them by hand/feel. My theory for installing the balancer before torquing the timing cover bolts was devised from when I rebuilt an engine and the dowels were a sloppy fit with the timing cover. Leaving the cover loose ensured that the damper centred the cover around the crankshaft seal. It worked well as that engine did not leak from the crankshaft seal or the timing cover. |
|
|

|
|
|
#8 | |
|
*** That's interesting ***
Join Date: Oct 2008
Location: Pittsburgh, PA
Posts: 2,772
|
Re: Timing cover crankshaft seal replacement
Quote:
__________________
Tom  Chevy by day... 1969 Chevy C30 Rollback Tow Truck -- 383 stroker, 4L80E 2011 Chevy Caprice PPV 9C3 6.0L 1995 Chevy Caprice 9C1 1994 Chevy Caprice 9C1 #3 1995 Chevy Caprice Wagon #2 1995 Chevy Impala SS Mopar by night... 1969 Dodge Charger 1972 Chrysler Newport 2dr Hardtop (27K miles) Plus others... |
|
|
|

|
|
|
#9 | ||
|
"I ain't nobody, dork."
Join Date: Sep 2007
Location: Whidbey Island, Washington
Posts: 8,977
|
Re: Timing cover crankshaft seal replacement
I agree... will give that a try the next time I pull a cover.
 Gary
__________________
'cuz chicks dig scars... My 1972 GMC 1500 Super Custom (Creeping Death) "long term" build thread. The Rebuild of Creeping Death after the wreck Quote:
Quote:
|
||
|
|

|
|
|
#10 |
|
Senior Member
Join Date: Apr 2000
Location: Delta,Pa
Posts: 14,948
|
Re: Timing cover crankshaft seal replacement
I had a cover that sat ever so slightly offset and caused the seal to leak. I must have pulled that damn cover 5 times to stop the leak. It just kept tearing the seal. I finally ended up replacing the timing cover completely and the problem went away. Pay very close attention to the seal when you pull it out. See if its pushed down on one side or if the rubber is worn off more in one place on the seal. This will indicate that the cover itself isnt positioned right.
__________________
Owner of North Point Car Care in Dundalk Md. We specialize in custom exhaust on both modern and classic vehicles. We are a full service auto shop from classics to modern vehicles. Feel free to contact me with questions. I will give a 10% discount to any board member. |
|
|

|
|
|
#11 |
|
Registered User
Join Date: Oct 2003
Location: OC CA
Posts: 1,374
|
Re: Timing cover crankshaft seal replacement
Update
Well I did a practice run (I have two cores sitting on the stands). 1) Removal of the water pump (long type) is not required for balancer removal - there is enough clearance for balancer to clear water pump body. It does make it easier for reach balancer from the top (I'll be doing from underneath) 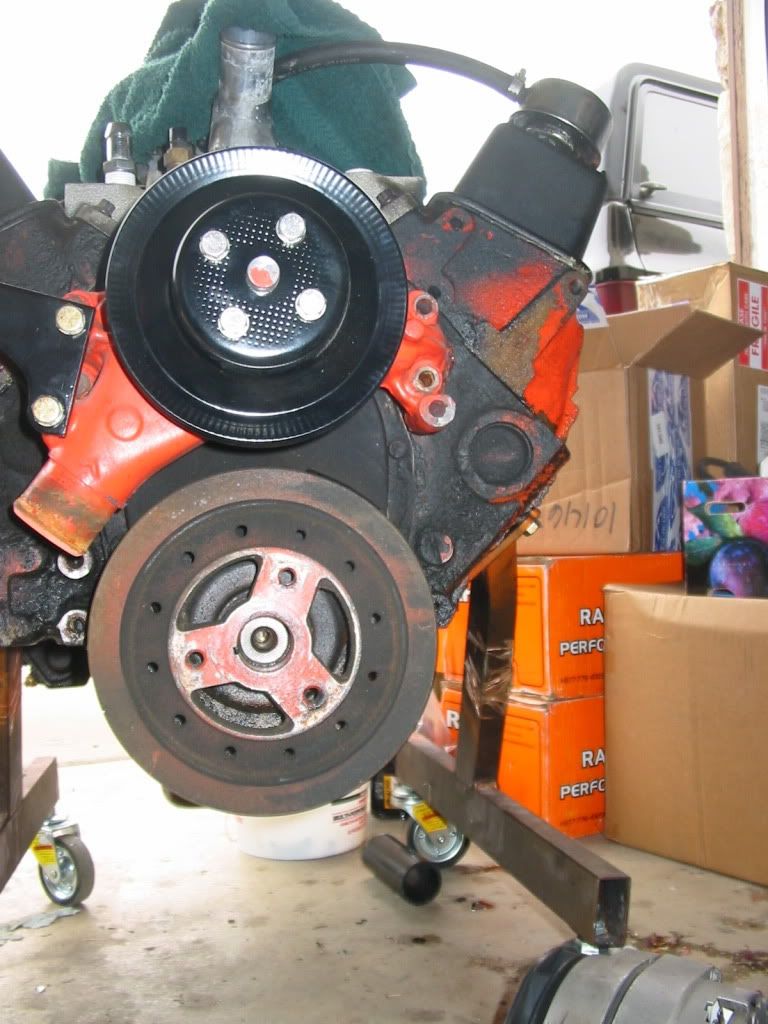 2) The Claw seal removing tool works - but you need to wrap end of the shaft to protect it being scored. 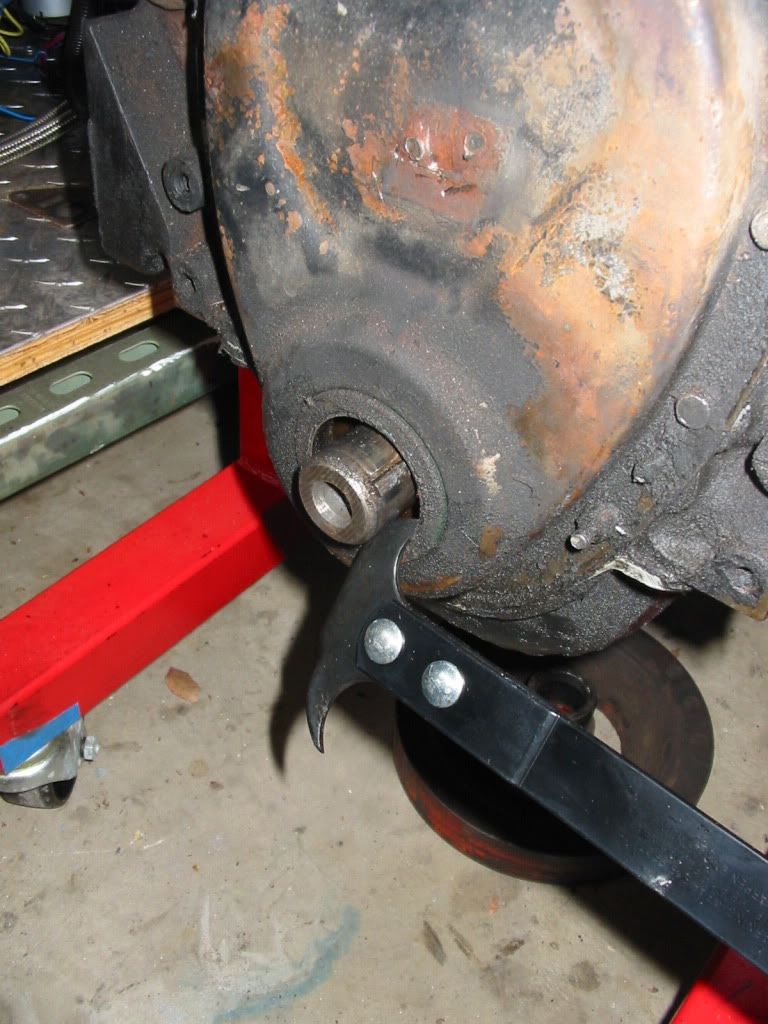 Seal will be trashed 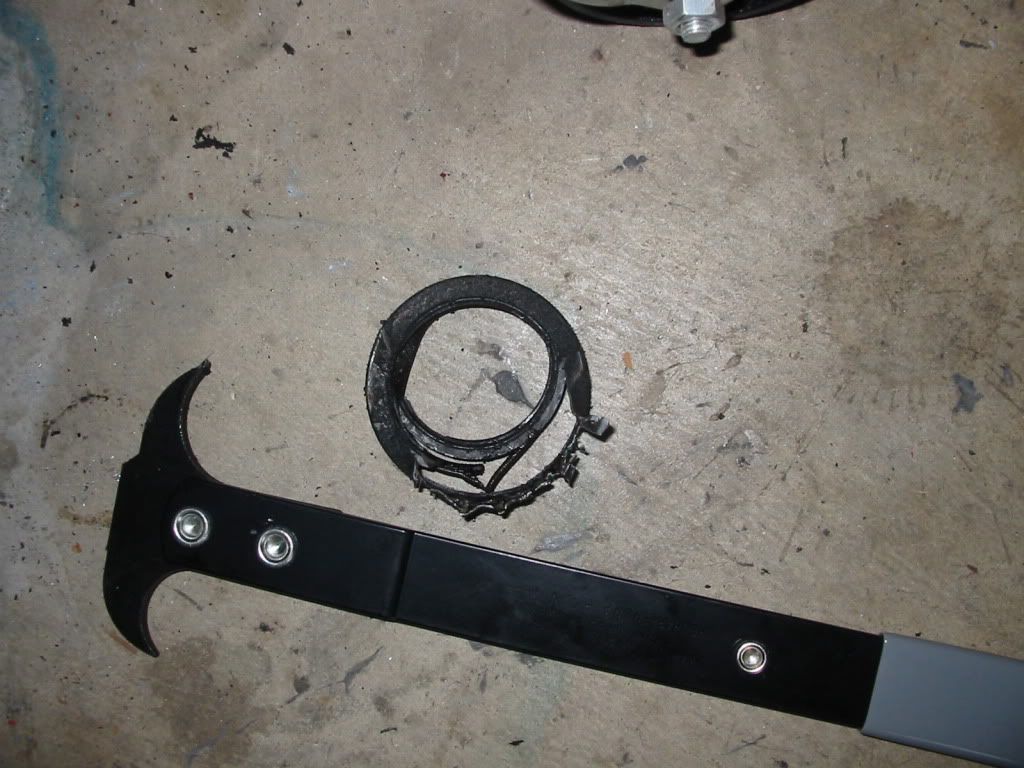 The sheet metal cover flex during R&R, but if you keep amount of force in check should be OK. Note the blue paint residue around seal bore perimeter 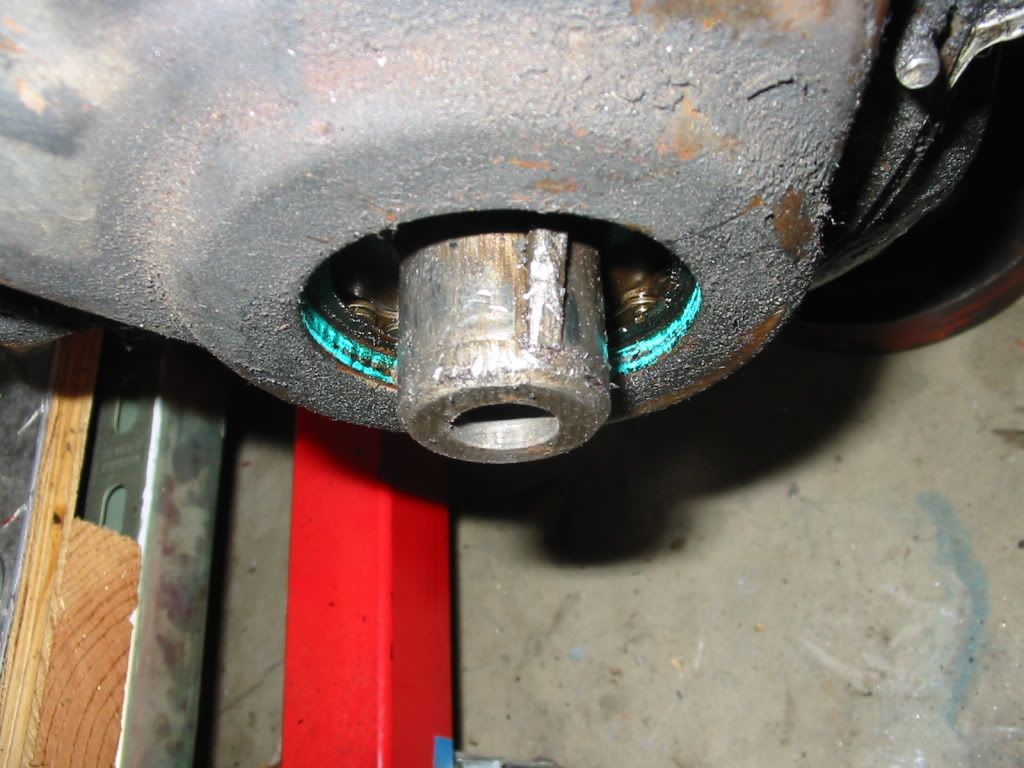 Actual job will have till weekend //RF
__________________
"The Beast" 1975 Chevrolet C20 longbed 350/700R4! with 3inch body lift Dual Flowmasters Super 40's! TBI retrofit completed (2007-07-29)  New 383CID (+030) 08-304-8 9.5:1CR x36,005 (2012-12-17) |
|
|

|
|
|
#12 |
|
Registered User
Join Date: Mar 2012
Location: Georgetown, Texas
Posts: 73
|
Re: Timing cover crankshaft seal replacement
piece of cake now, just need an oak board with hole drilled in it to accommodate crank snout, and a huge socket or the like.
__________________
'67 K-20 longbed 4X4, 350, SM-420, Vortec heads, flat top 4-brow pistons, Eaton 4.55's, Qjet, MSD 8365, Comp XE250H, Dynomax duals |
|
|

|
|
|
#13 |
|
Registered User
Join Date: Oct 2003
Location: OC CA
Posts: 1,374
|
Re: Timing cover crankshaft seal replacement
Update
R&R timing cover seal. Total time about 2-1/2 (going slow). Sorry, but I did not take any photos during actual job - just me and my truck (no helpers). Seal popped out very easily and seal's OD rim felt oily. This may explain the leak. On a replacement seal I put a thin bed Loctite #2 gasket sealer on the OD rim. While being down there I put some this sealer on the oil pump shaft hole bolt (3/8-16). This bolt hole is known for causing mysterious oil leaks. Did not see any oil after starting and running engine for awhile. I did see some oil bubbling through on the bottom of the oil pan half moon. I having a slopping driveway and oil in the pan maybe accumulating against in front of the oil pan. As a desperation measure I put a bed of #2 gasket sealer - I doubt it will stop it, but it worth the shot. The Loctite gasket sealer stays pliable and may curtail the seepage - we'll see after a test drive. //RF
__________________
"The Beast" 1975 Chevrolet C20 longbed 350/700R4! with 3inch body lift Dual Flowmasters Super 40's! TBI retrofit completed (2007-07-29)  New 383CID (+030) 08-304-8 9.5:1CR x36,005 (2012-12-17) |
|
|

|
|
|
#14 | |
|
60-66 Nut
  Join Date: Mar 2007
Location: Coeur d'Alene, Idaho
Posts: 23,252
|
Re: Timing cover crankshaft seal replacement
You lost me on that one.........
Quote:
Do you have any details on how you installed the new seal? I think that is the biggest question most of us have.
__________________
Power Steering Box Adapter Plates For Sale HERE Power Brake Booster Adapter Brackets For Sale '63-'66 HERE and '67-'72 HERE and '60-'62 HERE and "60-'62 with clutch HERE Rear Disc Brake Brackets For Sale. Impala SS calipers HERE Camaro Calipers HERE D52 Calipers HERE 6 Lug HERE Hydroboost Mounting Plates HERE |
|
|
|

|
|
|
#15 | |
|
Registered User
Join Date: Oct 2003
Location: OC CA
Posts: 1,374
|
Re: Timing cover crankshaft seal replacement
Quote:
However, the oil leak has not been cured - I may need to drop the oil pan and replace oil pan gasket. Photos tomorrow, I promise. //RF
__________________
"The Beast" 1975 Chevrolet C20 longbed 350/700R4! with 3inch body lift Dual Flowmasters Super 40's! TBI retrofit completed (2007-07-29)  New 383CID (+030) 08-304-8 9.5:1CR x36,005 (2012-12-17) |
|
|
|

|
|
|
#16 |
|
~Rest In Peace~
Join Date: May 2005
Location: CALIFORNIA NOR CAL
Posts: 9,707
|
Re: Timing cover crankshaft seal replacement
i would use one of these tools to install the seal ,there about 15 bucks
__________________
is it fast ? it has a lighting bolt donut? B___H please, I can remove 90% of your so called "beauty" with a kleenex |
|
|

|
|
|
#17 | |
|
Registered User
Join Date: Oct 2003
Location: OC CA
Posts: 1,374
|
Re: Timing cover crankshaft seal replacement
Quote:
//RF
__________________
"The Beast" 1975 Chevrolet C20 longbed 350/700R4! with 3inch body lift Dual Flowmasters Super 40's! TBI retrofit completed (2007-07-29)  New 383CID (+030) 08-304-8 9.5:1CR x36,005 (2012-12-17) |
|
|
|

|
|
|
#18 |
|
Registered User
Join Date: Oct 2003
Location: OC CA
Posts: 1,374
|
Re: Timing cover crankshaft seal replacement
Follow up
How to install timing cover crankshaft seal without pounding on the seal with hammer. Disclaimer - these photos were taken on a core sitting in my garage, but actual installation was identical. The sad core 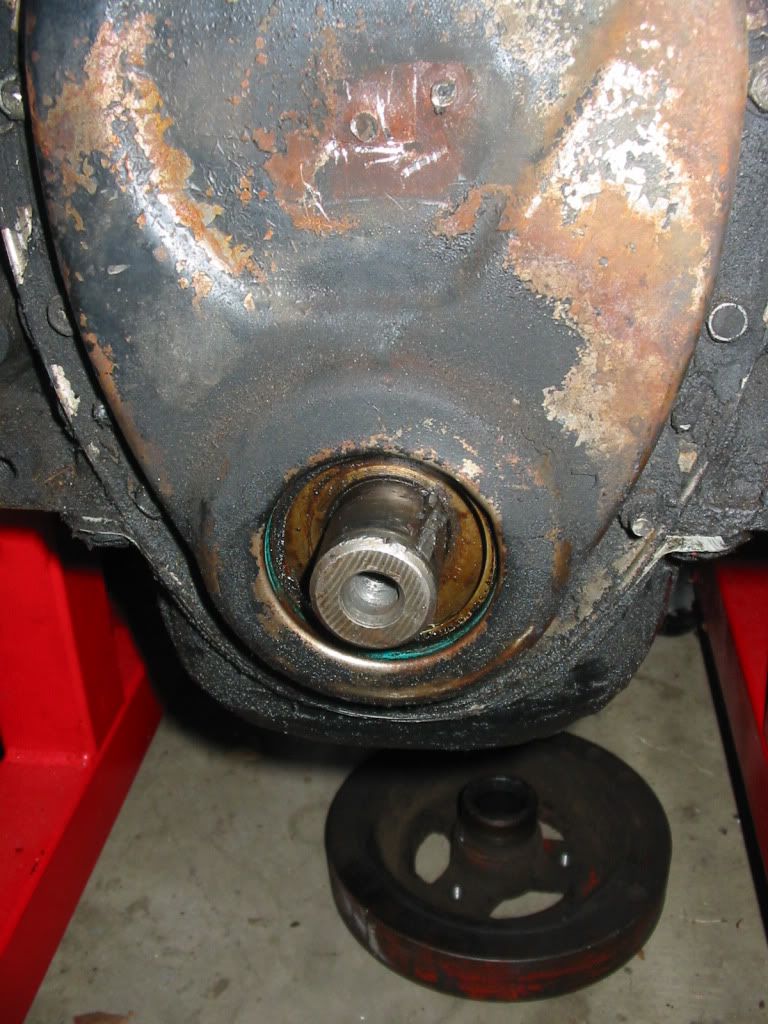 Clean the timing cover crankshaft seal bore - remove paint residue left over by the original seal. 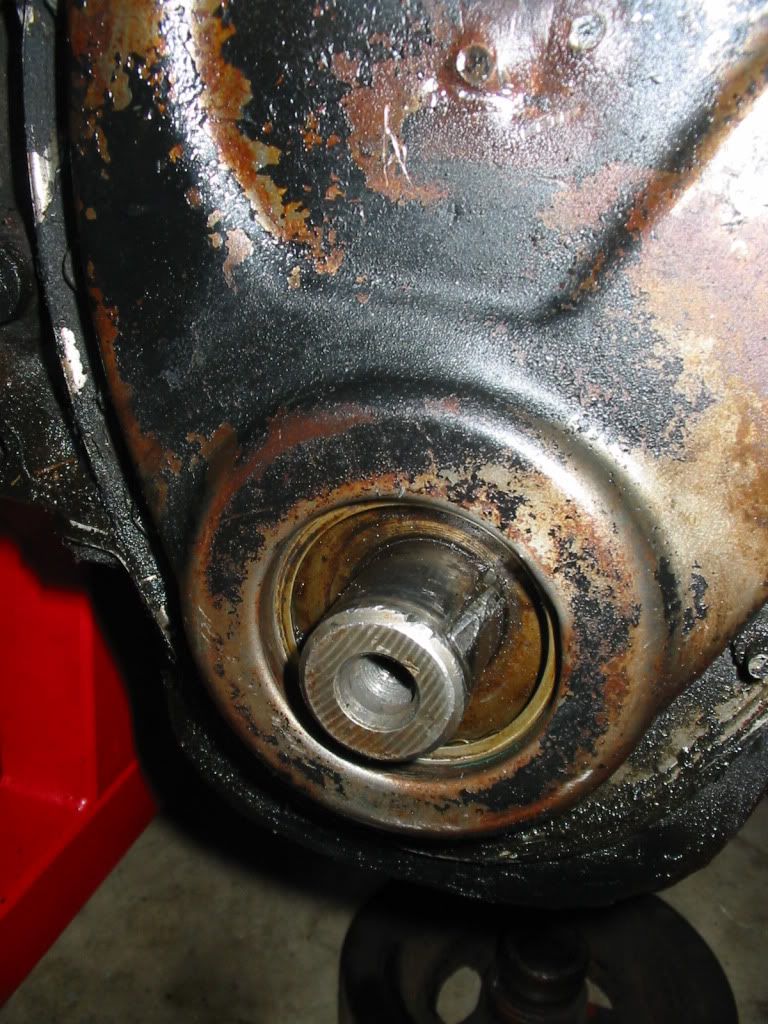 Install correct crankshaft adapter (7/16-20) from CompCam harmonic balancer installation set (#4920) 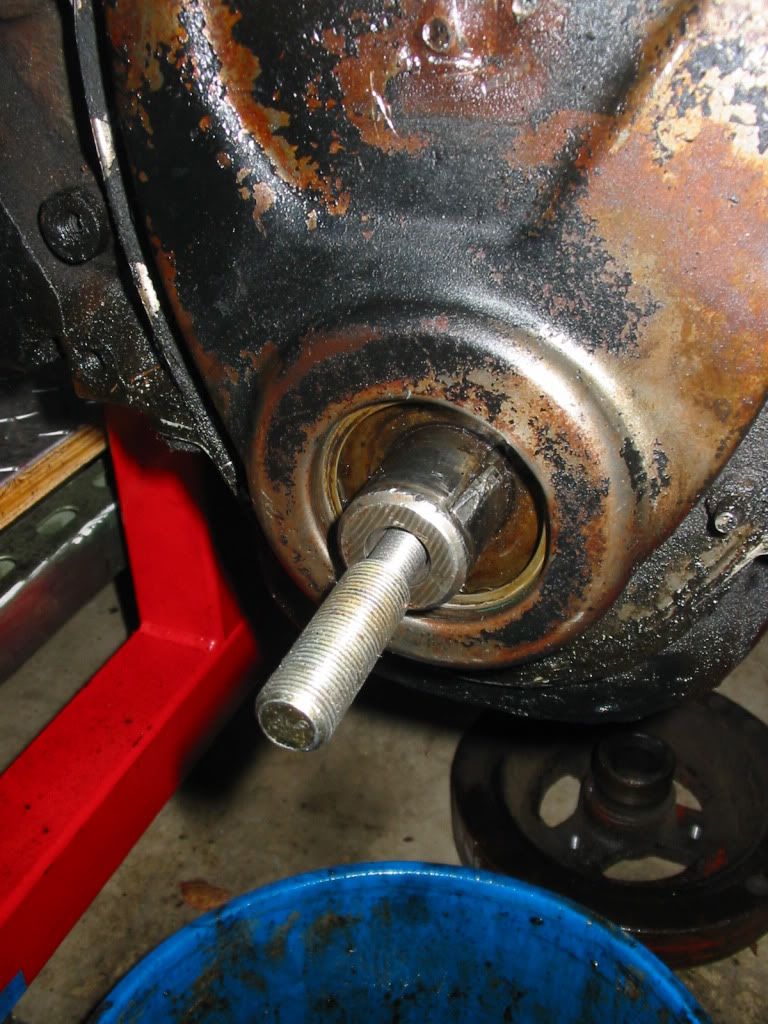 Install main shaft and locking nut. 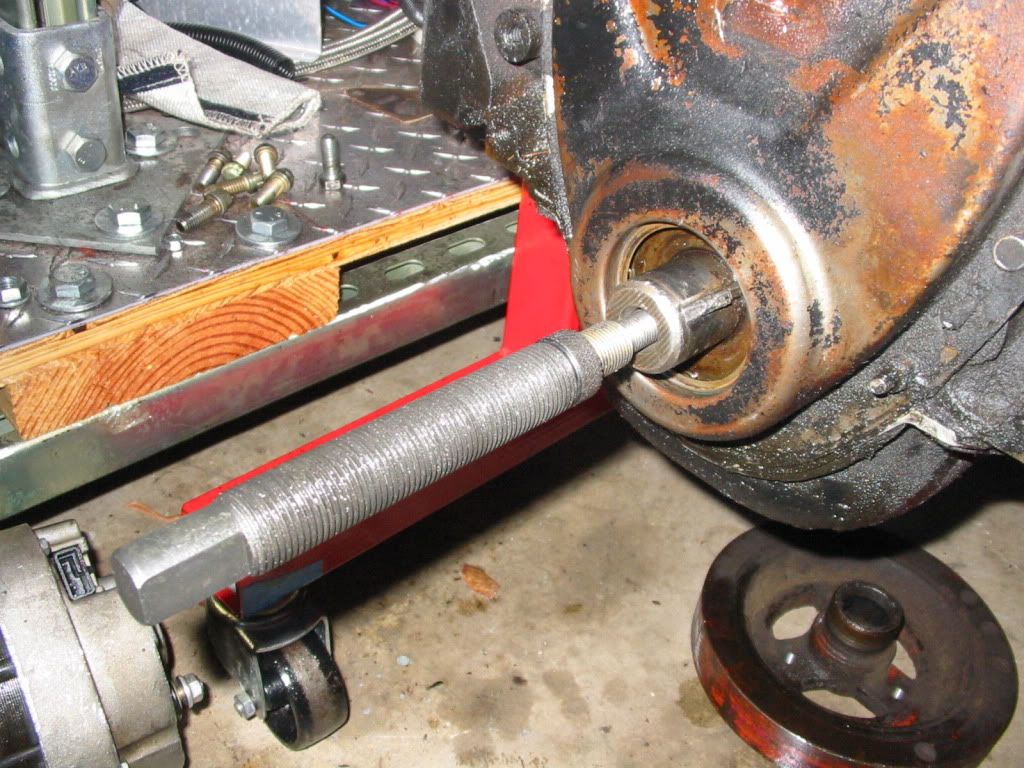 Install oil seal - I like coat OD with #2 gasket sealer 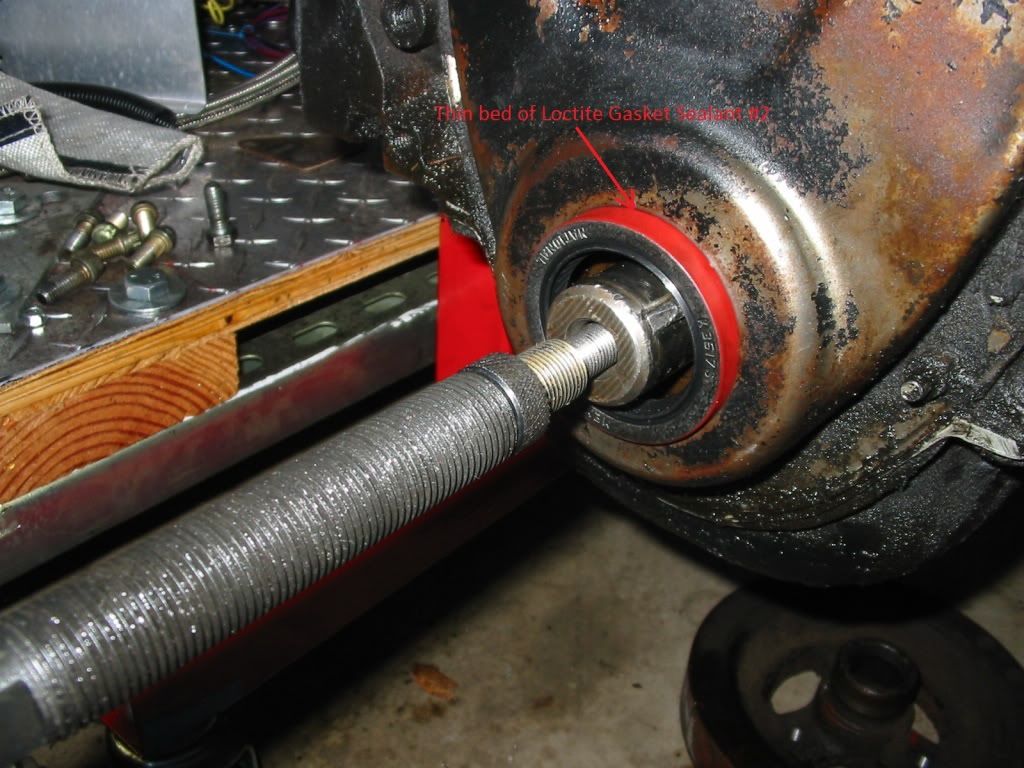 Install crank gear collar (CompCam # 4789) 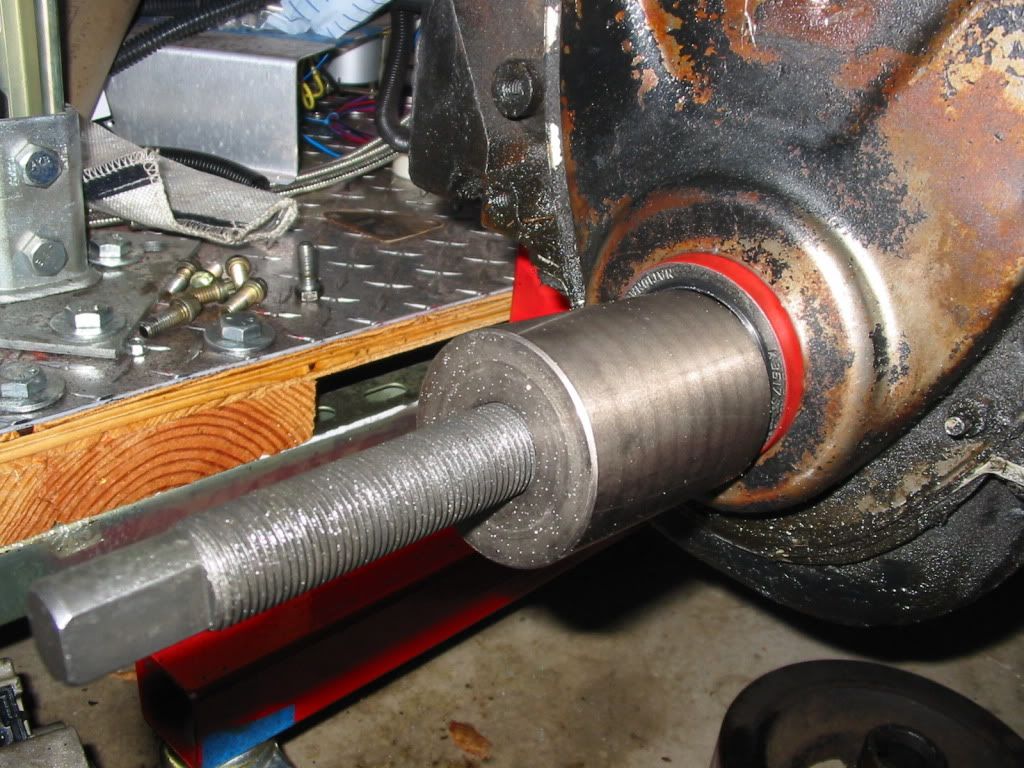 Install thrust bearing and main drive nut finger tight - align collar so that it even around circumstance of the seal. Get 5/8" wrench to keep shaft from rotating and BFR to drive main nut. 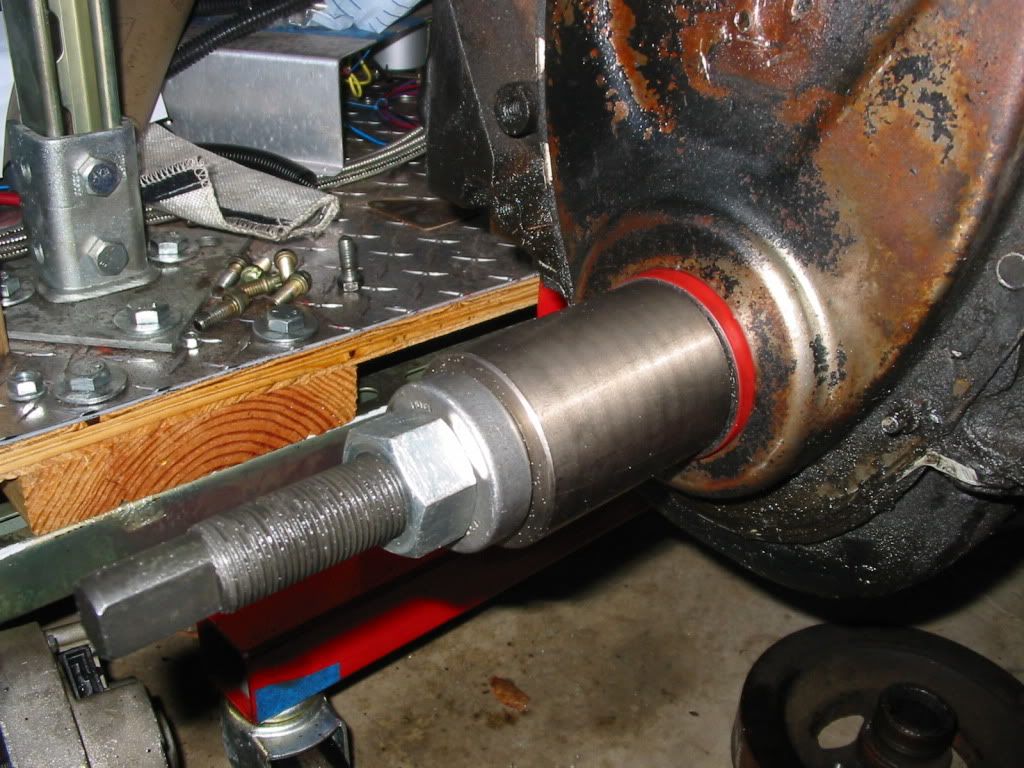 Drive until seal is flush with cover surface (or just under). Use calipers to determine the channel depth with the seal width. That's about it - main tools used 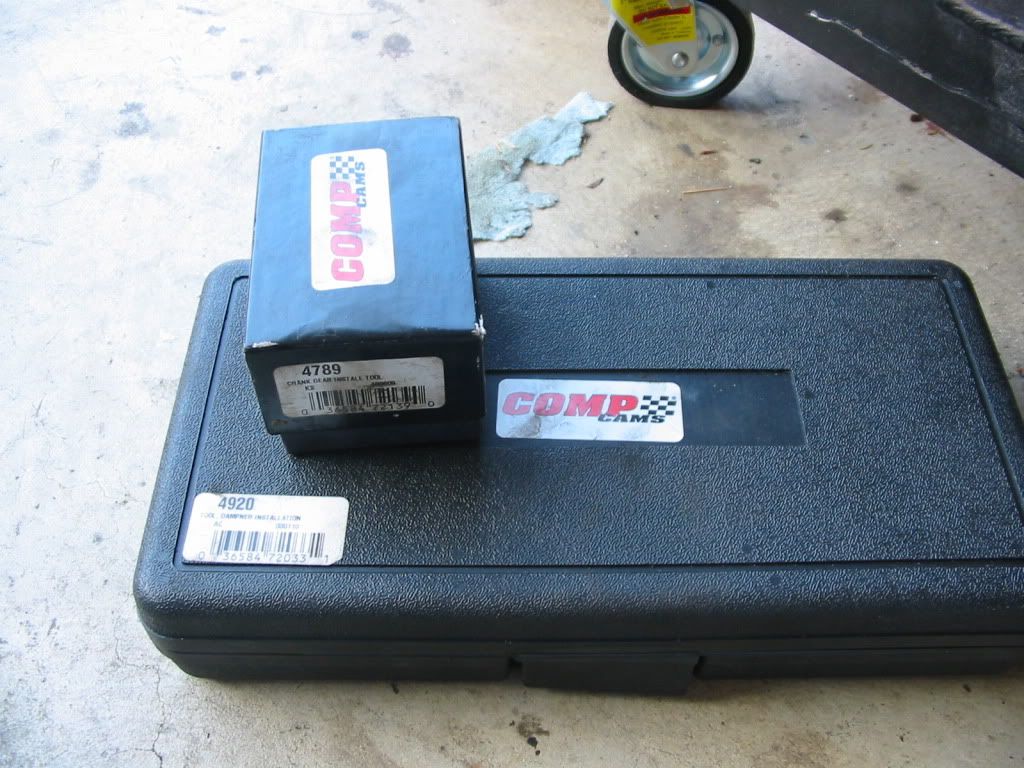 //RF
__________________
"The Beast" 1975 Chevrolet C20 longbed 350/700R4! with 3inch body lift Dual Flowmasters Super 40's! TBI retrofit completed (2007-07-29)  New 383CID (+030) 08-304-8 9.5:1CR x36,005 (2012-12-17) |
|
|

|
|
|
#19 |
|
60-66 Nut
  Join Date: Mar 2007
Location: Coeur d'Alene, Idaho
Posts: 23,252
|
Re: Timing cover crankshaft seal replacement
Thanks for the photos and the explanation. That is pretty much the way I would have done it, but I just wanted to see/hear how you did it. You might have had a better idea than me.

__________________
Power Steering Box Adapter Plates For Sale HERE Power Brake Booster Adapter Brackets For Sale '63-'66 HERE and '67-'72 HERE and '60-'62 HERE and "60-'62 with clutch HERE Rear Disc Brake Brackets For Sale. Impala SS calipers HERE Camaro Calipers HERE D52 Calipers HERE 6 Lug HERE Hydroboost Mounting Plates HERE |
|
|

|
|
|
#20 |
|
Registered User
 Join Date: Apr 2008
Location: San Diego California
Posts: 1,316
|
Re: Timing cover crankshaft seal replacement
Had to do the same thing to my freshly rebuilt 350 just last week. I had a brand new balancer and brand new timing chain cover. When I was getting the leak on my pan I thought it was my Felpro super seal also but it turns out it was the crank seal that was leaking in the same spot as yours. Not on the seal itself where oil would be flung by centrifgal force all over the place but just a slow weep in between the seal and the edge of the cover down onto the pan. The hardest part was getting the seal out without dammaging the surrounding steel, but it was not that difficult once it starts moving. I used rtv on the outside of the new seal and it worked like a charm.
To set the seal I used a short piece of 2" DOM tubing that had a .250 wall and it was almost identical to the seal diameter. I put that over the front of the seal and tapped the seal flat with a large diameter body hammer, not moving edge to edge but flat. Slow taps sent it home with no issues and solved the leak, but I wish I would have read this before I did it, your method seems a little better to get a good seat.
__________________
I'd rather attempt something great and fail.. than try something ordinary and succeed. Norman Vincent Peale Project: Barn Raising http://67-72chevytrucks.com/vboard/s...d.php?t=414961 Project: 30 Be Low https://67-72chevytrucks.com/vboard/...d.php?t=830583 |
|
|

|
|
|
#21 |
|
Registered User
 Join Date: Oct 2013
Location: Stockton, CA
Posts: 475
|
Re: Timing cover crankshaft seal replacement
btt
|
|
|

|
|
|
#22 |
|
Registered User
Join Date: Apr 2015
Location: Taylor Ridge, IL
Posts: 4
|
Re: Timing cover crankshaft seal replacement
It's times like this that I'm glad I have both a hydraulic and an arbor press at my disposal.
|
|
|

|
|
|
#23 |
|
Registered User
Join Date: Jun 2014
Location: Connecticut
Posts: 521
|
Re: Timing cover crankshaft seal replacement
I"m going to try this as a quick and dirty fix on my 400, probably tomorrow while the weather is unseasonably warm here. I'm also going to install a sleeve on the harmonic balancer. If between those two things I can stop the leak that I have, I'll be happy until I can save up the funds for a crate motor some time down the road.
|
|
|

|
|
|
#24 |
|
Registered User
Join Date: Jun 2013
Location: Somewhere
Posts: 3,130
|
Re: Timing cover crankshaft seal replacement
I was thinking to suggest putting the seal in the freezer but too late.
I had to replace the seal some time ago and pulled the front everything and oil pan... |
|
|

|
|
|
#25 |
|
Registered User
Join Date: Jun 2014
Location: Connecticut
Posts: 521
|
Re: Timing cover crankshaft seal replacement
Good idea. I'm going into this thinking that removing the timing cover will be a possibility. Easy enough with the serpentine drive (the pump comes out without removing anything), but if I do that, I'll splurge for a new pan (mine is a bit beat up around the sump) timing cover (crusty old Mr. Gasket) and the balancer, which I am sleeving as part of this "under $20" repair attempt.
|
|
|

|
 |
| Bookmarks |
| Tags |
| seal, timing cover |
|
|