 |
Register or Log In To remove these advertisements. |
|
|
|
|||||||
 |
|
|
Thread Tools | Display Modes |
|
|
#26 |
|
Registered User
Join Date: Dec 2011
Location: Perth Western Australia
Posts: 146
|
Re: 1948 1 1/2 Ton Loadmaster
Hey Jrdecat,
I have the same model, but without the tipper. Mine isn't in as nice condition as yours. It seems hard to find info on the 4400 all the way here in Australia. Good Luck mate!! Shane
__________________
Australian GM/Holden Dealer 1937 Chev Rod - LS1/4L60E 1949 Chevy 4400 Dually - 235ci/4L60E 1958 Chevy Apache Fleetside SBC/T400 |
|
|

|
|
|
#27 |
|
Registered User
Join Date: Sep 2009
Location: Denver, CO
Posts: 120
|
Re: 1948 1 1/2 Ton Loadmaster
He said "tipper". Gotta love those Aussies! Thanks Shane!
Anybody have any info on how to get the gauges working? When I switch the key on the fuel gauge pegs over to full (the tank is not full) and nothing else moves. The speedometer needle is also broken but moves although inaccurately. The dials for the odometer are also boogered up so they are unreadable and immobile. |
|
|

|
|
|
#28 |
|
Registered User
Join Date: Sep 2009
Location: Denver, CO
Posts: 120
|
Re: 1948 1 1/2 Ton Loadmaster
I could also use some help on troubleshooting the brake system...please?
|
|
|

|
|
|
#29 |
|
Registered User
Join Date: Sep 2009
Location: Denver, CO
Posts: 120
|
Re: 1948 1 1/2 Ton Loadmaster
yay! it's cab cleaning day!

|
|
|

|
|
|
#30 |
|
Registered User
 Join Date: Dec 2011
Location: Calgary Alberta
Posts: 3
|
Re: 1948 1 1/2 Ton Loadmaster
Hey,
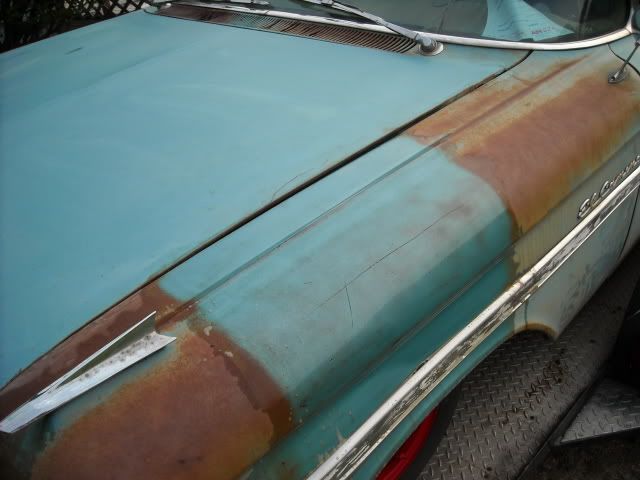
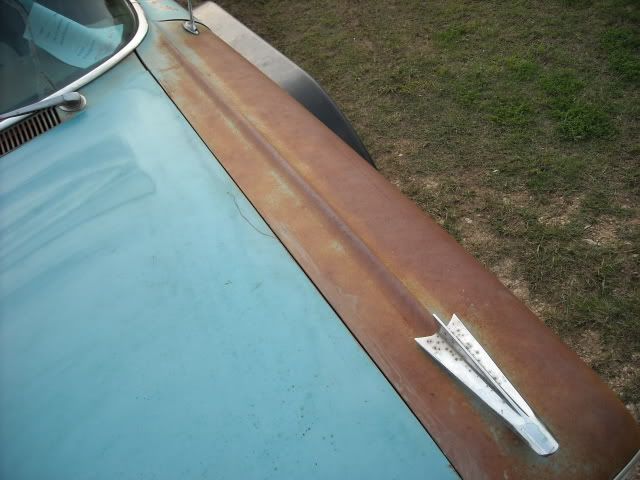
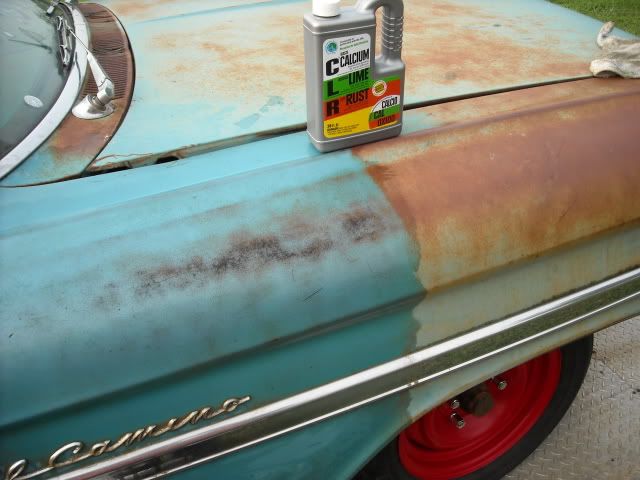
I saved these pictures from somewhere on this website... so they are not mine, and I thank whoever took them, they sure show the effect of CLR on rust stained body parts:    Gregger |
|
|

|
|
|
#31 |
|
Registered User
Join Date: Sep 2009
Location: Denver, CO
Posts: 120
|
Re: 1948 1 1/2 Ton Loadmaster
Thanks Gregger! That's pretty impressive. I got most of the rat turds cleaned out of the cab over the past few days. The leaf blower was the best tool for that job. I started using some CLR on the dash. I made a lot of mud....just getting to the metal is the hard part! I doubt I will have such dramatic results on my rig. The paint is pretty much gone in many areas. I'm beyond rust stains and just have rust!
Bad news after removing the rubber floor mat, I've got a rusted out transmission cover plate. Oh well, if that's the worst that I've got to patch up then I'm ok with that. On to brakes! |
|
|

|
|
|
#32 |
|
Registered User
Join Date: Sep 2009
Location: Denver, CO
Posts: 120
|
Re: 1948 1 1/2 Ton Loadmaster
did a little cleaning...
     Next step is to get the last bit of that sticky insulation junk off the floorboard / firewall area and coat the floor pan and firewall with POR15. Probably gonna do the area inside of the headliner as well, that had some good surface rust on it too. I'm right next door to a fab shop so I'm going to have a transmission cover built to replace the rusted out one. It won't be original equipment, but I can live with that. I'm in the market for a set of wheels as well. All the tire shops cringe when they hear the words "split rims". |
|
|

|
|
|
#33 |
|
Registered User
Join Date: Dec 2011
Location: Perth Western Australia
Posts: 146
|
Re: 1948 1 1/2 Ton Loadmaster
I would be interested in which wheels you find.
I have got the old ones sandblasted and powder coated. Shane "tipper"
__________________
Australian GM/Holden Dealer 1937 Chev Rod - LS1/4L60E 1949 Chevy 4400 Dually - 235ci/4L60E 1958 Chevy Apache Fleetside SBC/T400 |
|
|

|
|
|
#34 |
|
Registered User
Join Date: Jun 2006
Location: Idaho
Posts: 8,800
|
Re: 1948 1 1/2 Ton Loadmaster
They came off a thread over at HAMB on CLR.
__________________
1959 Chevy Short Fleetside w/ 74 4WD drive train (current project) OrrieG Build Thread 1964 Chevelle Malibu w/ 355-350TH (daily driver) Helpful AD and TF Manual Site Old Car Manual Project |
|
|

|
|
|
#35 |
|
Registered User
Join Date: Sep 2009
Location: Denver, CO
Posts: 120
|
Re: 1948 1 1/2 Ton Loadmaster
making progress on the interior. having a lot of fun using a flat screwdriver to remove all of those headliner retainer screws with the weird hourglass shaped head. gonna swing by home depot and sears on my way out today and see if they have anything that will fit. today i plan on ripping out the firewall insulation pad, removing the transmission cover, and continue prepping the floor pan for por-15. next i will be disassembling the dash and probably doing some rewiring.
|
|
|

|
|
|
#36 |
|
Senior Member
 Join Date: Jun 2011
Location: North Beaver TWP PA
Posts: 833
|
Re: 1948 1 1/2 Ton Loadmaster
Those screws are clutch head screws. Your probably not find anything local but look on the web and you wull find screw drivers and socket bits for them. I do not think they were used on anything after the 50's.
|
|
|

|
|
|
#37 |
|
Registered User
Join Date: Sep 2009
Location: Denver, CO
Posts: 120
|
Re: 1948 1 1/2 Ton Loadmaster
Thanks Buggy! Called the local NAPA and they have them at their warehouse. Will have the drivers this afternoon!
|
|
|

|
|
|
#38 |
|
Registered User
Join Date: Jun 2006
Location: Idaho
Posts: 8,800
|
Re: 1948 1 1/2 Ton Loadmaster
FYI there are three sizes you need.
__________________
1959 Chevy Short Fleetside w/ 74 4WD drive train (current project) OrrieG Build Thread 1964 Chevelle Malibu w/ 355-350TH (daily driver) Helpful AD and TF Manual Site Old Car Manual Project |
|
|

|
|
|
#39 |
|
Registered User
Join Date: Sep 2009
Location: Denver, CO
Posts: 120
|
Re: 1948 1 1/2 Ton Loadmaster
Those clutch head screwdrivers are kind of expensive! Anyone know the purpose behind using those versus a phillips? Style points I guess?
Anyways, I'm making a little progress on the truck. Got a new battery installed yesterday. Turns over very strong, but won't kick off and start. I'm going to try spark plugs today. It was definitely missing when I drove it home so maybe a fresh set of sparkies will make things all better. Anybody know the proper gap? The owner's manual says .040" for '48 and .035" for 49-51, but the online parts stores that I've shopped show .035" for a '48. Who do I trust? BTW, I have the 235. |
|
|

|
|
|
#40 |
|
Registered User
Join Date: Sep 2009
Location: Denver, CO
Posts: 120
|
Re: 1948 1 1/2 Ton Loadmaster
I'm also going to have to rewire the truck as well. I have found a wiring diagram online and I think I can rewire the thing myself, It will just involve a lot of thinking. I've heard of the EZ wiring harnesses, but their website doesn't really have a lot of info. I doubt the wires are long enough to reach the tail lights on my dumper as well, but I could always just get a little more wire and use butt connectors. I was hoping that someone who has done this before could give me the lowdown on which was is best: building a kit from scratch or buying a pre made kit? I was considering a 12v conversion, but decided to keep the 6v because I'm really cheap and don't want to buy the conversion kit. Just going to do what's necessary to get it running consistently.
|
|
|

|
|
|
#41 |
|
Registered User
Join Date: Jun 2006
Location: Idaho
Posts: 8,800
|
Re: 1948 1 1/2 Ton Loadmaster
Do a search, there are a couple of recent threads on wiring set companies. I have an EZwire 21 circuit that I have not installed yet. Instructions are pretty straight forward and when I called with questions (mine is a franken truck that will have some extras not on hot rods) I got the owner and he answered them, and said to call back if I needed help during the install. It does not come with the ends terminated except for the column connectors. Wires are the right gauge and labeled. If you are keeping the truck a stock replacement would work better for you. I would bet that once you choose a vendor you could call and they could make the back wires a few feet longer for you. Or you could just put in a junction connector and your own extension in case you want to disconnect the back harness to pull the bed, etc.
__________________
1959 Chevy Short Fleetside w/ 74 4WD drive train (current project) OrrieG Build Thread 1964 Chevelle Malibu w/ 355-350TH (daily driver) Helpful AD and TF Manual Site Old Car Manual Project |
|
|

|
|
|
#42 |
|
Registered User
Join Date: Sep 2009
Location: Denver, CO
Posts: 120
|
Re: 1948 1 1/2 Ton Loadmaster
Gas problems. New battery, new plugs, new wires...turns over great, just doesn't start. Took the fuel line off from the "out" side and there's nothing coming out when I crank. Put my finger over the hole and I feel no pressure whatsoever, so either the pump quit on me, or there is something clogged upstream. I loosened the fitting coming out of the tank and there was fuel in the line (weird yellow color, but it was still fuel). I guess tomorrow I will take the fuel pump off and see if I can figure out if there is a problem with it. I also have a sneaky suspicion that the tank wasn't too clean. What's the best way to get crap out of the tank? The color of fuel that came out of that line didn't make me feel warm and fuzzy.
|
|
|

|
|
|
#43 |
|
Registered User
Join Date: Aug 2011
Location: Barnum, Mn
Posts: 795
|
Re: 1948 1 1/2 Ton Loadmaster
Sounds like what I had to deal with a few weeks ago. The fuel in my tank was lime green.... It was nasty. I pulled the tank and just hosed it out.... I know water is bad but I left it out on the garage floor to dry over night. After I installed the tank and filled it up some I had nice clean fuel coming out of the fitting where the line leaves the tank. There was still alot of cranking and no fire up so I went to the fuel pump. I'll bet you that your sediment bowl is plugged up. Open it up and clean it out. You will probably have to make a new gasket, I did. Make sure you shut the gas off at the tank before you pull the sediment bowl otherwise fuel will spill out. After its all together turn the fuel back on and the bowl will fill. Its glass so you can see it fill. After that I still wasn't getting the engine to fire so I pulled the line at the carb and there was fuel there. I then cleaned the carb by spraying carb cleaner in it and tapped on it with a wrench while someone cranked it over and that dislodged any left over gunk. Fired right up when the choke was on full.
Anyway thats the story of my similar experience with my 1950 216ci. Good luck |
|
|

|
|
|
#44 |
|
Registered User
Join Date: Sep 2009
Location: Denver, CO
Posts: 120
|
Re: 1948 1 1/2 Ton Loadmaster
Thanks Root. I was hoping not to waste the 3 gallons of gas I put in yesterday, but I guess that's really the only option. I have the sediment bowl that is right next to the carb and I have cleaned that out. I think I'll try and mess with the tank a little today.
|
|
|

|
|
|
#45 |
|
Registered User
Join Date: Jan 2012
Location: Central Missouri
Posts: 155
|
Re: 1948 1 1/2 Ton Loadmaster
|
|
|

|
|
|
#46 |
|
Registered User
Join Date: Sep 2009
Location: Denver, CO
Posts: 120
|
Re: 1948 1 1/2 Ton Loadmaster
Disconnected all of the fuel lines and blew them out with an air compressor. The line from the fuel pump to the carb was bone dry. Took the lid off of the fuel pump and the gasket is cracked. Took the plug out of the bottom of the gas tank and got a few drops...completely plugged. Dropped the fuel tank (busted one of the bolts) and found a hole in the top of it as well next to the sending unit.
 I found out why the fuel gauge wasn't working.  Can of worms has been opened. Any input on the fuel tank? JB Weld the hole and get a new sending unit? New tank? Junkyard tank? |
|
|

|
|
|
#47 |
|
Registered User
Join Date: Jan 2012
Location: Central Missouri
Posts: 155
|
Re: 1948 1 1/2 Ton Loadmaster
A lot of radiator shops will also recondition and seal gas tanks. If you prefer to do it yourself Eastwood has a lot of very good products -
http://search.eastwood.com/search?w=gas+tank+sealer Looking at that sending unit it's easy to imagine what the fuel system looks like - amazing you made it home lol |
|
|

|
|
|
#48 |
|
Registered User
Join Date: Nov 2011
Location: Minneapolis, MN
Posts: 124
|
Re: 1948 1 1/2 Ton Loadmaster
Terrific stories! Thanks for sharing.
BTW, the mouse droppings were likely from the actual mouse, still clinging to the top side of the sun visor, looking out the windshield and literally crapping on your head while thinking 'OMG, this guy has no brakes and we're screaming down the road in this old truck!!'  -Doug -Doug
|
|
|

|
|
|
#49 |
|
Registered User
Join Date: Sep 2009
Location: Denver, CO
Posts: 120
|
Re: 1948 1 1/2 Ton Loadmaster
You may be right Doug! I found a few dead ones in there, I'm pretty sure it was a heart attack. I don't know if 25-30 mph is technically "screaming" down the road, but it was an adventure!
Funny thing is, when I picked up the truck I could get it to run, but it wouldn't stop (very good). Now that I've worked on it the brakes are great so it stops but won't run! I think I've decided that instead of paying for chemicals to restore the tank, or paying a radiator shop to do it, I will just buy a new one. Either that or just make one at the fab shop next door. It's hard to find the exact tank for this truck. I've been googling, but haven't had any luck so far. |
|
|

|
|
|
#50 |
|
Registered User
Join Date: May 2012
Location: Fort Collins, Colorado
Posts: 54
|
Re: 1948 1 1/2 Ton Loadmaster
Does it have a different tank then a 1/2 ton?
|
|
|

|
 |
| Bookmarks |
| Tags |
| 1948, dump, loadmaster |
| Thread Tools | |
| Display Modes | |
|
|