
 |
Register or Log In To remove these advertisements. |
|
|
|
|||||||
 |
|
|
Thread Tools | Display Modes |
|
|
#201 | ||
|
Registered User
Join Date: May 2010
Location: Stillwater,MN
Posts: 39
|
Re: My caster mod (with pictures)
Quote:
Quote:
Might just do the cross shaft mod on another set of arms if I messed these up too much. I do appreciate all the feedback, as Im not the best at this. |
||
|
|

|
|
|
#202 |
|
Registered User
Join Date: Jul 2009
Location: San Jose Ca
Posts: 2,871
|
Re: My caster mod (with pictures)
I dont have any pics of them done. You could easily weld a piece of steel to connect the sides.
Here is a pic of how I did a second set 
__________________
David Used parts build: http://67-72chevytrucks.com/vboard/s...d.php?t=638991 My brother's Nova: http://www.67-72chevytrucks.com/vboa...d.php?t=727985 Rear suspension rework: http://www.67-72chevytrucks.com/vboa...d.php?t=750557 Instagram: myfabguy |
|
|

|
|
|
#203 |
|
Registered User
Join Date: Dec 2009
Location: Kirkland, WA
Posts: 1,302
|
Re: My caster mod (with pictures)
You've got that album set to private
__________________
1968 LWB C20 / AC / Wood Bed |
|
|

|
|
|
#204 |
|
Registered User
Join Date: May 2010
Location: Stillwater,MN
Posts: 39
|
Re: My caster mod (with pictures)
I will probably do my next set like that, just tight on funds and wanted to take a stab at it with the resources I had. Will be a long winter so I have time.
Still would have to figure out the other side with some bracing. 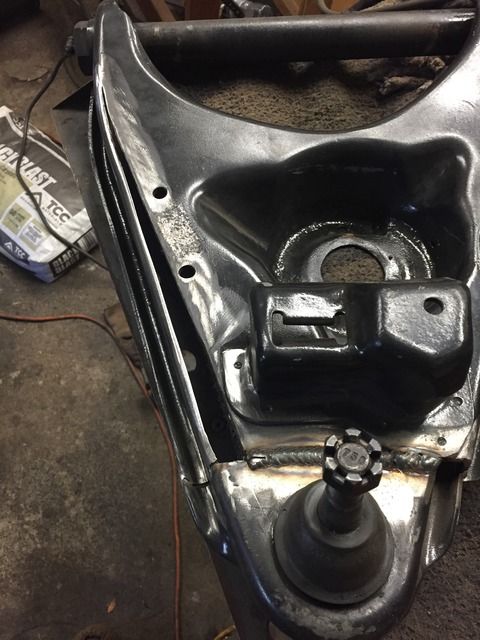 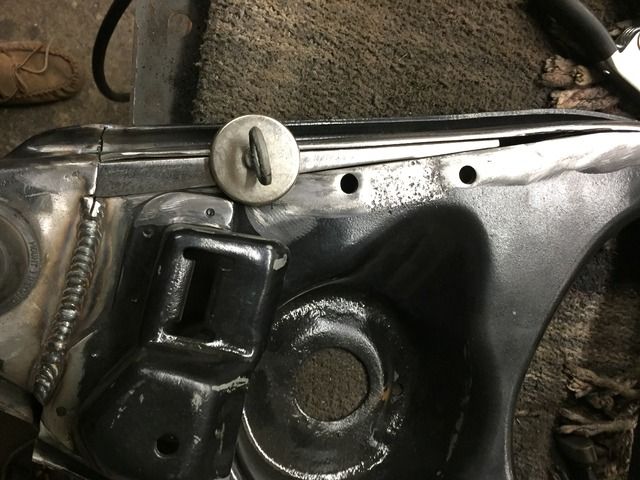 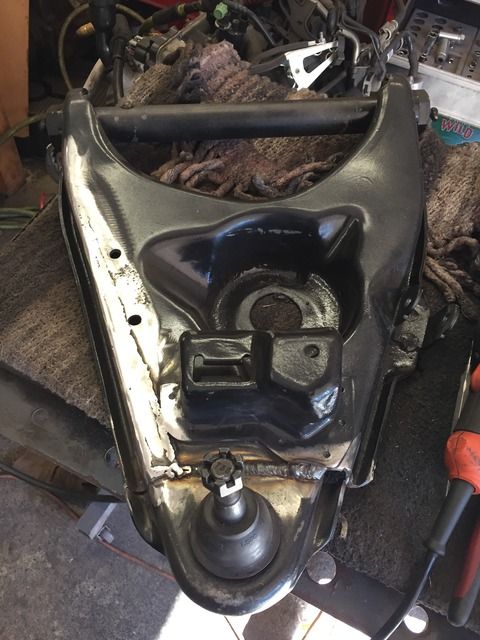
|
|
|

|
|
|
#205 |
|
Registered User
Join Date: Dec 2009
Location: Kirkland, WA
Posts: 1,302
|
Re: My caster mod (with pictures)
It'll be really hard to get your camber right unless you also take in the upper arm, and then you'll need to think about wheel backspacing (which you'd already have to do anyway most likely.
__________________
1968 LWB C20 / AC / Wood Bed |
|
|

|
|
|
#206 |
|
Registered User
Join Date: May 2010
Location: Stillwater,MN
Posts: 39
|
Re: My caster mod (with pictures)
Yea I did not shorten the arm much so camber should be ok. Just made some relief cuts and bent the arms u bend side supports in and welded them up. In the end should work, seems strong, but will probably be doing the BJ cup replacement mod as it seems the strongest and leaves the spring pocket and integrity of the arm in place?!
Sorry to hijack the thread, I just value the opinions here. I'm done now. 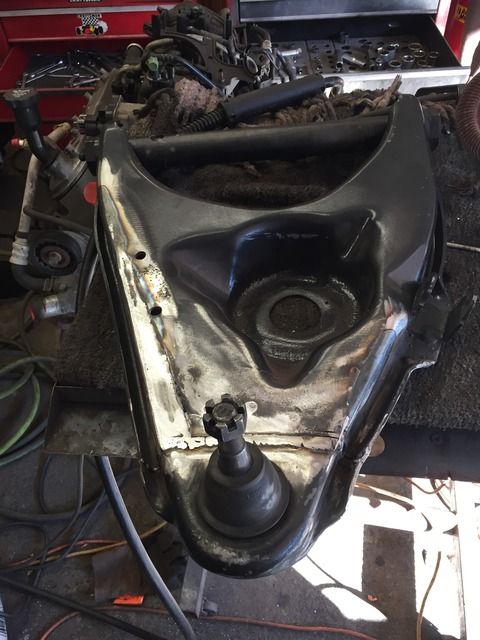 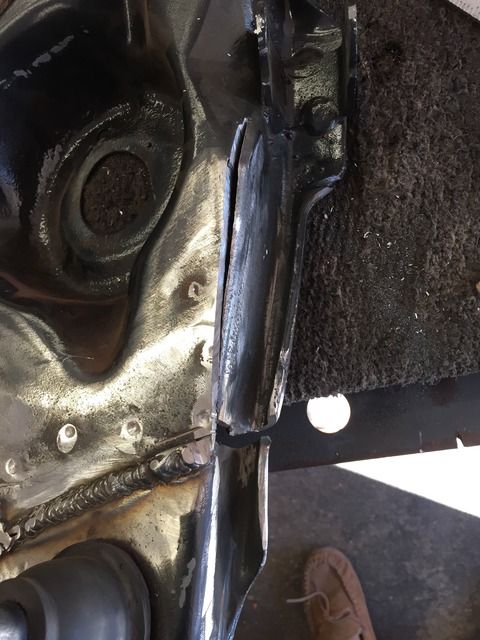
|
|
|

|
|
|
#207 |
|
Registered User
Join Date: Jul 2009
Location: San Jose Ca
Posts: 2,871
|
Re: My caster mod (with pictures)
I don't have my album set to private. Im not logged in and can see the pics. Maybe photobucket was down for a bit.
Anyway. The relief cut should work. I put ball joint cuts in my first set of arms and welded a tab to the airbag cup. Probably overkill. I shortened the lowers 7/8'' and the uppers 1/2''. Camber was fine with one shim. I know it would reduce camber gain but I was more concerned with fender clearance.
__________________
David Used parts build: http://67-72chevytrucks.com/vboard/s...d.php?t=638991 My brother's Nova: http://www.67-72chevytrucks.com/vboa...d.php?t=727985 Rear suspension rework: http://www.67-72chevytrucks.com/vboa...d.php?t=750557 Instagram: myfabguy |
|
|

|
|
|
#208 |
|
Registered User
 Join Date: May 2011
Location: Missoula, MT
Posts: 934
|
Re: My caster mod (with pictures)
ranger2339,
No apologies needed this is not high-jacking. You brought a new idea to the table and with some adjustments to your idea we all learned something and that is what we are here for. I like your modifications especially with the recent adjustments. I would plate both the inside and outside of both the leading side and trailing side with some rosette welds and a good perimeter weld all around. also run a "skid plate across the bottom that strattles the welded joint to prevent any outward deflection of the sides. Let us know how it ends up!
__________________
69 GMC C10 build thread- http://67-72chevytrucks.com/vboard/s...d.php?t=501676 03 Silverado build thread-http://67-72chevytrucks.com/vboard/s...d.php?t=591582 |
|
|

|
|
|
#209 |
|
Post Whore
 Join Date: Feb 2016
Location: Portland Oregon
Posts: 11,362
|
Re: My caster mod (with pictures)
I thought I would add some additional information to this thread. I went this route on my Burban by obtaining an extra set of used control arms and rebuilding them. By the time I was done I had four used control arm shafts off of three trucks. The measurements I show in the photos below. All of the used ones were 3" plus or minus a 1/16". The two new Moogs (K6147) I used were at 2 15/16". The measurements are from the end of the shaft to the center of the index hole. I did this to avoid the differences in the machined areas for the seals between old and new shafts as previously discussed. (Second photo) After much measuring and double checking I milled a 3/4" index hole (and finished it off with an 5/8 drill bit just in case the rivet was taller than I expected) at 3 3/4" from the end of the shaft.
I haven't got the truck on the alignment rack yet. (Still waiting for a tie rod end). But I will post the spec's when I get them. A couple of things I noticed when doing this. One is as the lower control arm moves forward it changes how the brake hoses flex and I had to tweek the brackets on the cross member to keep the hoses from rubbing when the wheels are hard over. In addition I had to move my sway bar frame mounts forward 3/4" to keep the ends of the factory sway bar from rubbing on the airbags. The factory index holes measured 11/16" and the Moogs were 23/32". The index rivets were 19/32" in diameter. That means with the replacement shafts there is 1/8" of slop forward and back. As both of my shafts had been knocked back and had damaged the rivets, I had to drill them out and replace them with 1/2" socket head cap screws as the OP did. The old rivet holes had to be drilled out to half inch. As I didn't machine the index holes deep enough I had to grind a 1/16" off the top of the cap screws to keep them from holding the shaft away from the saddles.
__________________
Thanks to Bob and Jeanie and everyone else at Superior Performance for all their great help.  RIP Bob Parks. 1967 Burban (the WMB),1988 S10 Blazer (the Stink10 II),1969 GTO (the Goat), 1970 Javelin, 1952 F2 Ford OHC six 4X4, 29 Model A, 72 Firebird (the DBP Bird). 85 Alfa Romeo If it breaks I didn't want it in the first place The WMB repair thread http://67-72chevytrucks.com/vboard/s...d.php?t=698377 |
|
|

|
|
|
#210 |
|
Post Whore
 Join Date: Feb 2016
Location: Portland Oregon
Posts: 11,362
|
Re: My caster mod (with pictures)
Also when doing this modification on a bagged truck you will have an additional shock issue. The shock will contact the brake line bracket or the cross member at full drop. To solve the problem I removed the stock shock mounts and made new ones that hold the shock away from the control arm farther and about an inch closer to the frame. I apologize for the poor photos.
__________________
Thanks to Bob and Jeanie and everyone else at Superior Performance for all their great help.  RIP Bob Parks. 1967 Burban (the WMB),1988 S10 Blazer (the Stink10 II),1969 GTO (the Goat), 1970 Javelin, 1952 F2 Ford OHC six 4X4, 29 Model A, 72 Firebird (the DBP Bird). 85 Alfa Romeo If it breaks I didn't want it in the first place The WMB repair thread http://67-72chevytrucks.com/vboard/s...d.php?t=698377 |
|
|

|
|
|
#211 |
|
Registered User
Join Date: Dec 2009
Location: Kirkland, WA
Posts: 1,302
|
Re: My caster mod (with pictures)
Thanks for the heads up on that, nice to know what I'll be running into

__________________
1968 LWB C20 / AC / Wood Bed |
|
|

|
|
|
#212 |
|
Post Whore
 Join Date: Feb 2016
Location: Portland Oregon
Posts: 11,362
|
Re: My caster mod (with pictures)
You're welcome. I posted some more photos of the shock mount project and a little more information on "The WMB" thread on page 11 (I think its page 11)
__________________
Thanks to Bob and Jeanie and everyone else at Superior Performance for all their great help.  RIP Bob Parks. 1967 Burban (the WMB),1988 S10 Blazer (the Stink10 II),1969 GTO (the Goat), 1970 Javelin, 1952 F2 Ford OHC six 4X4, 29 Model A, 72 Firebird (the DBP Bird). 85 Alfa Romeo If it breaks I didn't want it in the first place The WMB repair thread http://67-72chevytrucks.com/vboard/s...d.php?t=698377 |
|
|

|
|
|
#213 |
|
Post Whore
 Join Date: Feb 2016
Location: Portland Oregon
Posts: 11,362
|
Re: My caster mod (with pictures)
Got a short window on the alignment rack this afternoon so I got a set of initial readings. This is with the shim sets that the PO had installed and I just reused as a base line. My first impression was "Yikes I went too far!". I may have to pull the lower arms and mill a third location if I can't remove some of the caster!!!

__________________
Thanks to Bob and Jeanie and everyone else at Superior Performance for all their great help.  RIP Bob Parks. 1967 Burban (the WMB),1988 S10 Blazer (the Stink10 II),1969 GTO (the Goat), 1970 Javelin, 1952 F2 Ford OHC six 4X4, 29 Model A, 72 Firebird (the DBP Bird). 85 Alfa Romeo If it breaks I didn't want it in the first place The WMB repair thread http://67-72chevytrucks.com/vboard/s...d.php?t=698377 |
|
|

|
|
|
#214 |
|
Post Whore
 Join Date: Feb 2016
Location: Portland Oregon
Posts: 11,362
|
Re: My caster mod (with pictures)
After going through it all this is what I came up with. The Burban is bagged so to get the camber where it is I did go with a one inch higher ride height. The biggest driver of this was to reduce the number of shims so now I have full thread contact on the upper control arm bolts. I will drive it this way for a while and see what I decide what to change next.
__________________
Thanks to Bob and Jeanie and everyone else at Superior Performance for all their great help.  RIP Bob Parks. 1967 Burban (the WMB),1988 S10 Blazer (the Stink10 II),1969 GTO (the Goat), 1970 Javelin, 1952 F2 Ford OHC six 4X4, 29 Model A, 72 Firebird (the DBP Bird). 85 Alfa Romeo If it breaks I didn't want it in the first place The WMB repair thread http://67-72chevytrucks.com/vboard/s...d.php?t=698377 |
|
|

|
|
|
#215 | |
|
Registered User
Join Date: Aug 2017
Location: Chicago,il
Posts: 361
|
Re: My caster mod (with pictures)
Quote:
Anyway, you were one of the only ones to mention bags. I too am using air and wondered how well you solved the issue of the crooked bag? Did you just relocate the mount holes in the top bag bracket? I actually cut out the lower indent section of my lca and welded in pockets to the entire bag will now sit in the pocket when completely deflated. This also allows me to run with more air in the bags at a lowered ride height. Iím wondering if this is going to affect or alter my attempt at this modification? |
|
|
|

|
|
|
#216 |
|
Post Whore
 Join Date: Feb 2016
Location: Portland Oregon
Posts: 11,362
|
Re: My caster mod (with pictures)
Here is a link to my Burban thread page on my front bag installation. I did have to reposition the bag on the upper plate to get the bag to sit straighter.
You didn't mention what make and model of bags your installing. If your using the SS7 bags I used, your plan with the control arms should work well. I haven't done it yet but I am planning to cut my lower cups down to get a higher pressure at ride height. http://67-72chevytrucks.com/vboard/s...698377&page=10
__________________
Thanks to Bob and Jeanie and everyone else at Superior Performance for all their great help.  RIP Bob Parks. 1967 Burban (the WMB),1988 S10 Blazer (the Stink10 II),1969 GTO (the Goat), 1970 Javelin, 1952 F2 Ford OHC six 4X4, 29 Model A, 72 Firebird (the DBP Bird). 85 Alfa Romeo If it breaks I didn't want it in the first place The WMB repair thread http://67-72chevytrucks.com/vboard/s...d.php?t=698377 |
|
|

|
|
|
#217 |
|
Registered User
Join Date: Aug 2017
Location: Chicago,il
Posts: 361
|
Re: My caster mod (with pictures)
All I have are the cheap 2600# airbags that came with the truck. I assume they are mostly the same? If not, it's not a big deal for me to change to a different brand right now.
|
|
|

|
|
|
#218 |
|
Post Whore
 Join Date: Feb 2016
Location: Portland Oregon
Posts: 11,362
|
Re: My caster mod (with pictures)
Those bags are what I replaced. They gave me the same ride height but required higher air pressure to do it on my Burban. I can't really give you a good ride comparison between the two as the entire suspension was worn out with the old bags and the new bags are part of the total suspension rebuild. They are also smaller in diameter so you will have more room for misalignments in the top and bottom mounts as the suspension moves.
__________________
Thanks to Bob and Jeanie and everyone else at Superior Performance for all their great help.  RIP Bob Parks. 1967 Burban (the WMB),1988 S10 Blazer (the Stink10 II),1969 GTO (the Goat), 1970 Javelin, 1952 F2 Ford OHC six 4X4, 29 Model A, 72 Firebird (the DBP Bird). 85 Alfa Romeo If it breaks I didn't want it in the first place The WMB repair thread http://67-72chevytrucks.com/vboard/s...d.php?t=698377 |
|
|

|
|
|
#219 | |
|
Registered User
Join Date: Dec 2009
Location: Kirkland, WA
Posts: 1,302
|
Re: My caster mod (with pictures)
Quote:
Anyway for posterity here, it's best to keep the bag centered on the LCA to evenly distribute load to the LCA bushings.
__________________
1968 LWB C20 / AC / Wood Bed |
|
|
|

|
|
|
#220 | |
|
Registered User
Join Date: Aug 2017
Location: Chicago,il
Posts: 361
|
Re: My caster mod (with pictures)
Quote:
I bought them here : http://www.bcfab.com/Front-Drop-Pock...10_p_1263.html I could have fabbed something myself but I figured for the amount of time saved searching for the correct sized steel, cutting and welding, etc...I’d be better off just spending the money on these. They went in pretty easy and I think I’ll be glad I did it once everything is all back together. It will allow the front to drop quite a bit more. Last edited by Slowguy; 11-12-2018 at 07:16 PM. Reason: Typo |
|
|
|

|
|
|
#221 |
|
Post Whore
 Join Date: Feb 2016
Location: Portland Oregon
Posts: 11,362
|
Re: My caster mod (with pictures)
For what it is worth from what I have done on mine I would recommend going with a smaller diameter bag like the 2600 as opposed to the Slam SS7 that I used. It will be easier to set up the bag at ride height so it won't touch the pocket.
__________________
Thanks to Bob and Jeanie and everyone else at Superior Performance for all their great help.  RIP Bob Parks. 1967 Burban (the WMB),1988 S10 Blazer (the Stink10 II),1969 GTO (the Goat), 1970 Javelin, 1952 F2 Ford OHC six 4X4, 29 Model A, 72 Firebird (the DBP Bird). 85 Alfa Romeo If it breaks I didn't want it in the first place The WMB repair thread http://67-72chevytrucks.com/vboard/s...d.php?t=698377 |
|
|

|
|
|
#222 |
|
Registered User
Join Date: Aug 2017
Location: Chicago,il
Posts: 361
|
Re: My caster mod (with pictures)
I think Iím about done with the front end. I think itís working out pretty good but weíll see when itís actually back together and has some weight on it. Have to do some research to see how the caps are supposed to be (properly) threaded onto the upper a arm bars. I can see now, how those bars are used for alignment purposes depending upon if the rear or the front caps are threaded more or less.
I think the bags are set as straight as I can get them. The caster mod really seemed to have set the lower ball joint pretty far forward but I guess thatís a good thing (especially since Iíll be using an ls ps pump - plenty of hydraulic assist). Also itís nice to be able to get all the air line fittings tight, properly assembled, and routed the way I want. The last guy did a real hack job with multiple things. |
|
|

|
|
|
#223 |
|
Post Whore
 Join Date: Feb 2016
Location: Portland Oregon
Posts: 11,362
|
Re: My caster mod (with pictures)
Nice work. I like the bump stops. What are they off of?
__________________
Thanks to Bob and Jeanie and everyone else at Superior Performance for all their great help.  RIP Bob Parks. 1967 Burban (the WMB),1988 S10 Blazer (the Stink10 II),1969 GTO (the Goat), 1970 Javelin, 1952 F2 Ford OHC six 4X4, 29 Model A, 72 Firebird (the DBP Bird). 85 Alfa Romeo If it breaks I didn't want it in the first place The WMB repair thread http://67-72chevytrucks.com/vboard/s...d.php?t=698377 |
|
|

|
|
|
#224 |
|
Registered User
Join Date: Aug 2017
Location: Chicago,il
Posts: 361
|
Re: My caster mod (with pictures)
I can look it up if you want. Thy were cheap. I just ordered them online somewhere. Donít know yet, they are fairly soft rubber but pretty tall. I may end up cutting it down a rib or two. Weíll see how it sits when back together.
|
|
|

|
|
|
#225 |
|
Post Whore
 Join Date: Feb 2016
Location: Portland Oregon
Posts: 11,362
|
Re: My caster mod (with pictures)
[QUOTE=HO455;7998948 In addition I had to move my sway bar frame mounts forward 3/4" to keep the ends of the factory sway bar from rubbing on the airbags.
.[/QUOTE] Just a note on this quote. If you need to reposition the sway mounts for clearance try to keep the bar as close as possible to the control arm. The theory is the shorter the distance between the mount on the arm and the front of the bar the stiffer the bar will be. As little as 1/2 " either way will be noticeable. In the photo the shiny spots near the ends of the bar shows the location of the end mounts as the factory installed them. If the bar is repositioned in the direction of the arrow the mounts can now ride where the blue line is. Basically instead of 1/2" of bar sticking past the mount there will be one inch sticking past. Cheap sway bar upgrade!
__________________
Thanks to Bob and Jeanie and everyone else at Superior Performance for all their great help.  RIP Bob Parks. 1967 Burban (the WMB),1988 S10 Blazer (the Stink10 II),1969 GTO (the Goat), 1970 Javelin, 1952 F2 Ford OHC six 4X4, 29 Model A, 72 Firebird (the DBP Bird). 85 Alfa Romeo If it breaks I didn't want it in the first place The WMB repair thread http://67-72chevytrucks.com/vboard/s...d.php?t=698377 |
|
|

|
 |
| Bookmarks |
| Thread Tools | |
| Display Modes | |
|
|