
 |
Register or Log In To remove these advertisements. |
|
|
|
|||||||
 |
|
|
Thread Tools | Display Modes |
|
|
#1 |
|
Senior Member
 Join Date: Nov 2010
Location: Honolulu Hawaii
Posts: 313
|
My Porterbuilt Experience...
So after being a member on this wonderful and most helpful forum for over a year now(lurking for even longer) and learning SO many new things on all things C10, I am finally doing my part to contribute something in hopes of giving back in any way that I possibly can. The information, camaraderie, and the sense of community here is unbelievable and the things I've learned here makes it such an invaluable resource.
My hope is that this post will benefit or help someone in some way that might be interested or curious about going Porterbuilt, or is already doing their PB install and needed some kind of reference on it. I know I did extensive searching and researching on all posts regarding PB to get as much info and reference as possible before pulling the trigger on my PB suspension. There's a ton of useful pics, builds, and how to's out there on PB but I didn't find anything quite as basic and dumbed down for novice to amateur guys like myself so I decided my experience would be perfect to share and also help add a little something to the growing number of PB related reference pics on the interwebs.  Whether you're going full Delmo and building a reflector scraping Nacho Truck with the full-shebang world famous PB Drop Member treatment or just always wanted the truck to be on air and sit just a little bit lower than you can get on static drops, I can honestly attest and confirm that, from mild to wild, Porterbuilt is definitely the way to go. Again, I wouldn't consider this a 'build thread' or anything like that. Just a quick Porterbuilt suspension installation pic diary/review of the installation process on my truck. It is by no means a 'how-to' or tutorial either so please just view the thread as reference(or just browse through it just for kicks if you're so inclined). Before I bombard everyone with the pics, though, I'd just like to compliment and thank Dave Porter for all the help and support that he's provided for my install. No matter how great a company or product is, there are always little things that can get missed and I had a few instances that some bolts and hardware were missing. Stuff like this just happens when shipping products over long distances with boxes tearing, stuff falling out while in transit, during packing, etc. No biggy. Dave always replied promptly and sent the missing parts right away so that I could keep on keeping on with the install. Kudos to the Porterbuilt customer service team for that. Ok, enough with the rambling. Lets get on with it! The Porterbuilt set up I chose to go with: FRONT: PB Stage 1 Front(bags, bag mount/plate/shocks/shock relocation bracket) PB Inch forward upper/lower control arms REAR: PB Stage 2 Basic Rear(c notch, upper/lower shock bar relocation x-member, trac bar/trac bar relocation brackets, shocks, bags) Air Management: AccuAir e-Level w/dual 3 gal tank/compressors(of course!) My decision to go with this particular set up was based on my height/stance preference. As mentioned earlier, I for one wanted a stance that sat just a little lower than the typical 5/7 set up could achieve without sacrificing drivability and function. I already had a 5/7 drop on my truck using ECE components(spindles/springs/blocks) but always thought it would look just a bit sweeter being a hair lower. As amazing as a truck with a full PB drop member set up like Old Aux, Hazel, Nacho, etc can be, I decided to start 'mild' instead of getting into some serious fab work like raising bed floors, fender wells and the like. It seems like everyone ends up going that route since you can never be too low, though, so we'll see...LOL.  For now, this is my personal experience and results with Porterbuilt. For those considering going PB, all I can say is that every bit of the hype is real. Porterbuilt products are top notch, high quality parts. Bar none. Step 1: Clearing the way for the brand new shiny PB parts~ Bed Removal~ 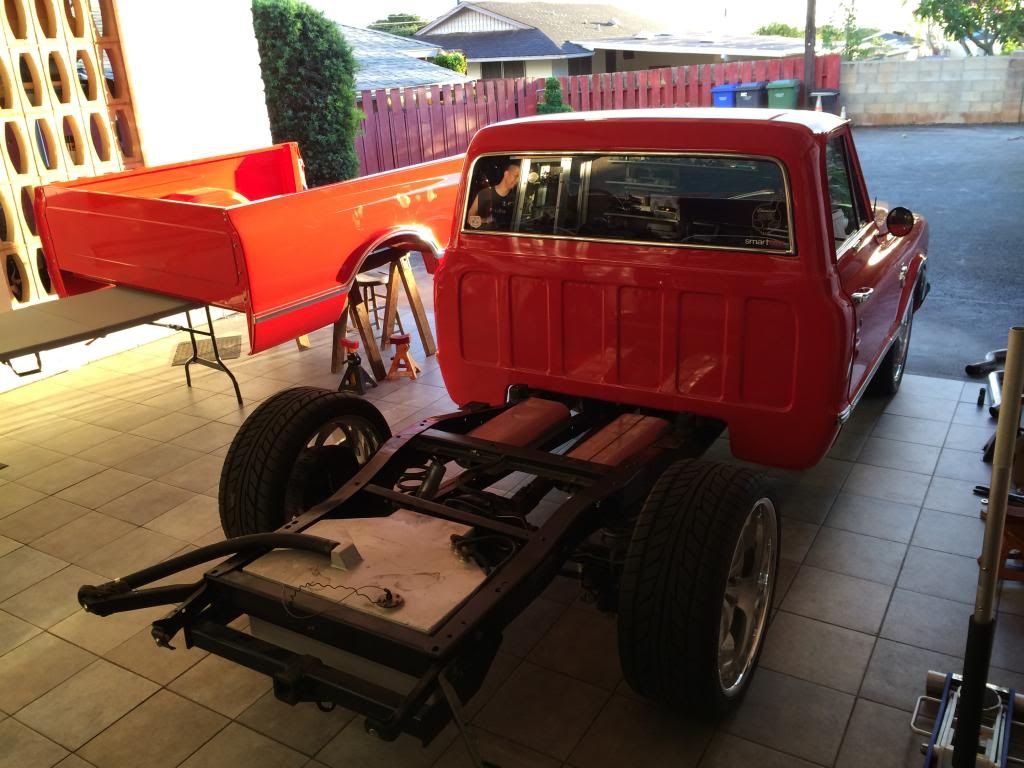 Cross member to be removed~ 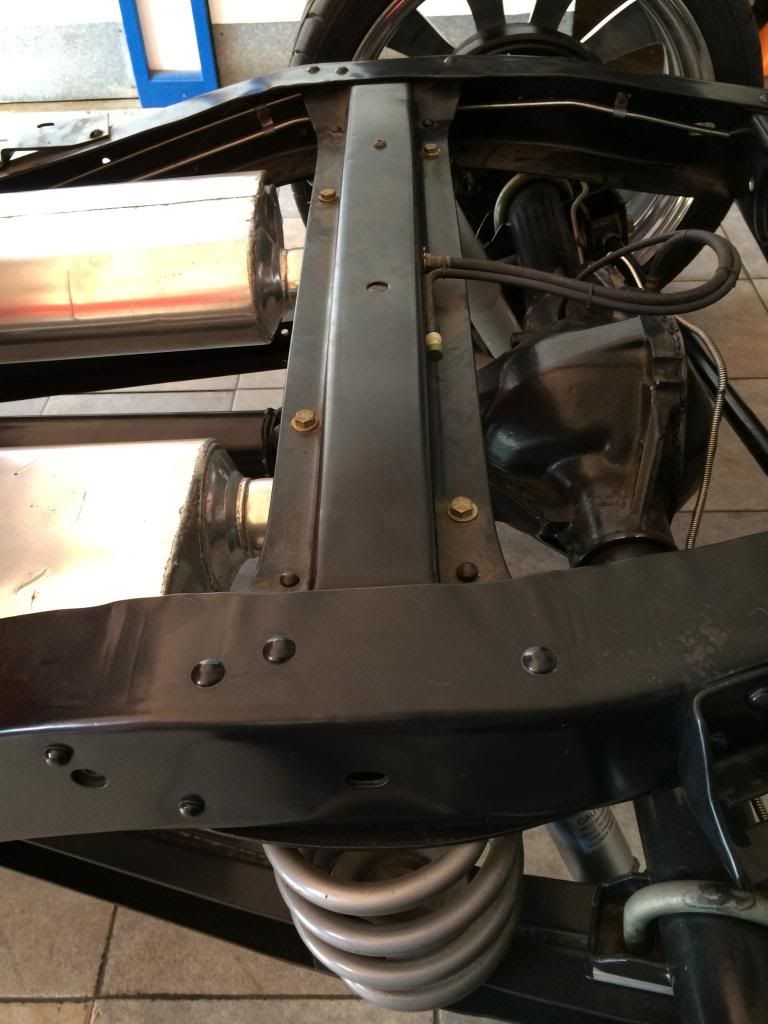 Bump stop perch to be removed~ 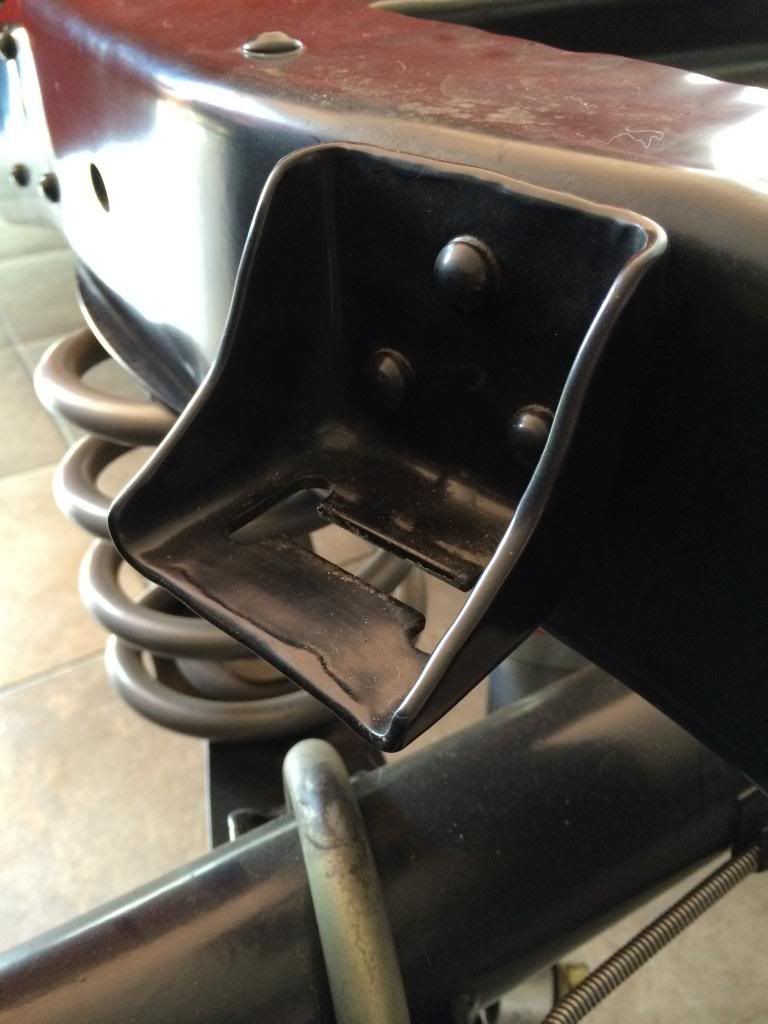 Drilling out the rivets. Quick thought on this: There are a lot of different opinions on the best way to get these off, and as always, there are as many 'best ways'. I found, trying both the impact chisel and the drilling method, that drilling out the rivets all the way through was not necessarily the fastest but definitely the cleanest method. Being 'clean' won't matter if you're chiseling off a rusted/old frame thats going to be coated or painted later but if you're working on a finished frame, you may want to consider the drill-out method. Just be prepared for a LOT of tinsel strands and bring your A-game on marking dead center on a button head rivet~ 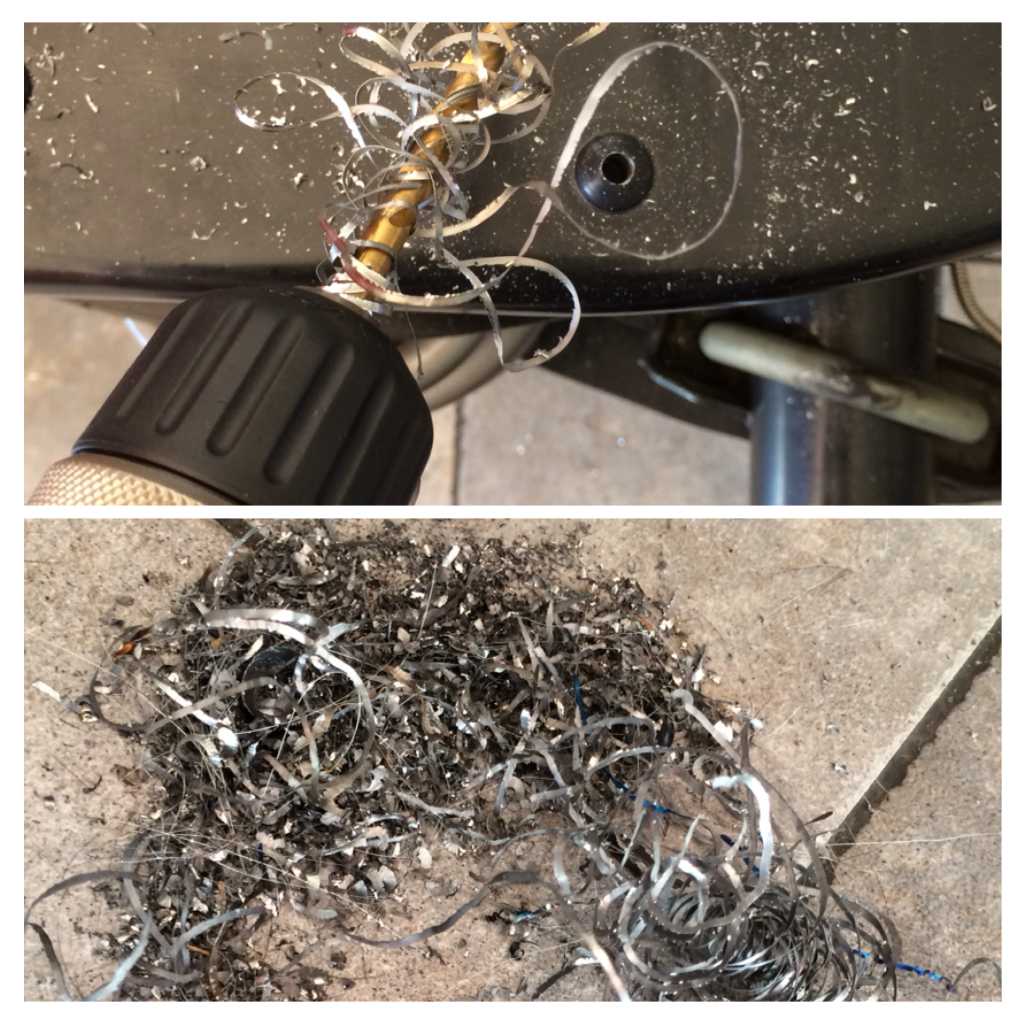 Just for reference and to show the difference in residual damage to surrounding areas; the impact chisel method on the left and drilled out rivets on the right~ 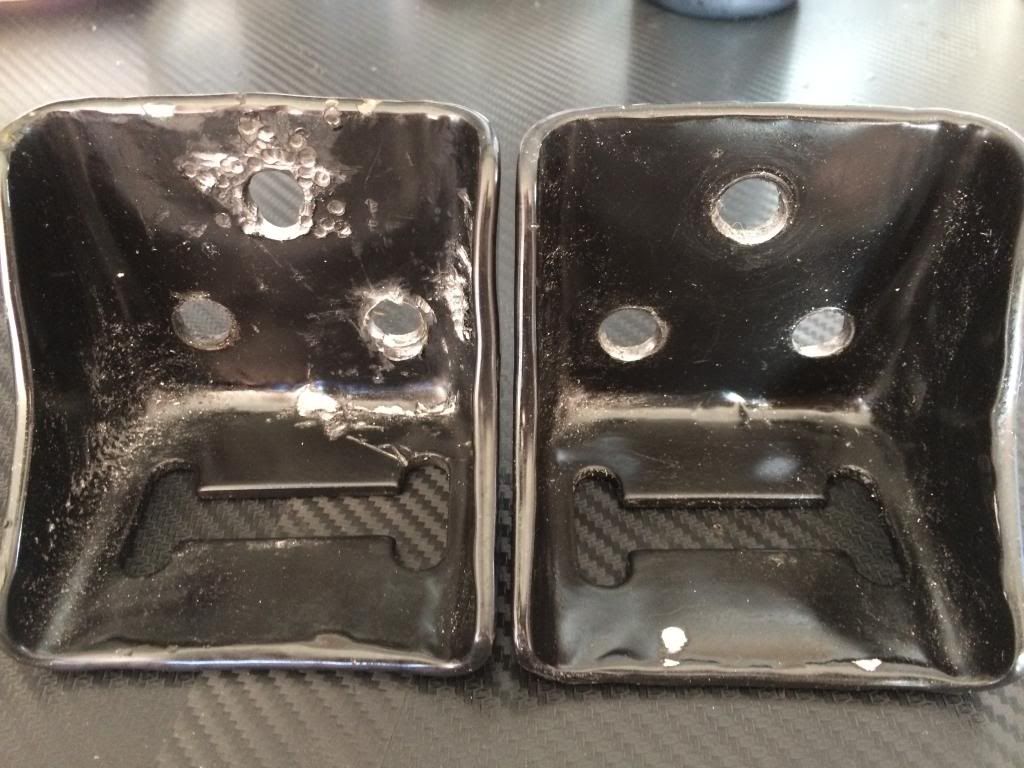 Cross member and perches finally removed~ 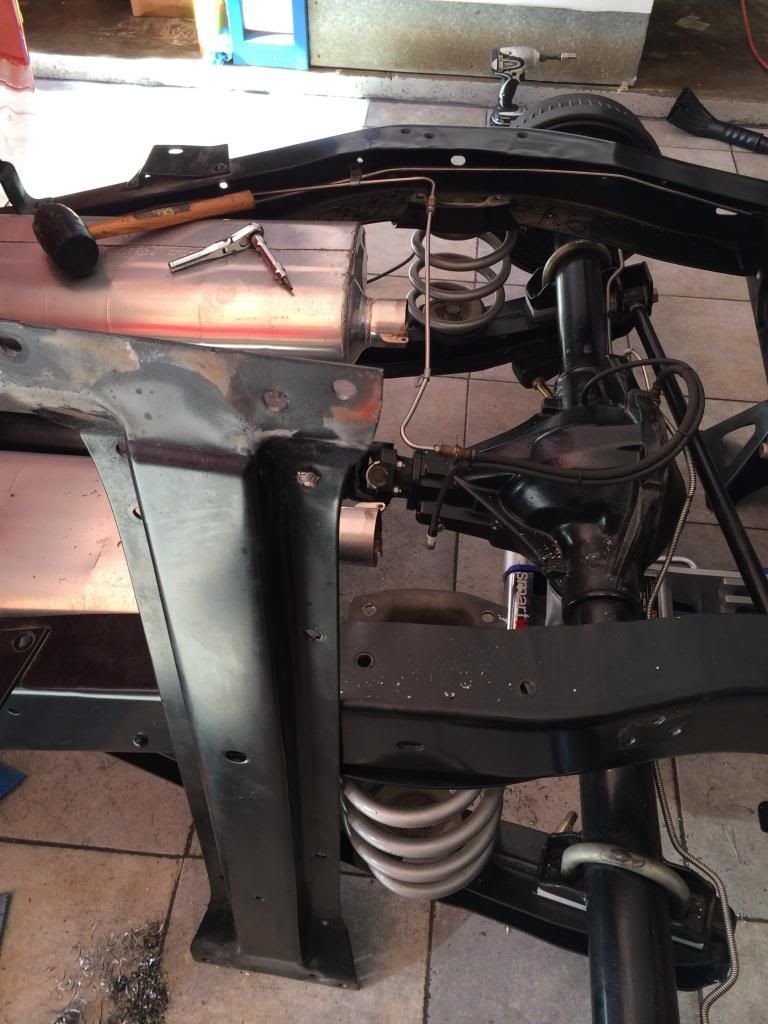 Be prepared for several of these... 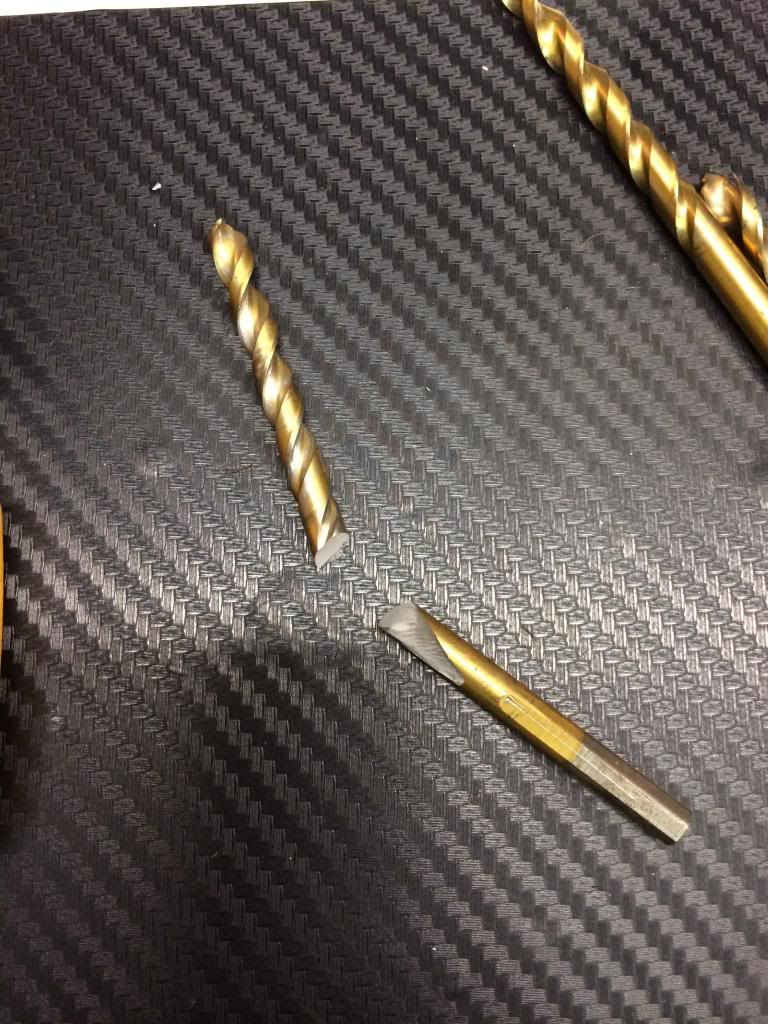 Step 2: Porterbuilt parts installation C-Notch test fit and hole alignment~ 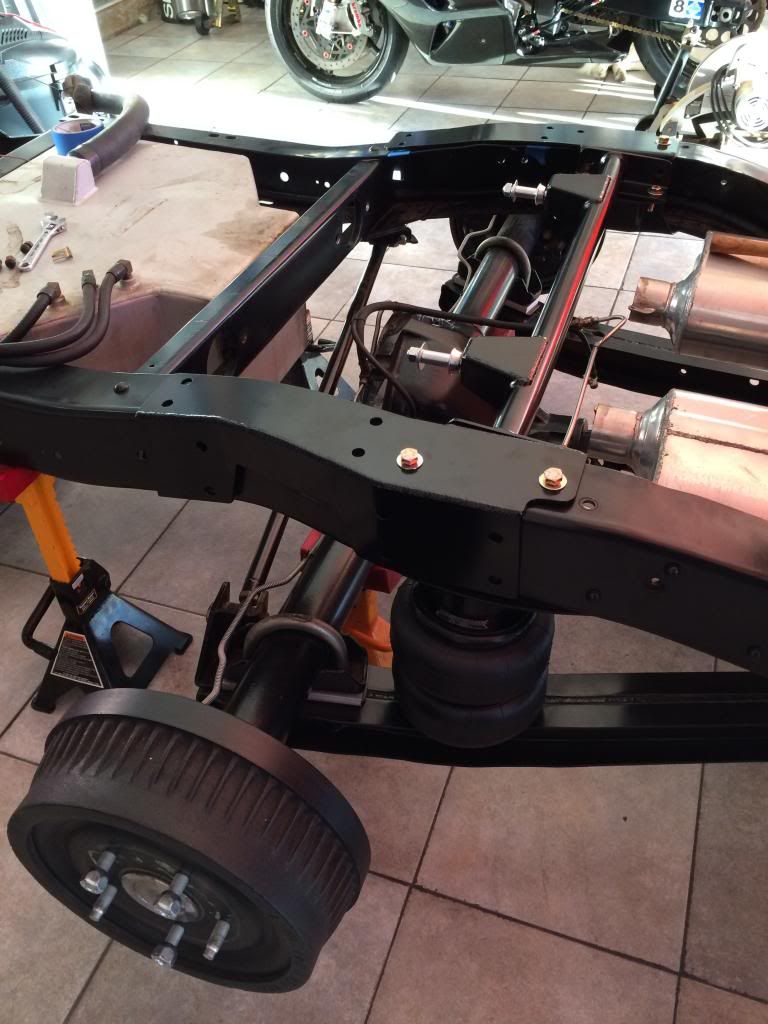 Holes marked and notch lines marked using clamped on notch as guide~ 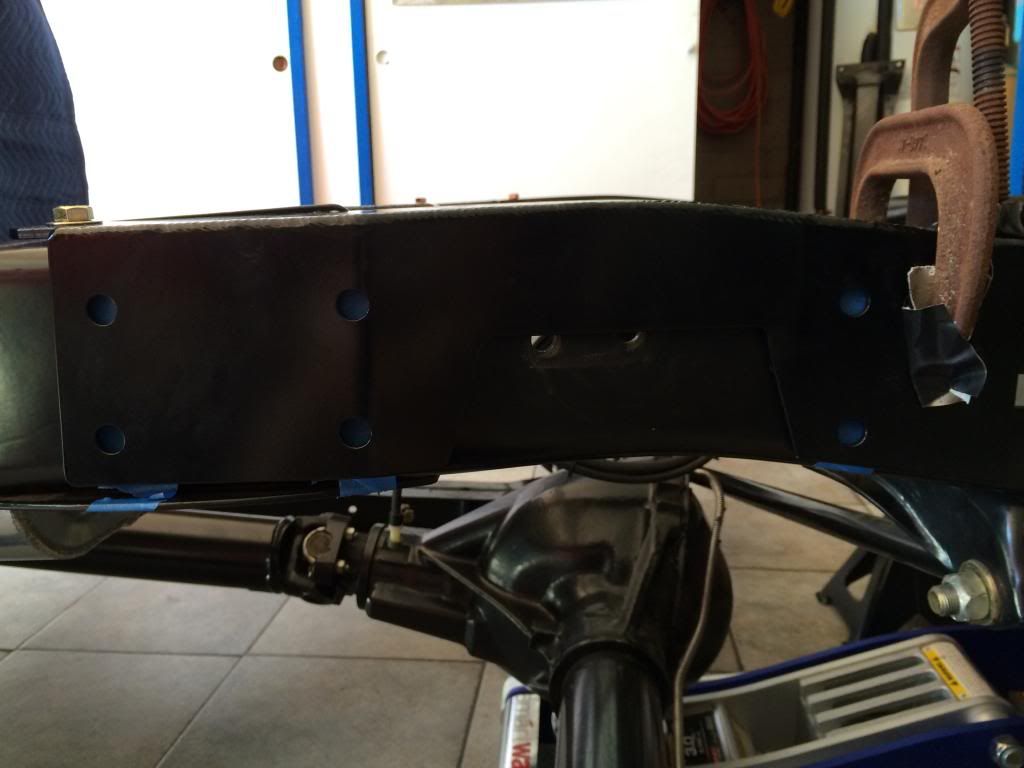 First cut is the scariest! Options I had to go with to cut the frame were plasma, air powered cut off wheel or electric grinder with cut off wheel attachment. I went with the electric cut off wheel because, again, it was the cleanest for my purposes. I didn't want to have to grind off the powdercoat on the frame to be able to use the plasma and the air powered cut off wheel I had was too thin and too weak~ 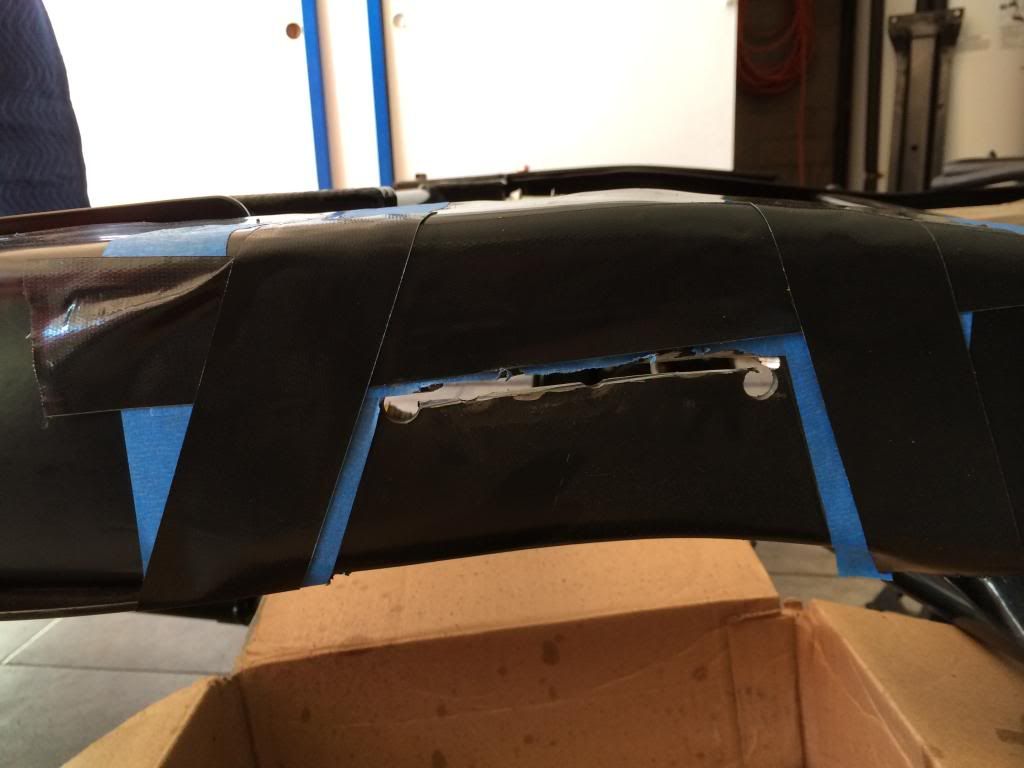 Notched~ 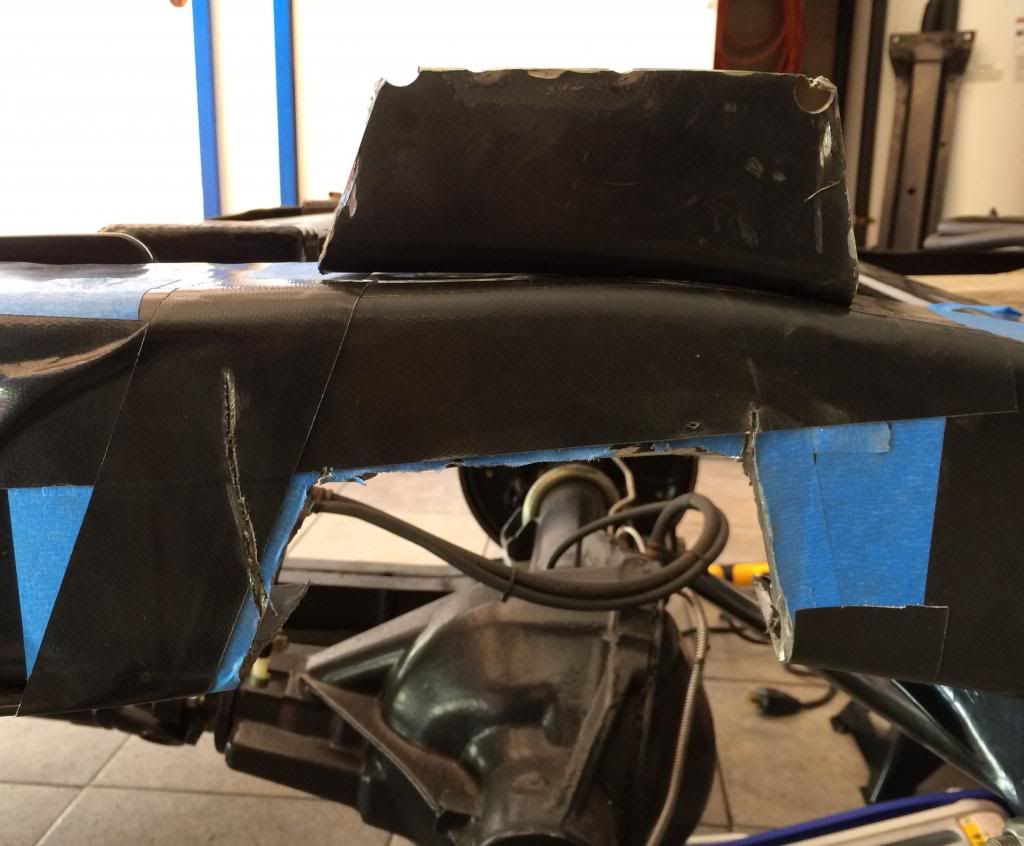 C-Notch bolted up and upper shock relocator cross member installed. The PB notch is not just a face notch but a fully boxed structure so it doesn't compromise any structural rigidity. I wouldn't be surprised if it actually strengthened the frame in that area~ 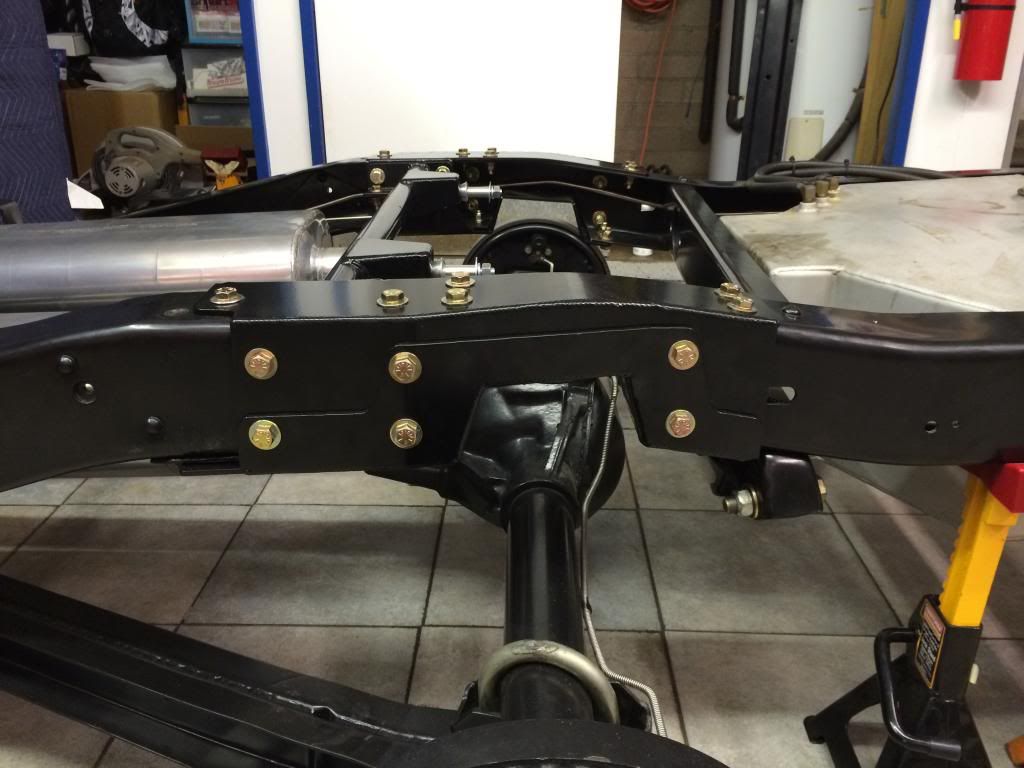 Trac Bar relocation bracket installed. This also requires a few more rivets to be drilled out to remove the old mount~ 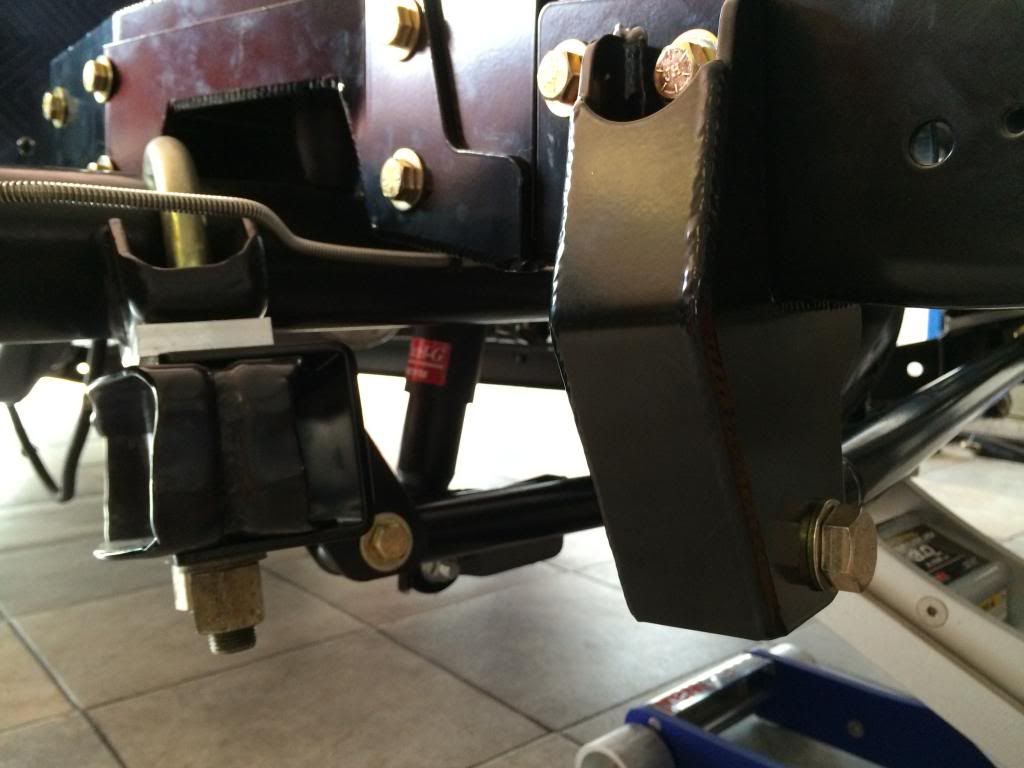 Shot of lower shock relocator cross member and Trac Bar from another angle. The lower shock cross member runs from u-bolt to u-bolt between the trailing arms, with the passenger side having a dual mount/pivot point for both the crossmember and the trac bar ~ 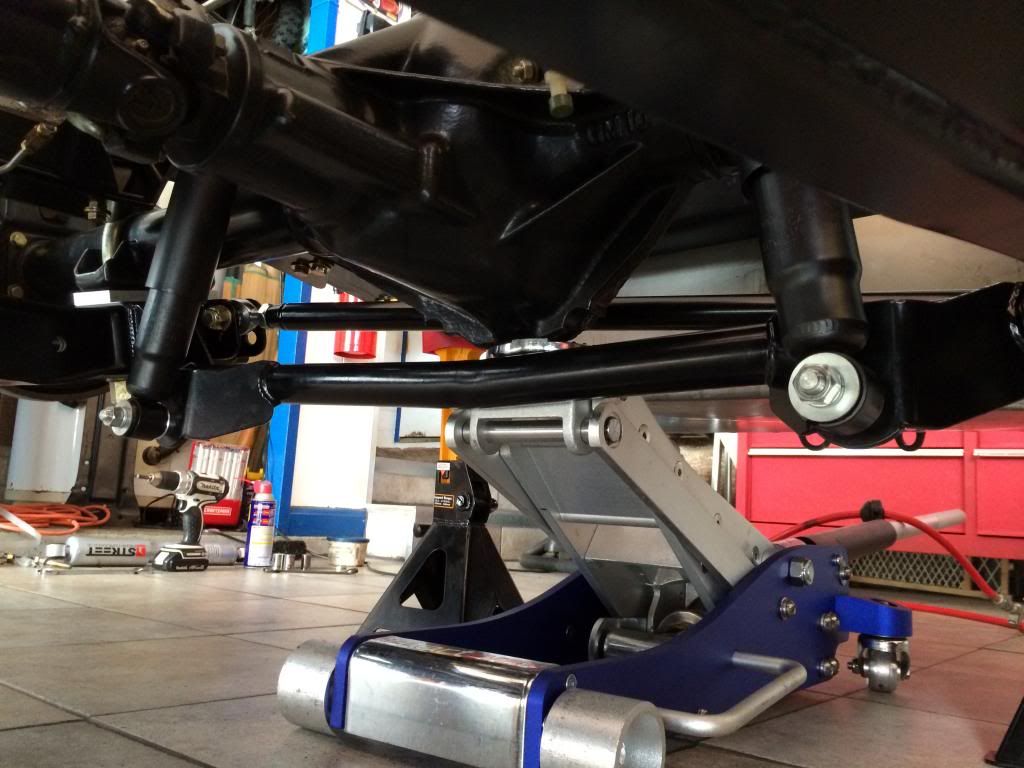 Passenger side trailing arm crossmember/trac bar mount~ 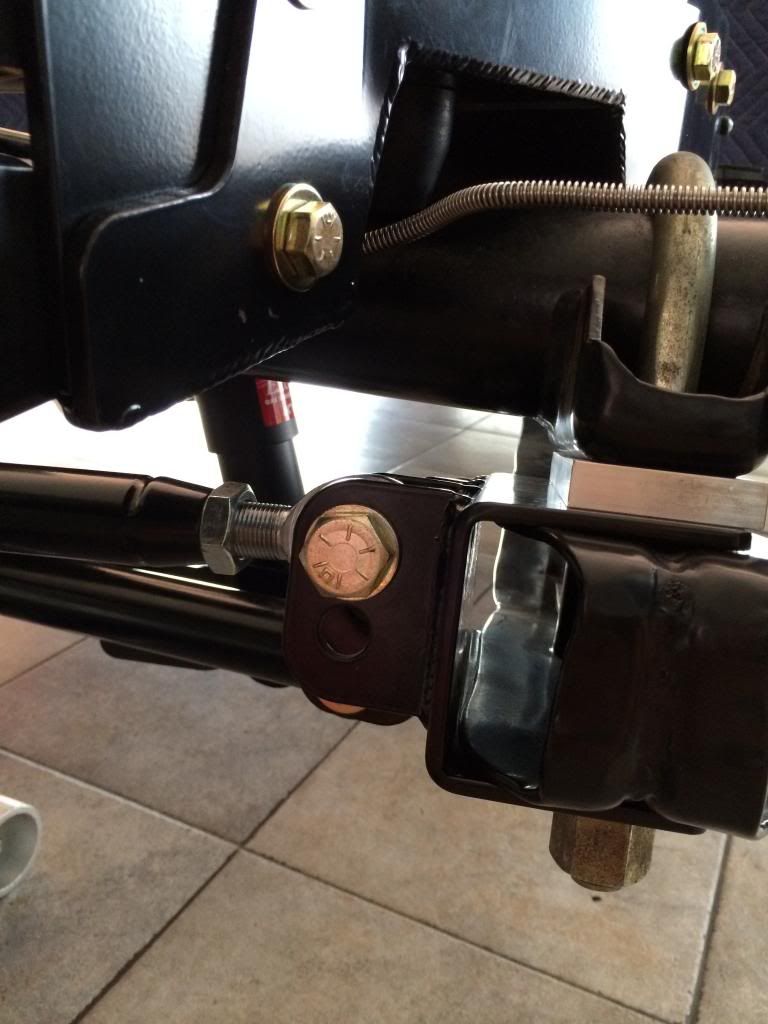 Another reference shot of the lower crossmember spacing to the axle pumpkin~ 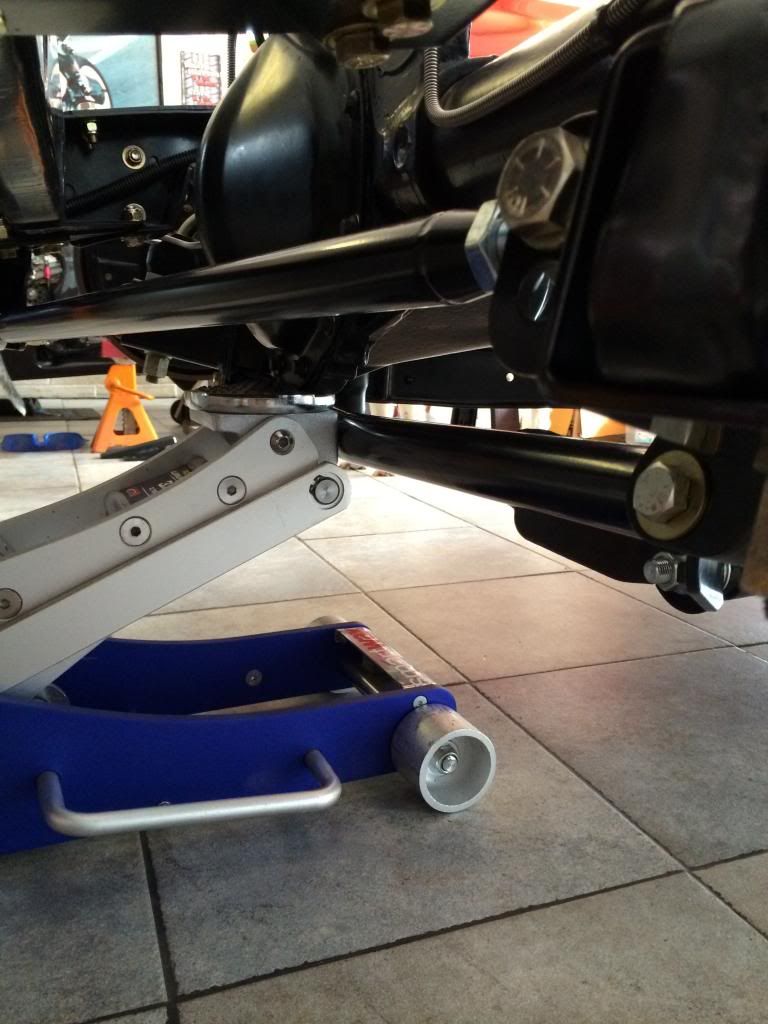 Another shot of the completed PB Stage 2 Rear~ 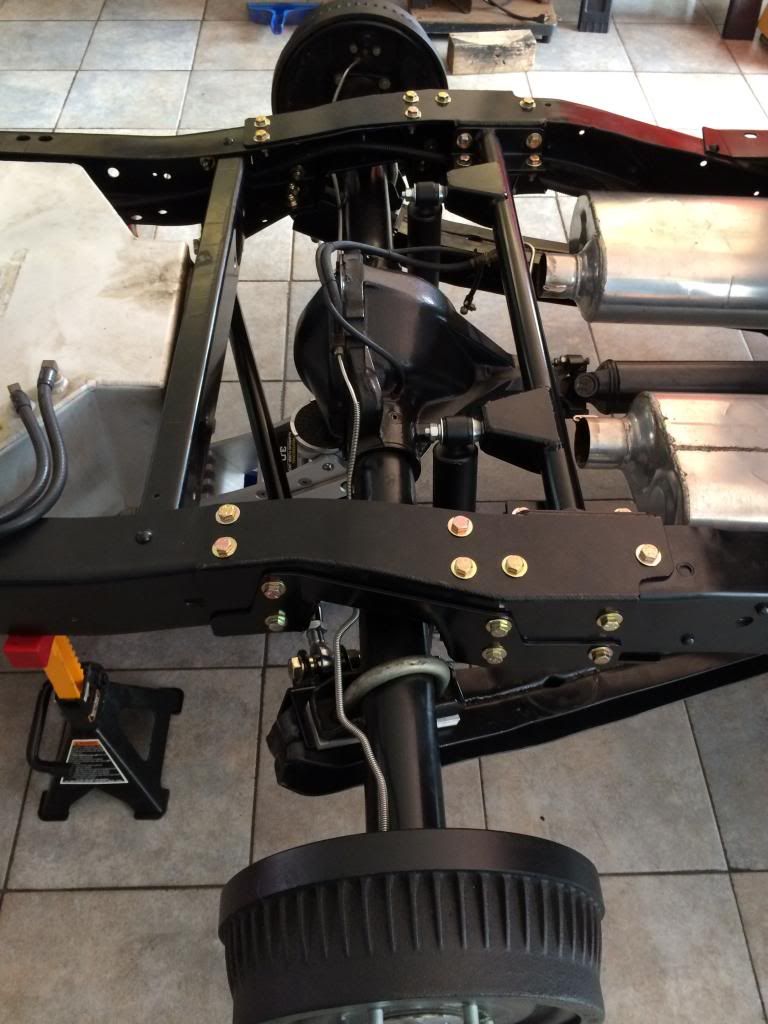 Wheels mounted and clearance testing. The axle is just touching the bump stop in this pic. It is just as well since the pumpkin is just about at frame height give or take the slight gap between the frame and bed. Any lower and the pumpkin would hit the bed floor. This will be confirmed once the bed is back on~ 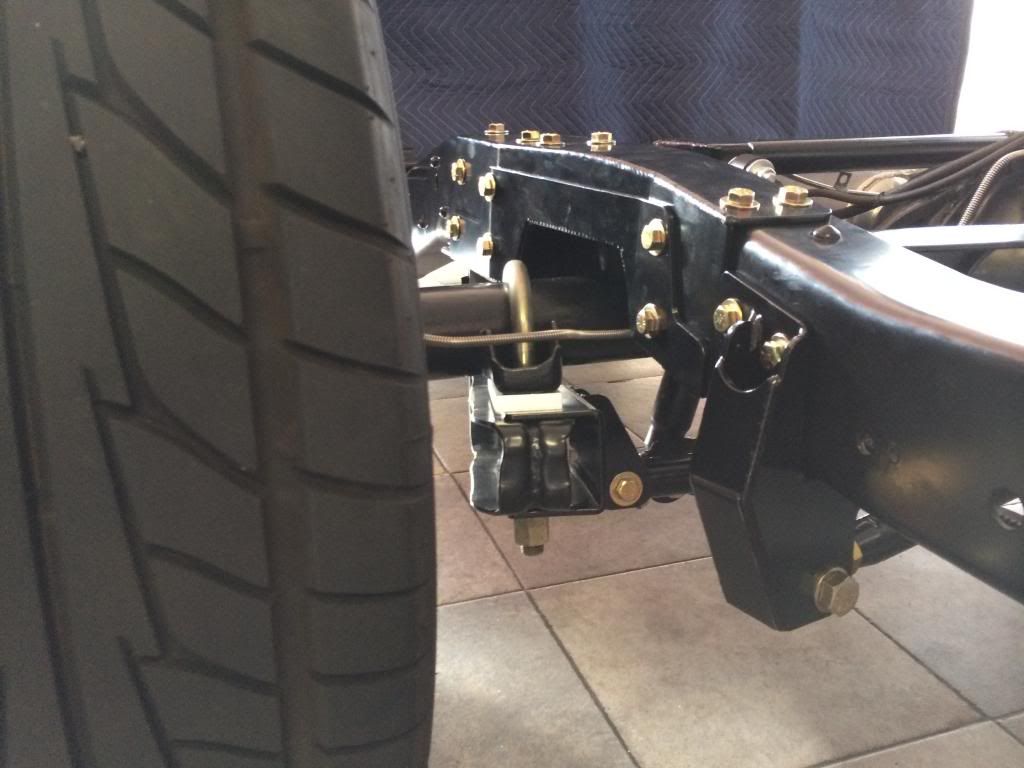 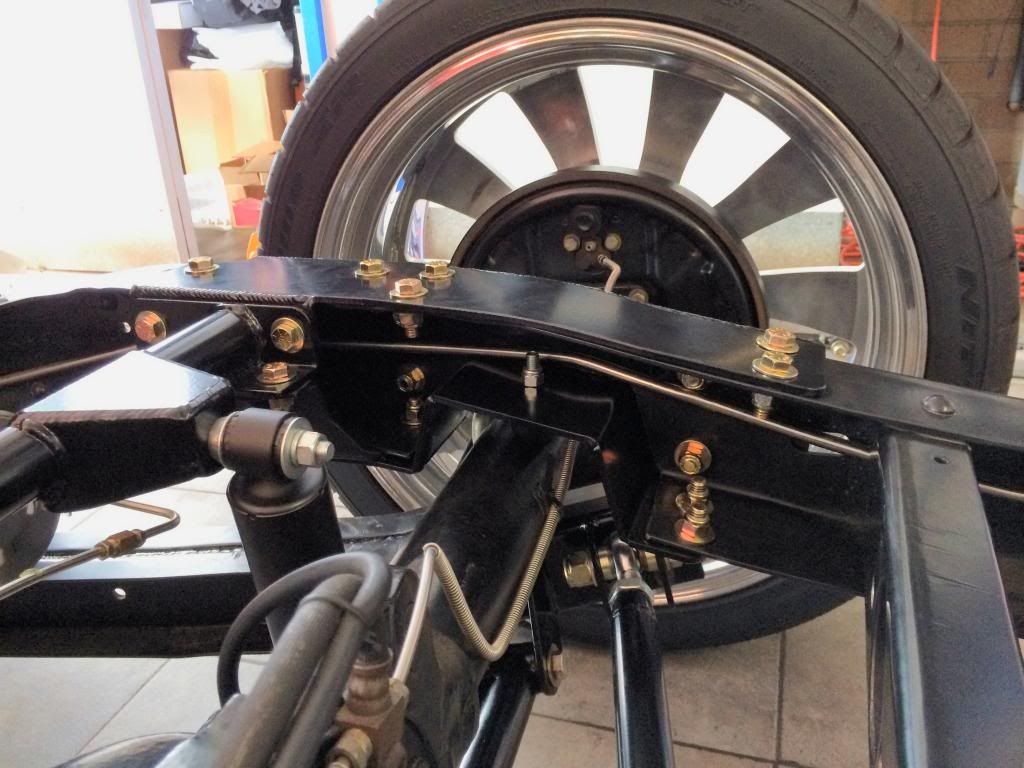 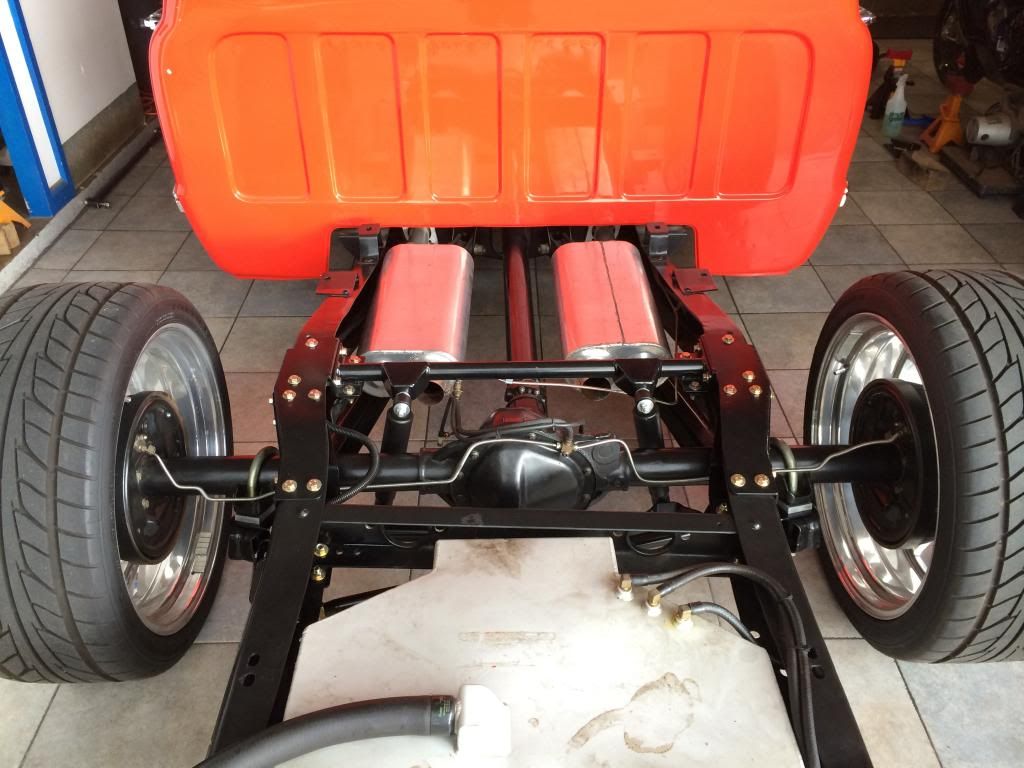 Although I should have took a quick frame to ground measurement before I notched it for height reference, i missed the chance so unfortunately, I won't be able to tell or show how much lower the truck sits and how much the wheel now tucks in the fender until the bed goes back on. For the sake of not making too long of a single post, I'll break this up into two instead of one long ass one. Stay tuned for the front arms and bags installation pics... |
|
|

|
|
|
#2 |
|
Registered User
 Join Date: Dec 2006
Location: Toms River, NJ
Posts: 5,518
|
Re: My Porterbuilt Experience...
First off I have to say that you have a beautiful truck. I love the color combo of the Red with the white grill. I'm really thinking about painting mine the same. You definitely chose right going with Porterbuilt and can't wait to see the final pics of your truck aired out. I'm very happy with my Porterbuilt purchase and even though I did go with dropmembers, the install was very straight forward with hardly any modifications needed besides a little welding for the rear bag mounts. This is a testament to how well the Porterbuilt products are made, everything fits as advertised.
Like you said though, going with dropmembers does make you have to raise your bed floor, change to different inner fenders and relocate your battery. It isn't for everybody and I think you made a great choice with your kit. I haven't driven my truck yet but from everything I read and hear you will love the way it drives. Nice job with the install pics, keep it up. Can't wait to see it finished.
__________________
Keith 66 Suburban Burb Build Thread: http://67-72chevytrucks.com/vboard/s...d.php?t=751361 IG: bennett68c10 |
|
|

|
|
|
#3 |
|
Registered User
 Join Date: Dec 2010
Location: N.E. Florida
Posts: 215
|
Re: My Porterbuilt Experience...
Beautiful truck.
And thanks for the post. I do wish PB would include instructions with their parts for those of us who aren't as well versed in where everything goes. I will be installing my PB stage one rear and adj trac bar soon. (Will be followed by stage 1 front soon after and maybe control arms). Will use your thread plus others for the locations and orientation of all the parts. So thank you for doing it!
__________________
1970 Shortbed 2wd C-10 |
|
|

|
|
|
#4 |
|
67-72 parts collector,…
 Join Date: Nov 2002
Location: Mid-MO
Posts: 22,703
|
Re: My Porterbuilt Experience...
Excellent thread!
Thanks for taking time to document each process with text and photos. I run between 40-50 psi in my rear bags on my 2wd blazer. Please post up some photos at ride height when you are done. I found I needed 2" lowering blocks on my blazer. Not to allow it to lay out more,... but to allow a lower ride height with the correct amount of air in the Slam Specialties RE-7 rear bags. Beautiful truck. We definitely need more "before" pictures of the entire truck!
__________________
Keith Convert to disc brakes. http://67-72chevytrucks.com/vboard/s...d.php?t=444823 |
|
|

|
|
|
#5 |
|
Senior Member
 Join Date: Mar 2011
Location: West Plains, Missouri
Posts: 7,559
|
Re: My Porterbuilt Experience...
Mac, thanks for posting this info, it will be a great help to people wanting to know how things fit. Will be waiting for the second part...Jim
__________________
my build thread: http://67-72chevytrucks.com/vboard/s...d.php?t=459839 Jimbo's long bed step build:http://67-72chevytrucks.com/vboard/s...t=464626<br /> |
|
|

|
|
|
#6 |
|
Tot Roddin'
Join Date: Apr 2005
Location: Mid-MO
Posts: 24,461
|
Re: My Porterbuilt Experience...
Awesome build. Can't wait to see some more before pictures.
__________________
-Nate  1969 CST SWB - Project Blank Slate (4.5/6" ECE Static Drop, 6-lug disc brake upgrade (manual), Billet Specialties Vintec 20x8.5 255/40 (F) 20x10 295/40 (R), 250 I-6) 1960 AMF Skylark - Tot Roddin' (Lowered with custom frame; soon to include custom push bar and interior) 2008 Silverado CrewCab 1LT (5.3L, 3:73, 4x4, LT1, Z-71, Towing Package) |
|
|

|
|
|
#7 | ||||
|
Senior Member
 Join Date: Nov 2010
Location: Honolulu Hawaii
Posts: 313
|
Re: My Porterbuilt Experience...
Quote:
It's great to hear your satisfaction and positive experience with PB as well. I can't agree more on the quality, fitment, and ease of installation with these parts. I actually thought to myself, 'if all of the PB components fit this well and are this easy to install, going to a full dropmember wouldn't be so initimidating'.  Alas, my better judgement got the best of me and I stopped myself from going further into that train of thought (till later, at least...). For now, I'm very happy with the 'mild' set up. I'll definitely have to check out your PB build as well so when the time comes for the dropmember upgrade, I'll know who to ask. Alas, my better judgement got the best of me and I stopped myself from going further into that train of thought (till later, at least...). For now, I'm very happy with the 'mild' set up. I'll definitely have to check out your PB build as well so when the time comes for the dropmember upgrade, I'll know who to ask. Quote:
 Looking forward to your install of your Stage 1 parts. Oh, and just my .02; go with the inch forward arms if you can. Totally worth it! Centers the wheel in the fender well and increases castor. Feel free to ask if you have any questions or need any pics and I'll help you out the best I can! Looking forward to your install of your Stage 1 parts. Oh, and just my .02; go with the inch forward arms if you can. Totally worth it! Centers the wheel in the fender well and increases castor. Feel free to ask if you have any questions or need any pics and I'll help you out the best I can!Quote:
I am running a 1 inch block for my set up as well, just so I can get a little more, as you mentioned, 'useable' bag height when its at drive height. The bag cups help in that area a bit as well(going without the bag cups was an option but it a) required drilling more holes for the airline/mounting holes and b) it would reduce my travel by the amount of the cup, leaving me with less range to play with). As for before and after pics, they will definitely be coming! I'll have a half completed shot without the bed at the end of the second part. Quote:
Thank you! Its a huge compliment coming from you! I've read through your entire build and was truly inspired by it, as I'm sure were many others. Whats funny is your truck was actually the nagging angel on my shoulder to keep it at a clean, simple, static drop.  I kept going back and forth whether to go lower or keep it at the static height. There are so many perfectly stanced static dropped 4/6, 5/7 trucks on here and I too was trying to leave well enough alone, but seeing awesome trucks like Sylvester go down just that extra couple of inches on bags sealed the deal for me. And with PB having such a bulletproof reputation for quality, it wasn't too difficult for me to pull the trigger and go with the devil on my other shoulder. I kept going back and forth whether to go lower or keep it at the static height. There are so many perfectly stanced static dropped 4/6, 5/7 trucks on here and I too was trying to leave well enough alone, but seeing awesome trucks like Sylvester go down just that extra couple of inches on bags sealed the deal for me. And with PB having such a bulletproof reputation for quality, it wasn't too difficult for me to pull the trigger and go with the devil on my other shoulder. I'll definitely be posting up the before/after pics once the bed goes back on. In the meantime, I'll post up a bed-less stance shot of the completed PB suspension install with the bags installed. 
|
||||
|
|

|
|
|
#8 |
|
Registered User
 Join Date: May 2007
Location: Deale Md
Posts: 4,663
|
Re: My Porterbuilt Experience...
nice write up but where's the hula grill ( the little one that you see on the dash )

__________________
James 63 GMC V6 4speed carryall 65 chevy swb bbw V8 auto 68 K20 327/4 speed, buddy buckets 2002 GMC CC Dually Duramax 64 GMC lwb 3/4 V6 4speed SOLD 66 GMC swb bbw buddy buckets SOLD IG duallyjams The only thing that stays the same is constant change! |
|
|

|
|
|
#9 |
|
Senior Member
 Join Date: Nov 2010
Location: Honolulu Hawaii
Posts: 313
|
Re: My Porterbuilt Experience...Part 2: PB Stage 1 Front with Inch Forward Arms
Thanks for all the comments and replies on Part 1 guys! Here goes Part 2!
On to the front! OEM control arm setup CPP 2 inch drop spindles(to accomodate the Wilwood brakes), ECE 3 inch drop springs and BellTech shocks. Note: It helps to specify the type of spindle you are running when ordering the arms so that the correct ball joints are sent with the new arms~ 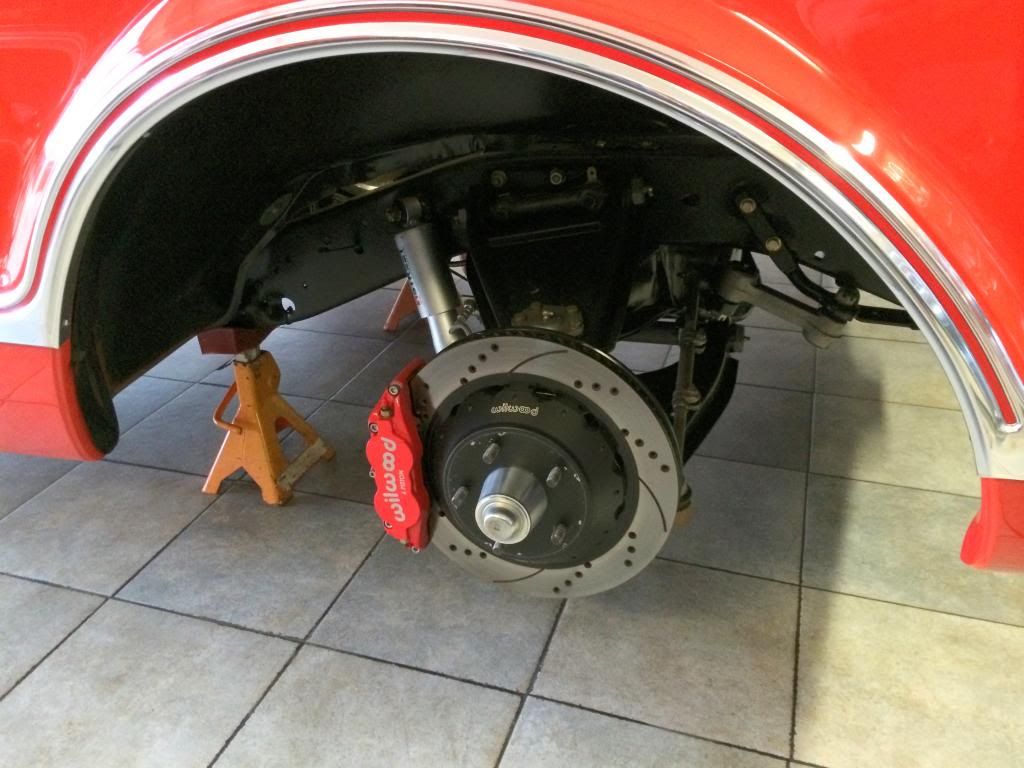 Out with the old and in with the new Porterbuilt Inch forward Lower Control Arms. All parts were powdercoated Satin black to match my frames coating. The PB parts are works of art and would look just as good unfinished or pc'd ~ 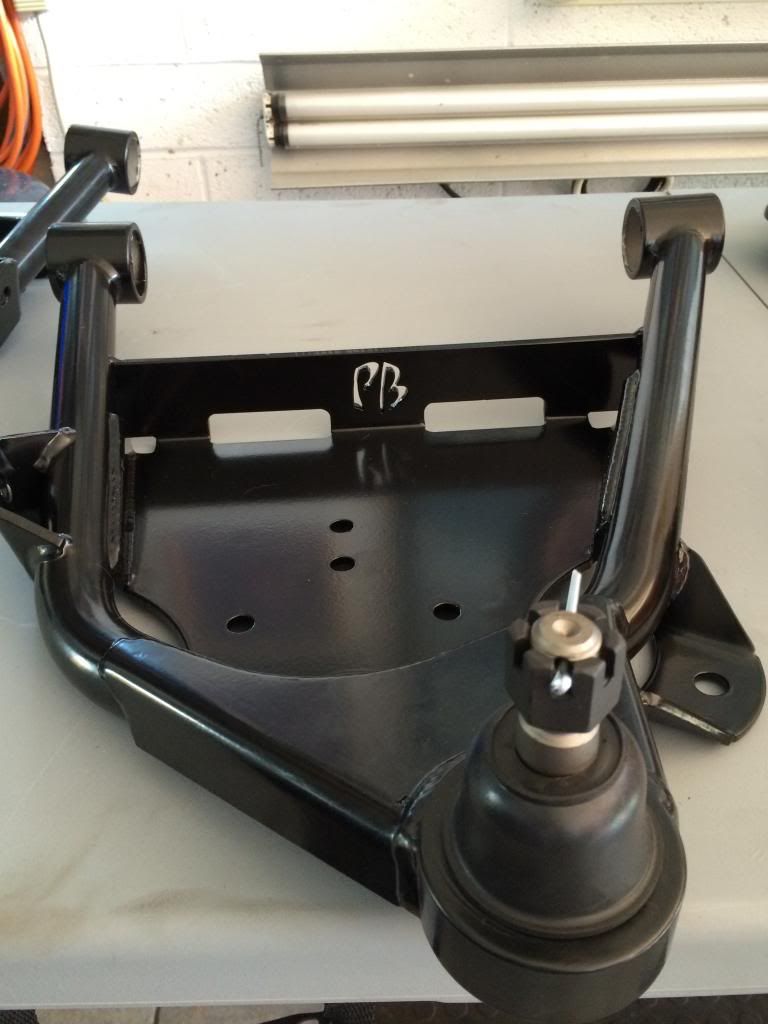 Side by side comparison with OEM lower arm~ 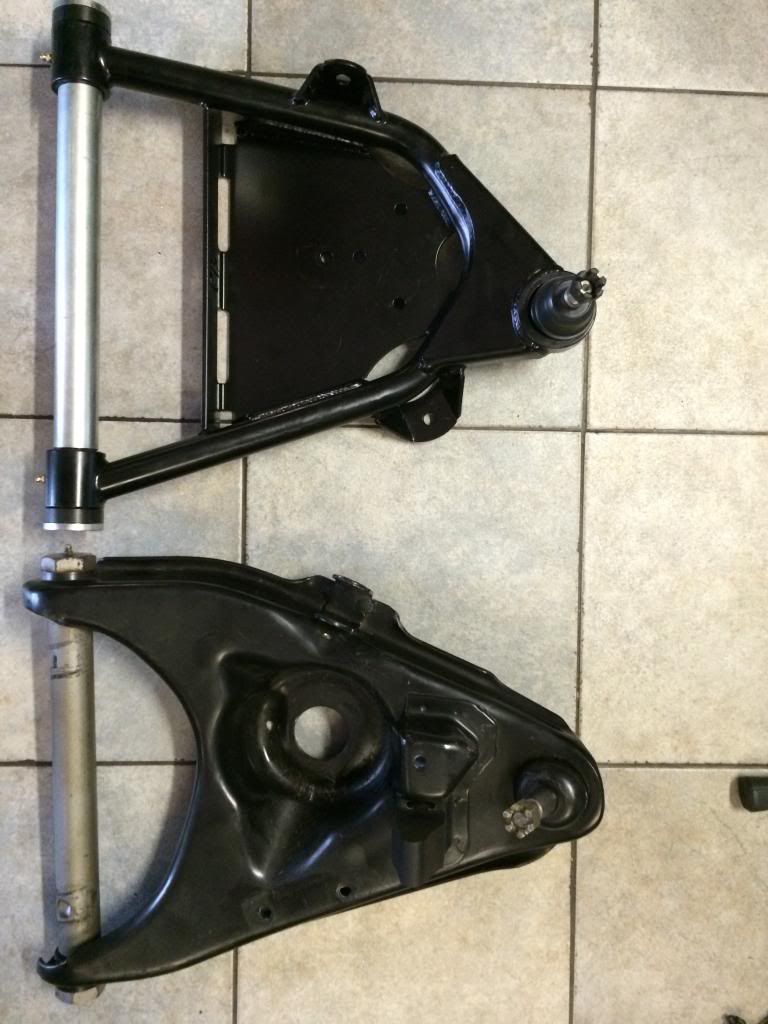 Front Airbag mounting plate to be attached to front x-member(covers the OEM spring pocket to accomodate the airbag) and the new front shock relocator bracket. More drilling! ~ 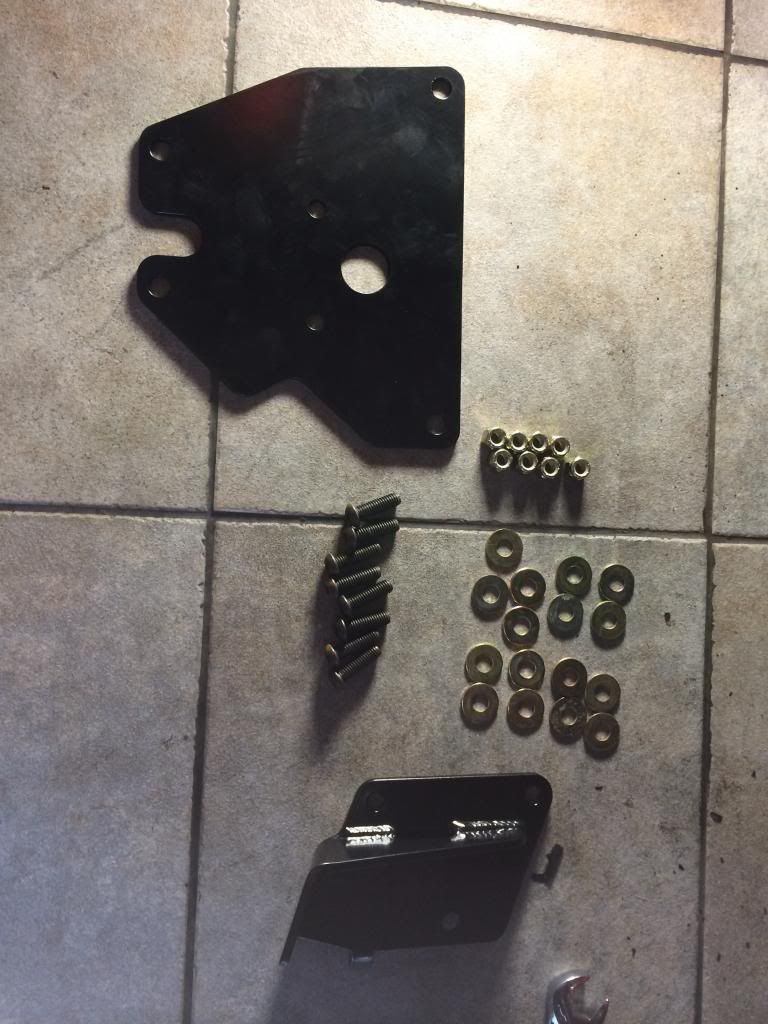 Lower Control Arms removed~ 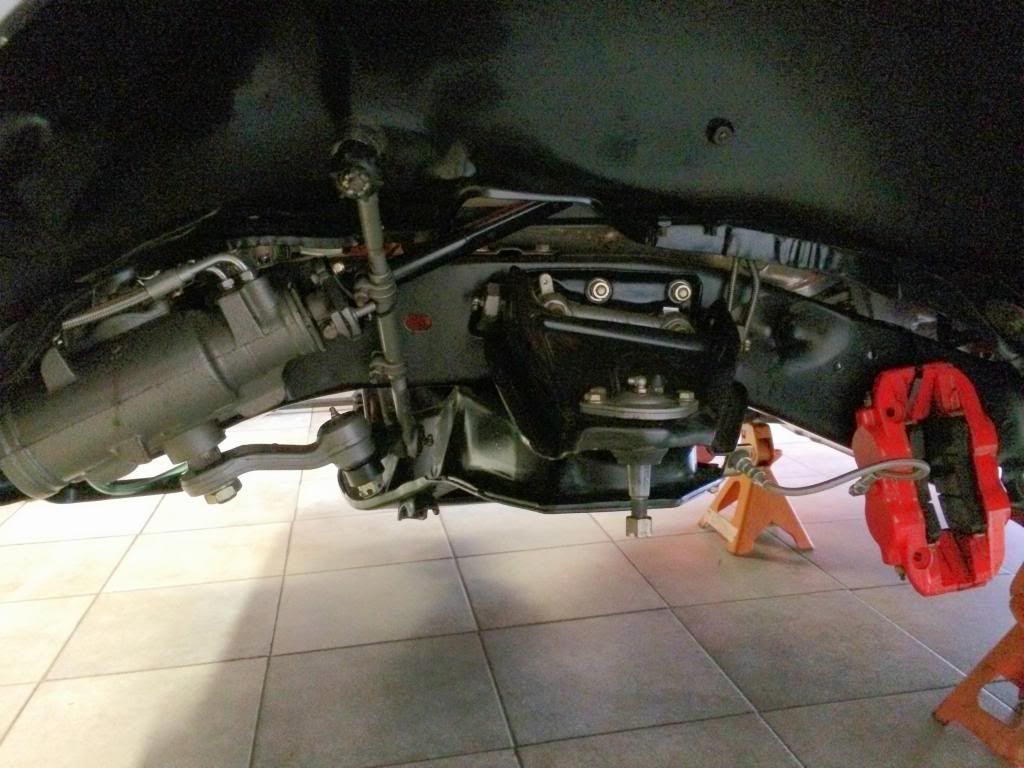 Upper Control Arms installed. I reinstalled the alignment shims to the OEM settings but I think the alignment values will be significantly different with the new arms anyway so it isn't critical to replace the shims as they were. I've seen a thread where someone found that the PB arms didn't clear the OEM x-members hump between the two pivot points and the cross shaft was hitting and preventing it from being attached but I found no such issues with my install. There is enough of a a gap to go without any shims temporarily till a new alignment can be done~ 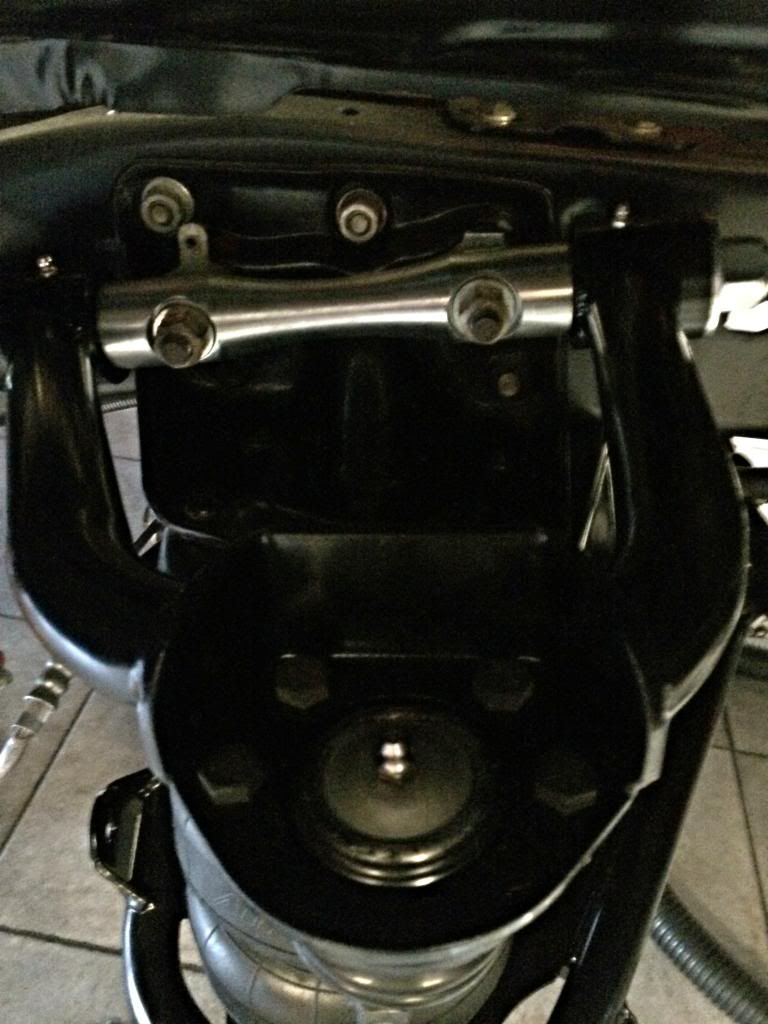 Airbag and Upper plate mounted up. Ready for the spindle and brakes to go back on~ 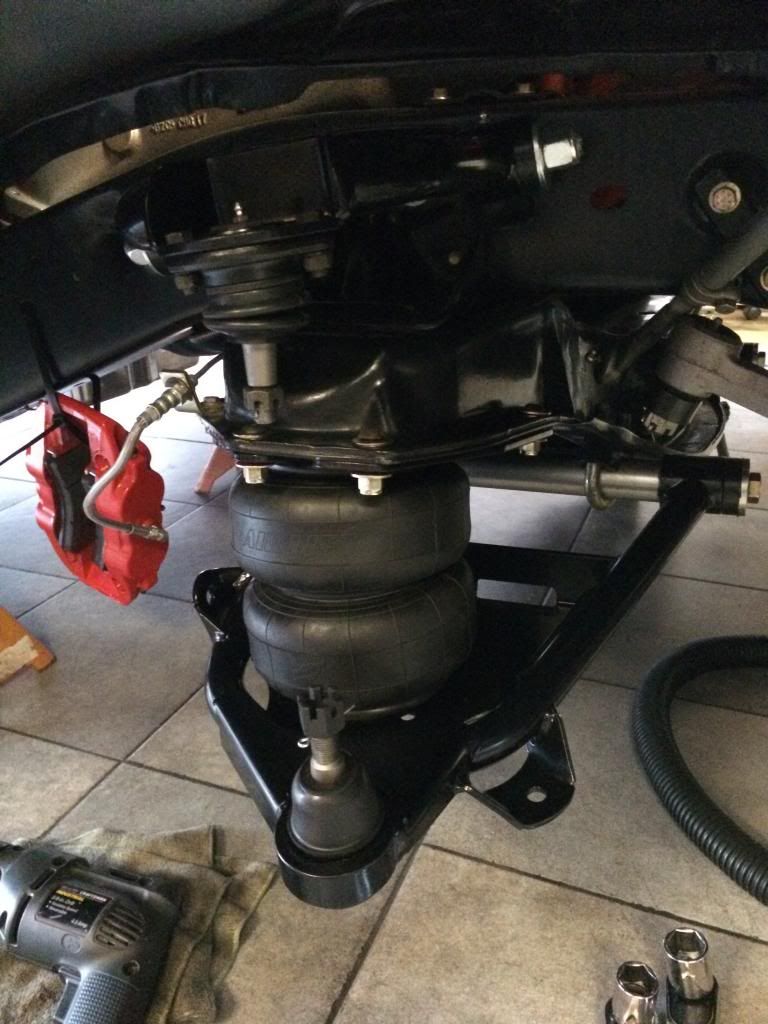 Quick note: In this pic you can see the upper bag plate mounting bolts with the button head on top, nut on bottom. This must be flipped around. Be sure to face the heads of the button head bolts down toward the bags with the nuts on top so that it reduces the risk of cutting into the bags. I flipped mine around after it was all mounted up just for peace of mind(and probably because that's the correct way to do it). There's quite a bit of clearance around the circumference of the bag so technically it would've been fine as is, but there's probably a good reason they provide smoother button head bolts for this part of the application~ 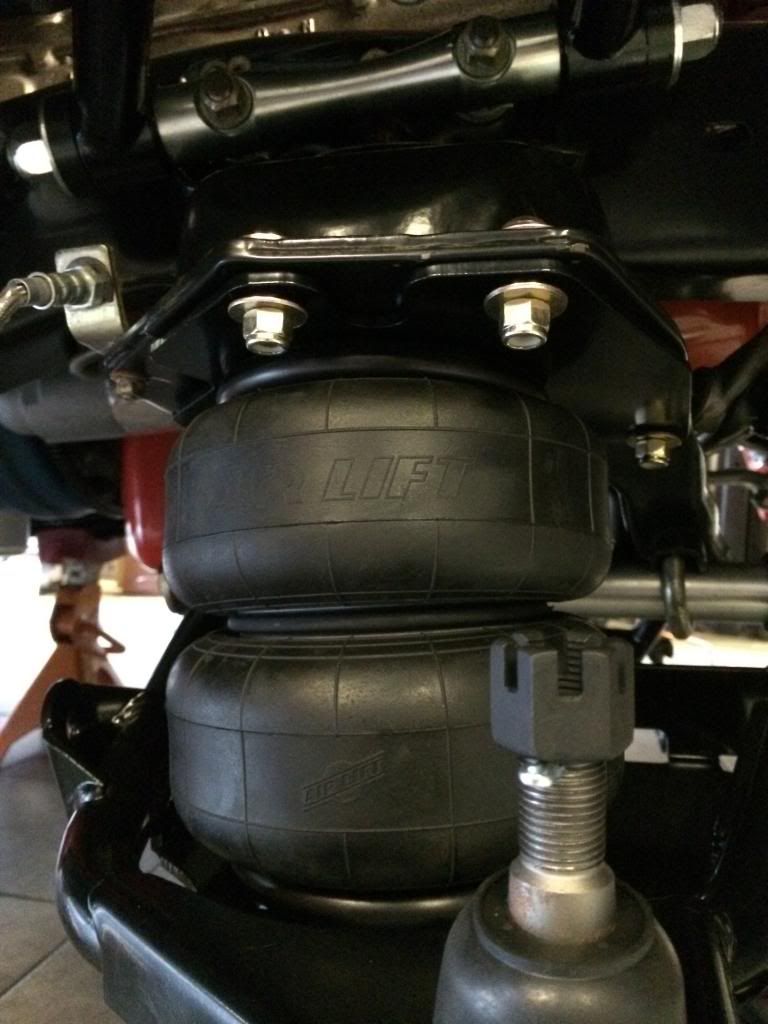 Spindle and brakes installed. At this point it might be a good idea to adjust the steering arm to correct the toe. I found that the new arms gave a severe toe-in position so I eye balled both sides to get the rotors as straight as possible ~ 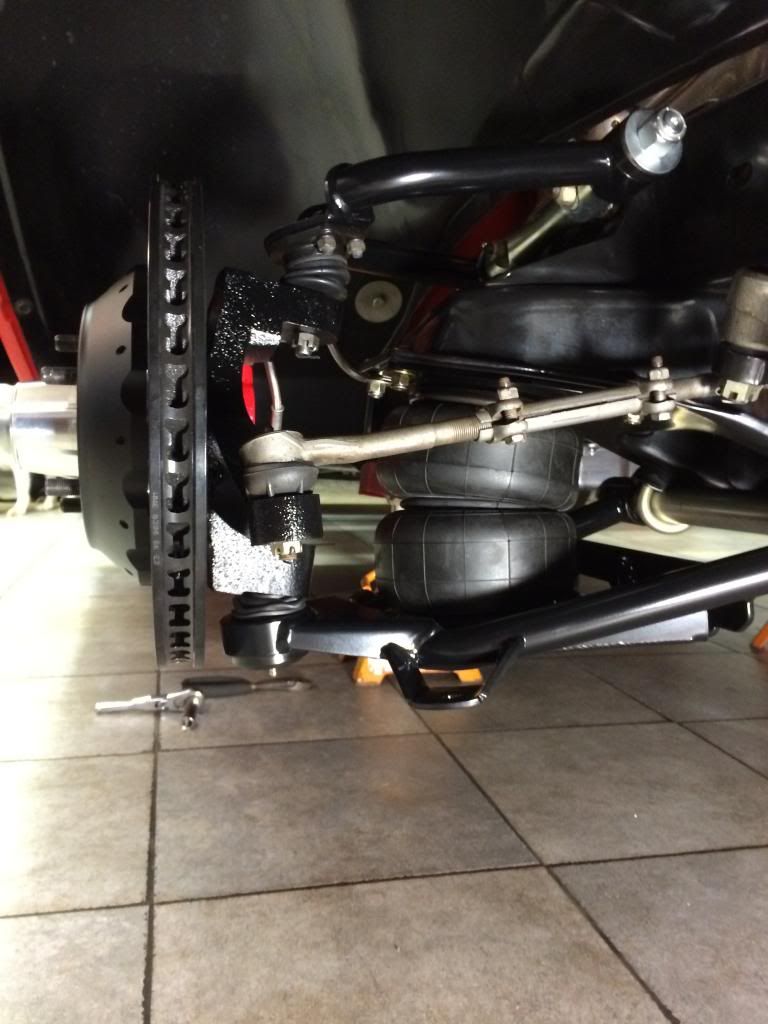 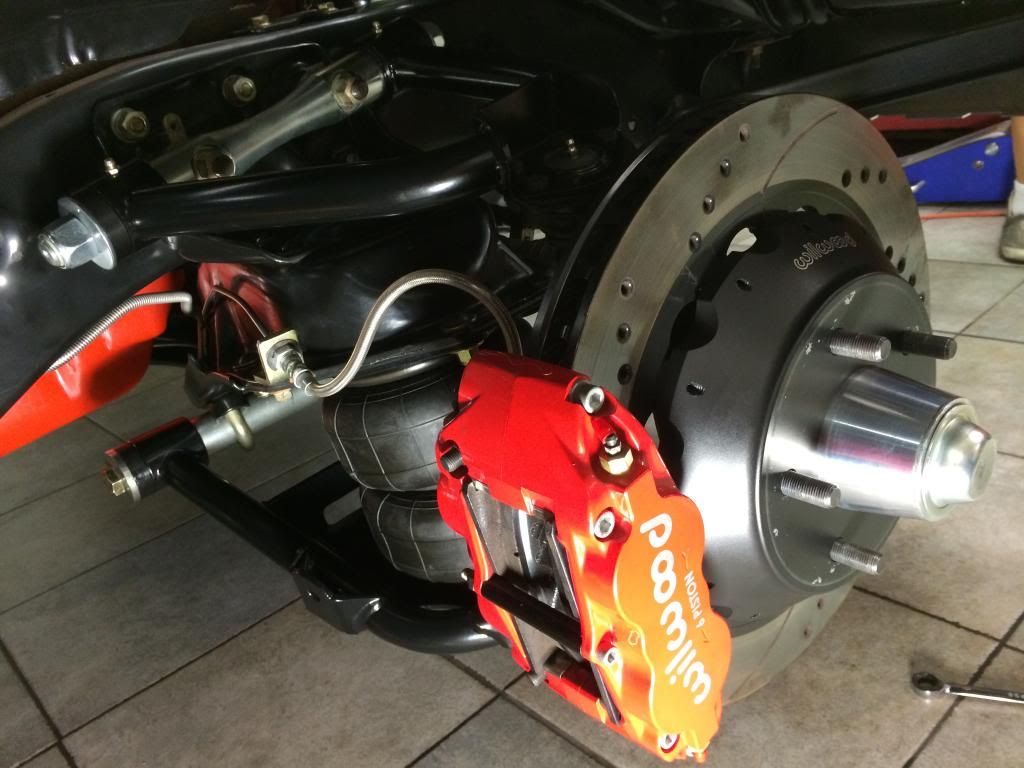 Correct installation of the aforementioned upper bag plate mounting hardware(button head down towards bags) 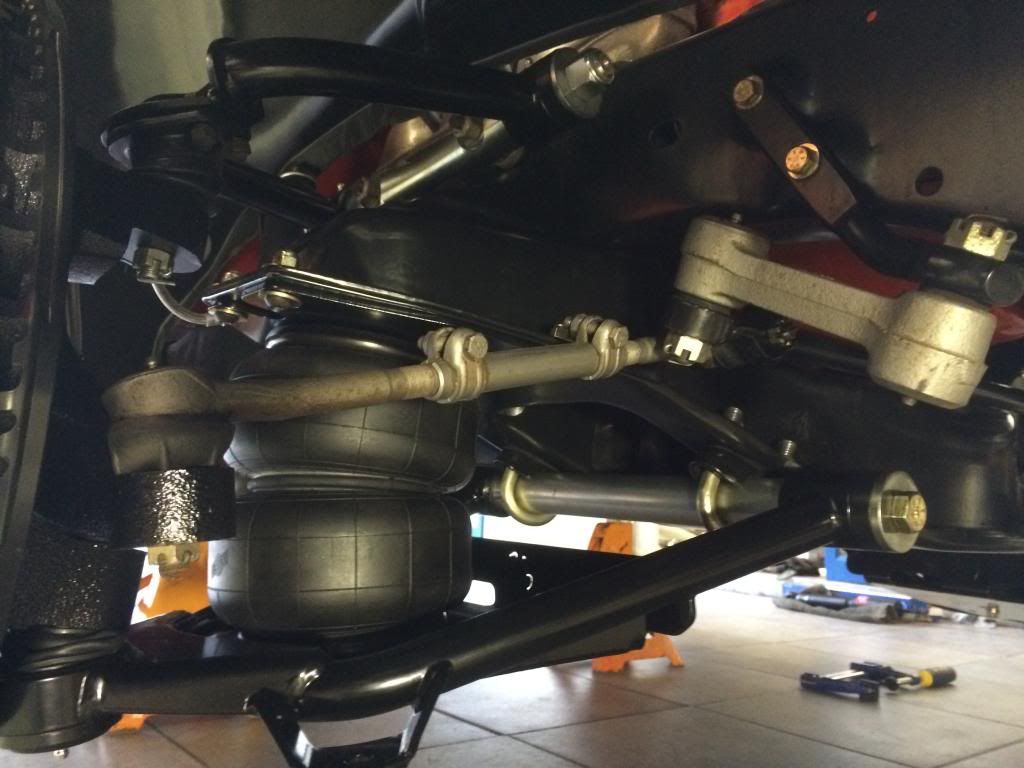 Completed front with new KYB Excel G shocks installed. Ride impression of these vs. the previous Belltech and KYB GR2's to come~ 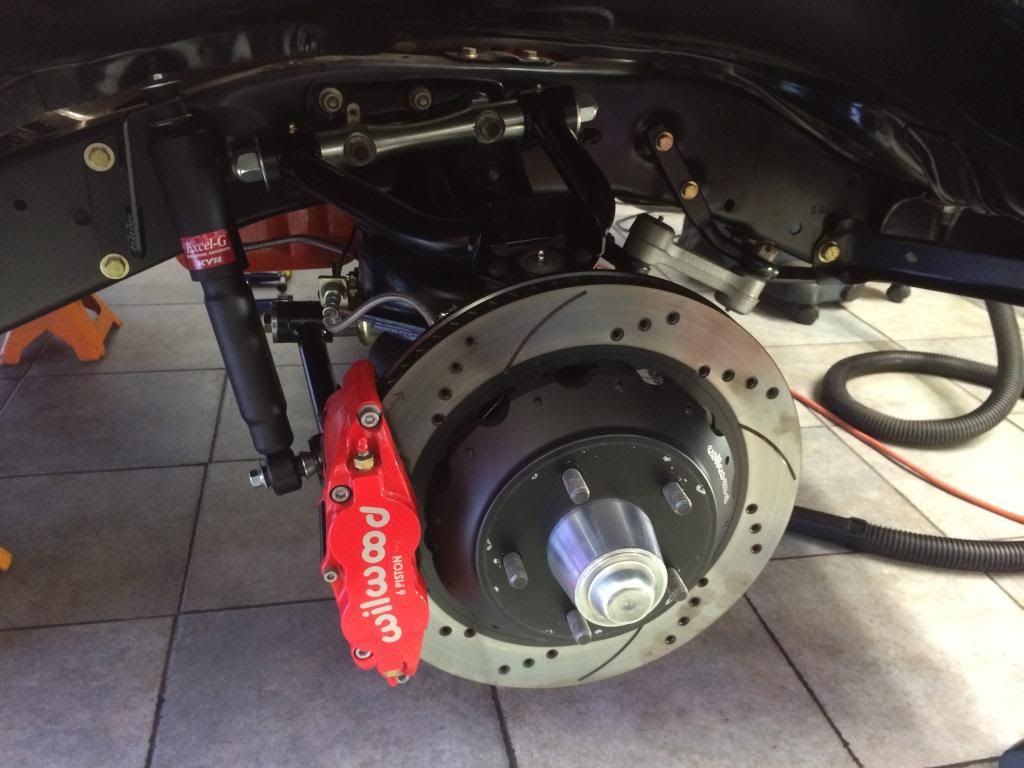 Since the airlines were not hooked up yet at this time, the first trial fit of wheel to fender clearance was done using a jack to lift the arm/wheel into the fender. Just as a side note, this is the stance and tire clearance with a 265/40/22 tire. It is sitting on the tire and this is the max drop that can be achieved with the stock fender. It is just shy of tucking the rim. More on this later...~ 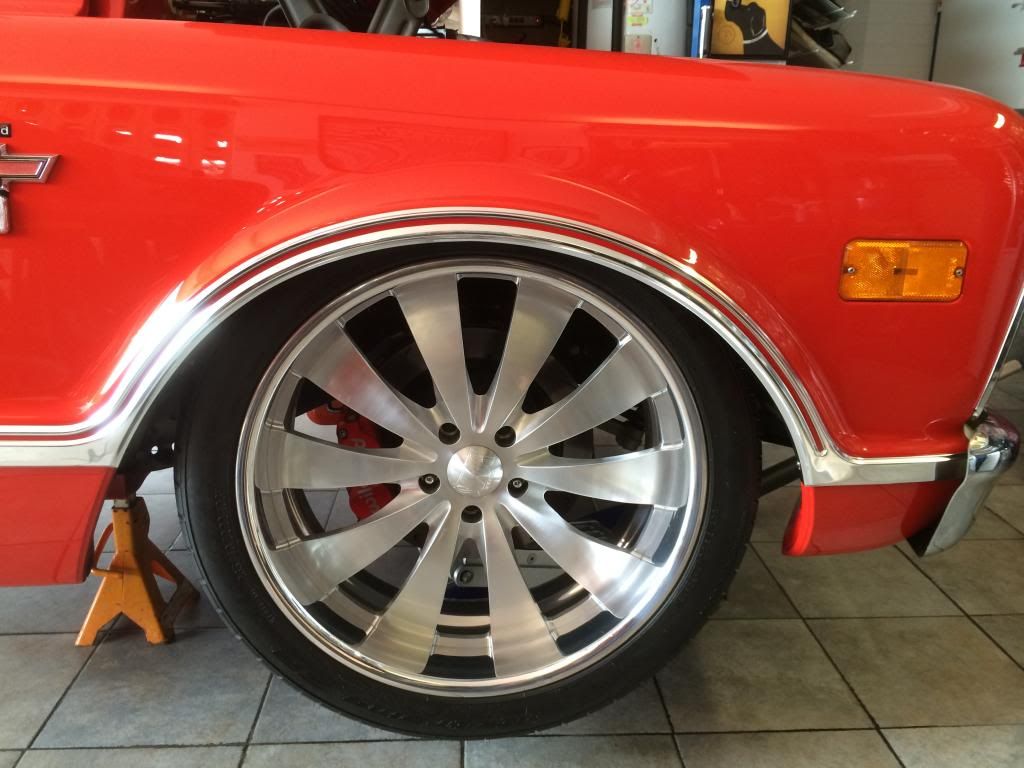 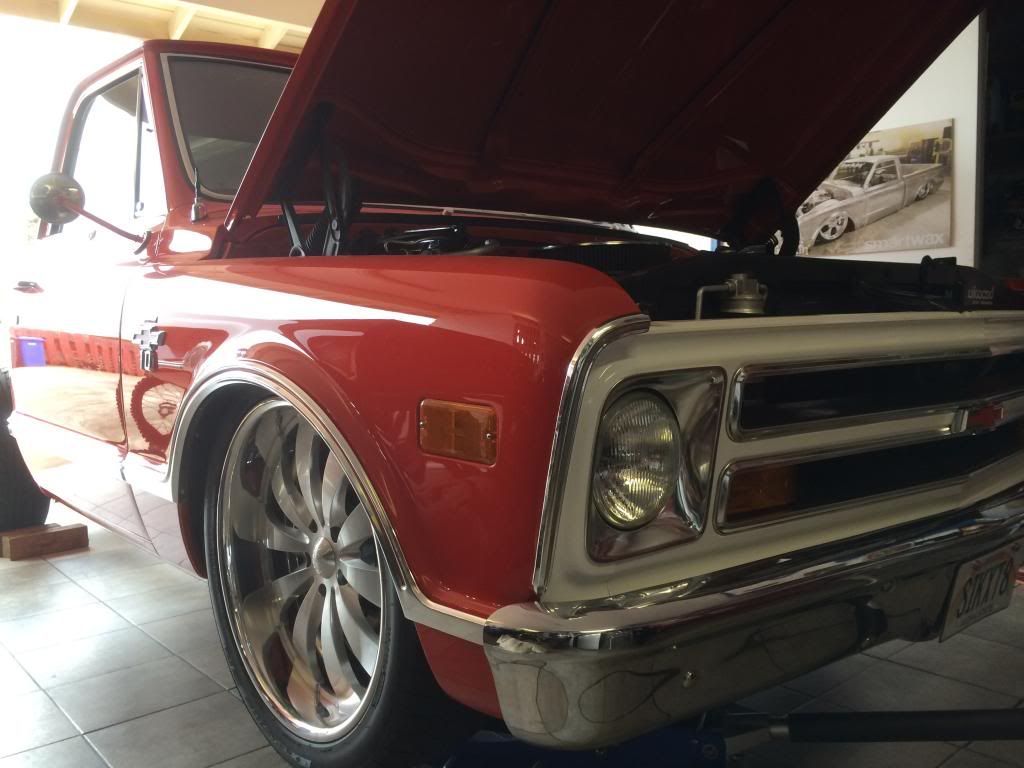 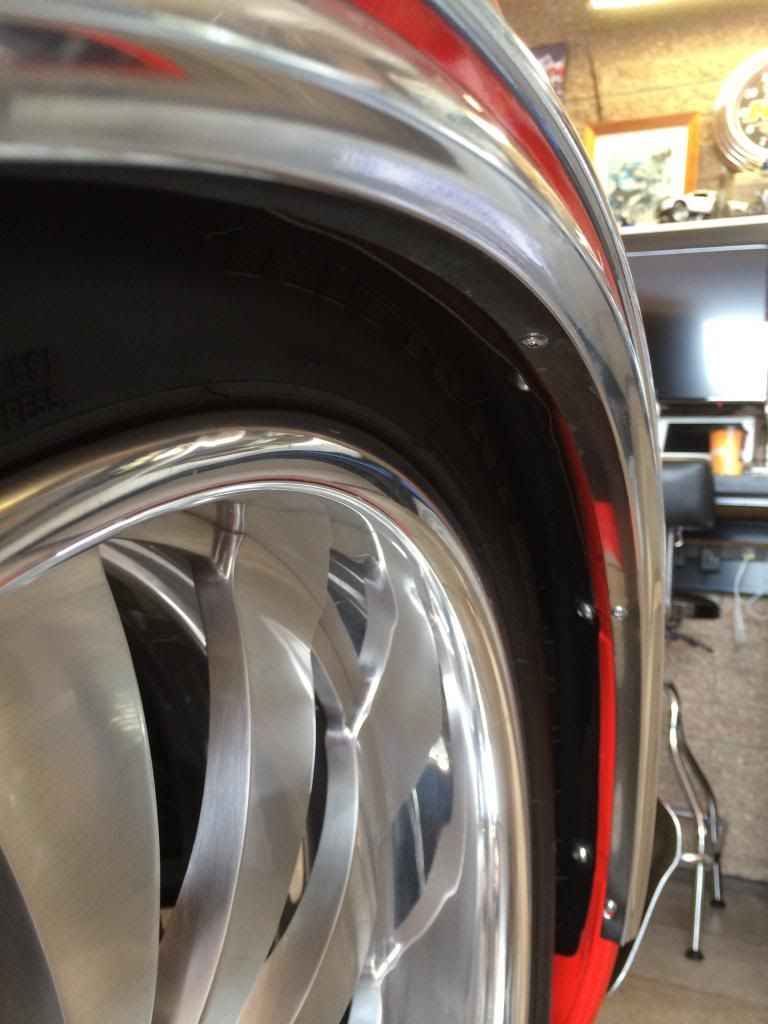 Air management: ACCUAIR eLEVEL system installation~ VU4 and eLevel CPU mounted on rear crossmember. Nice thing about trucks and having the bed off is all the space and access you get to play with. The only down side is I have to lose the tail pipes going out and over the axle and it leaves big gaping holes in the rear x-member. Unless I do a full rear dropmember and run the pipes along the same shape as the notch to get the tail pipe out to the rear, having a tail pipe is out of the question due to axle clearance issues and leaves me with the one option of doing a simple turn down tip right out of the mufflers. Turns out it actually sounds kinda nice!  ~ ~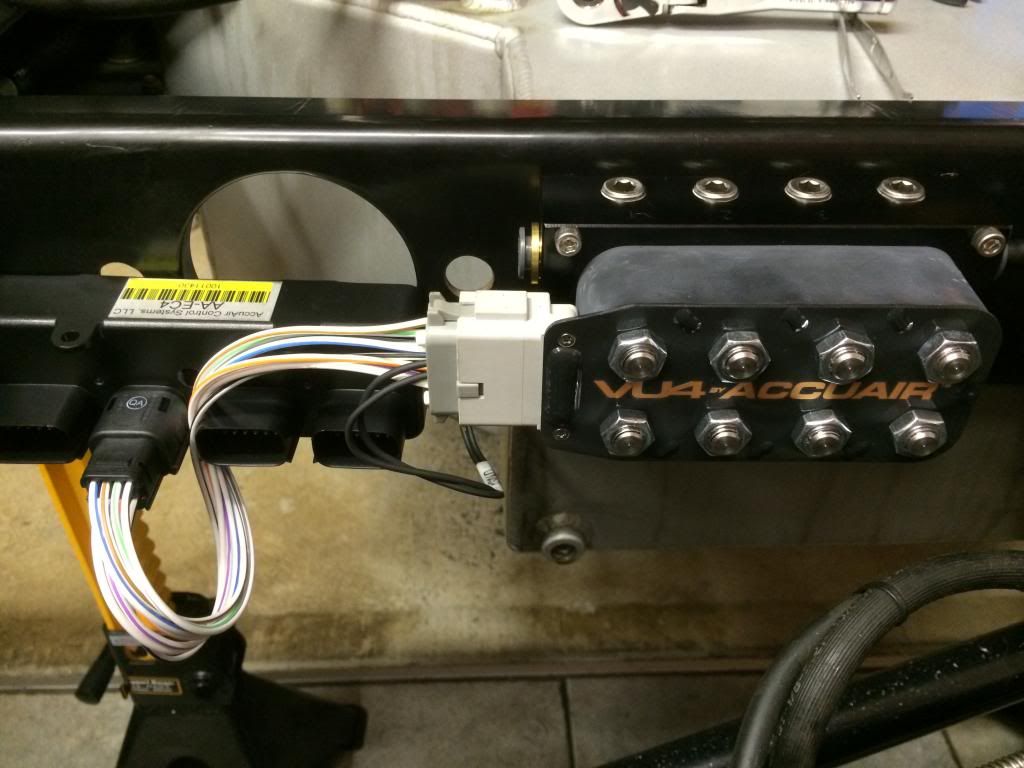 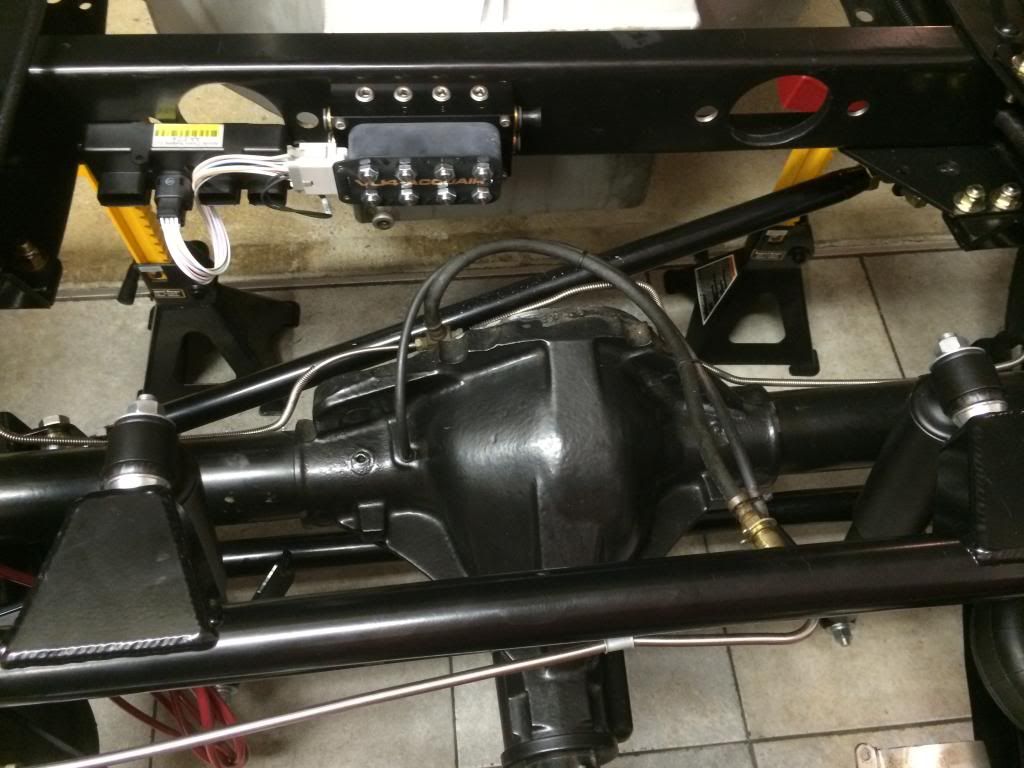 Dual 3 Gallon tanks with dual Viair 400c compressors mounted with eXo mount system~ 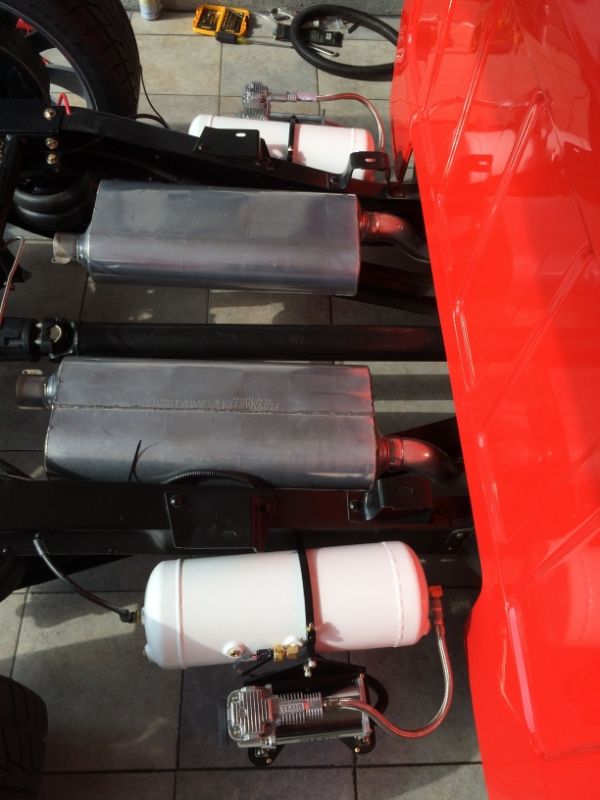 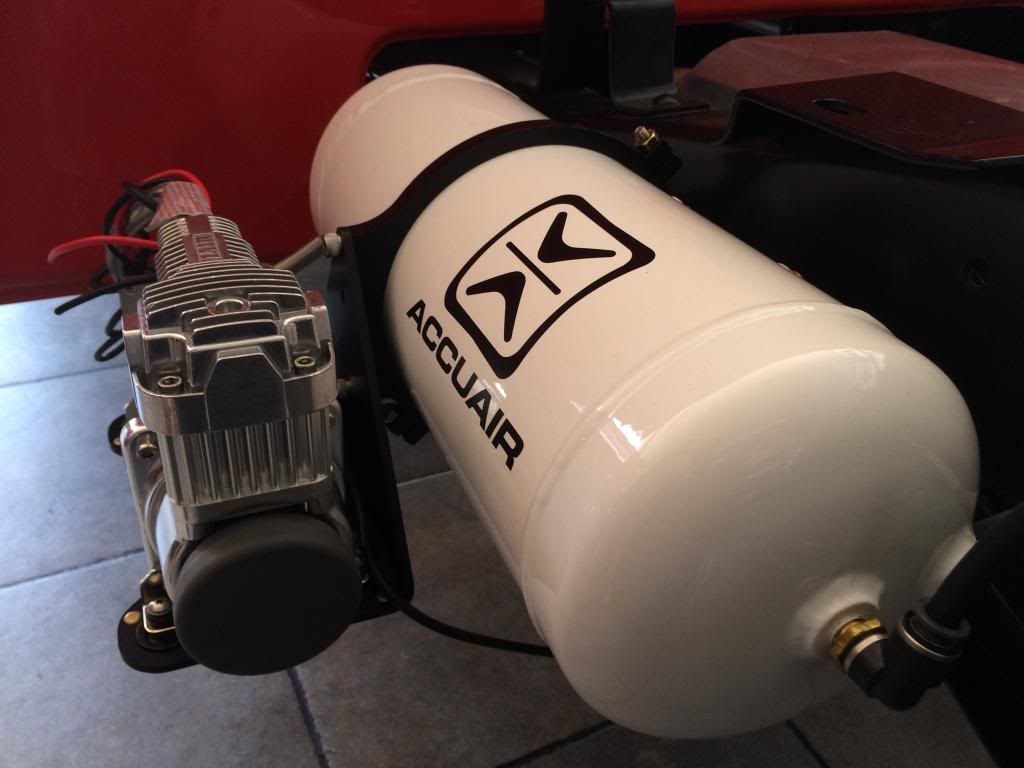 The magic keypad!~ 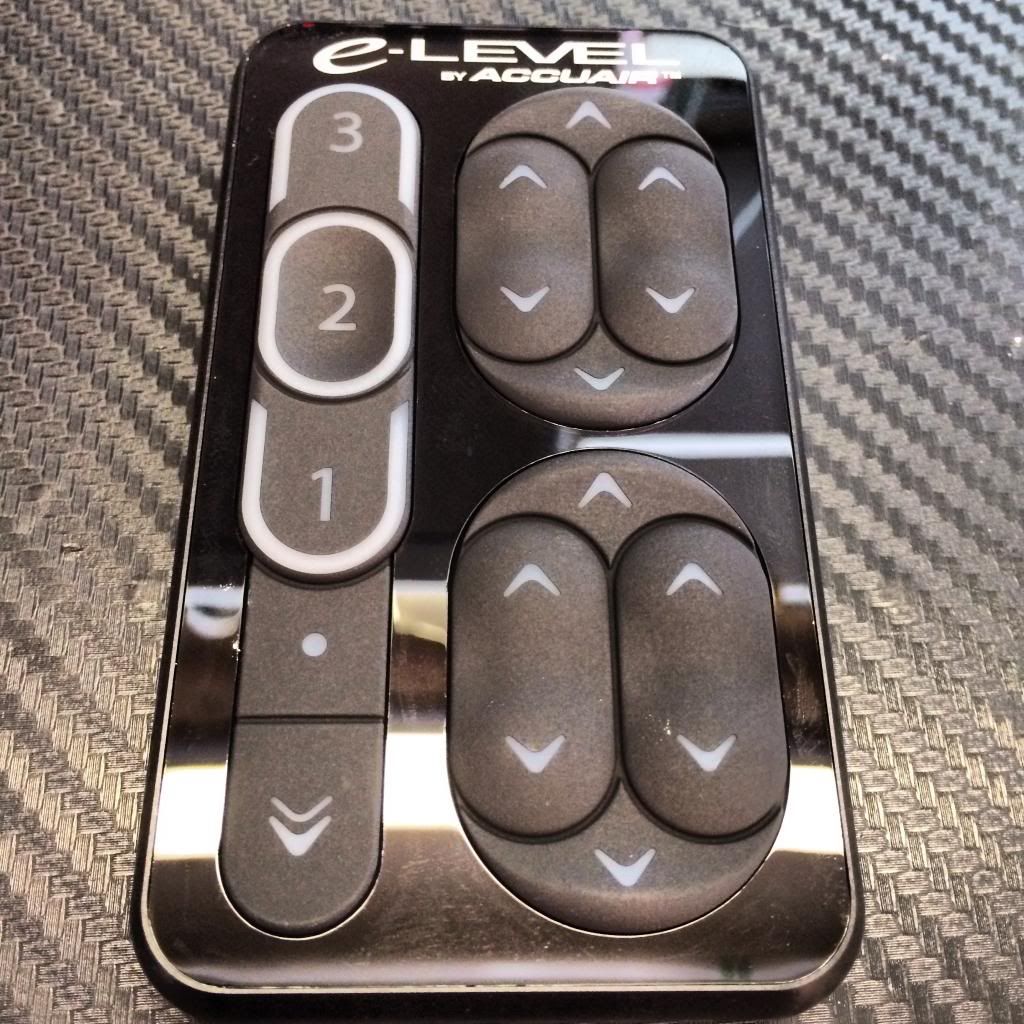 Now with everything finally hooked up and air lines run, wiring connected, the only thing left to do was to address the little issue of gaining another 10mm in drop height. How? Remember the tire in front...? My easy fix was to replace the 265/40 with a 255/30. Here's the difference in how much more it tucks... 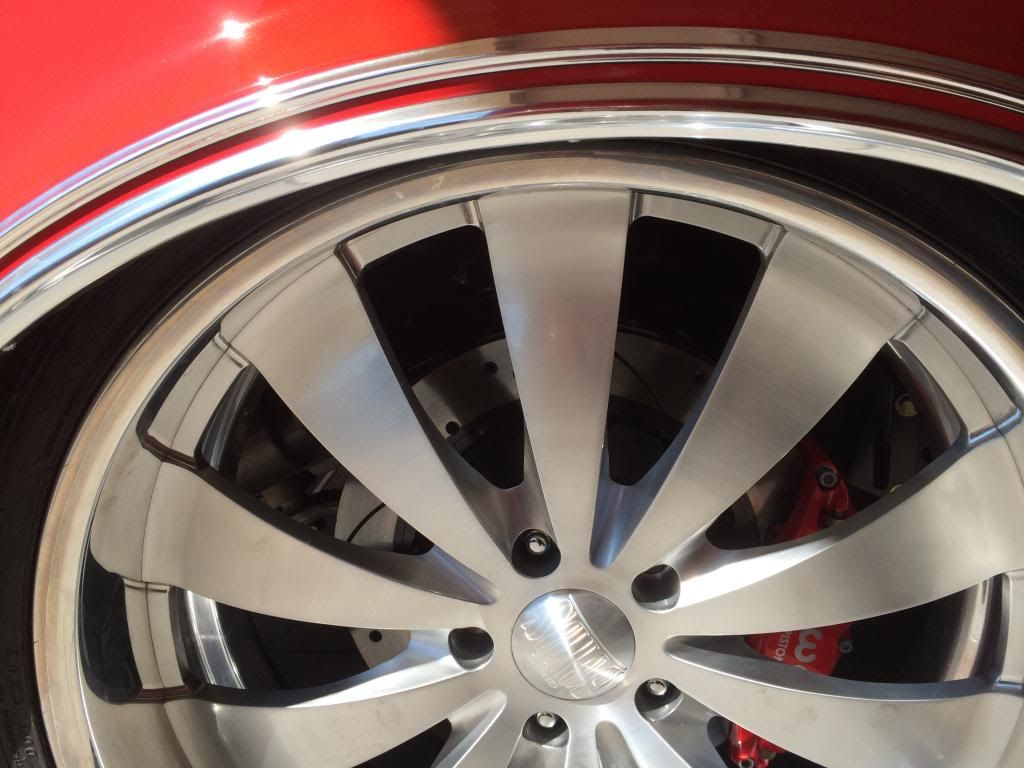 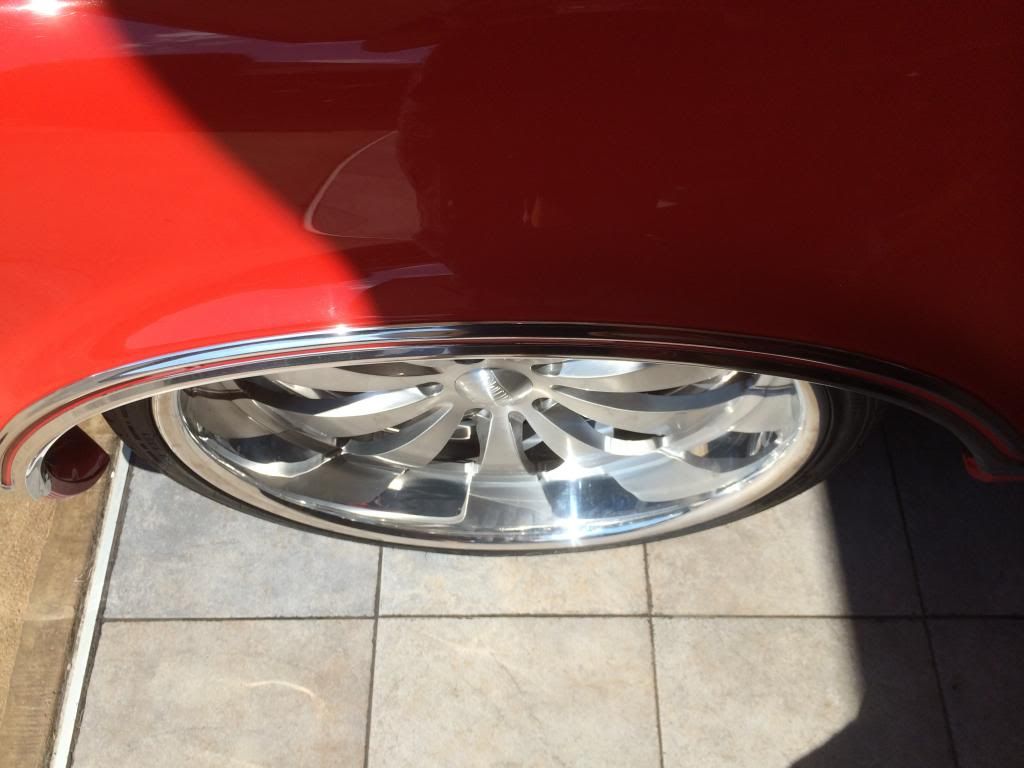 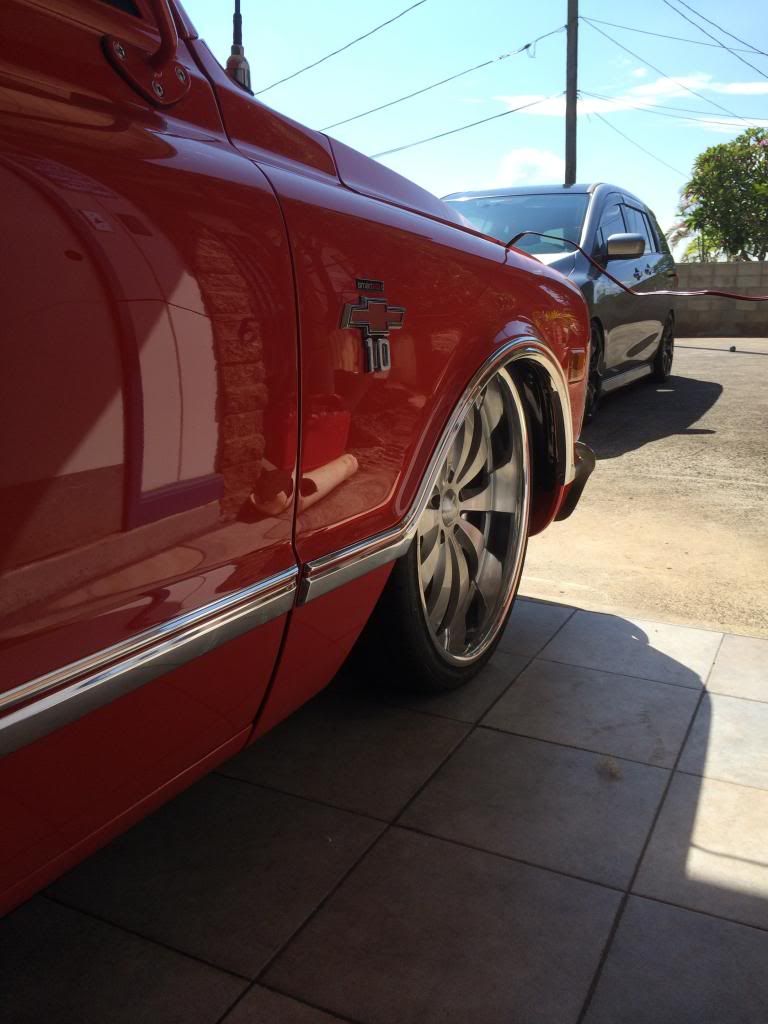 And to give you a better idea of how this all translated into the final stance, as promised, Ruby as she sits currently sans bed~ 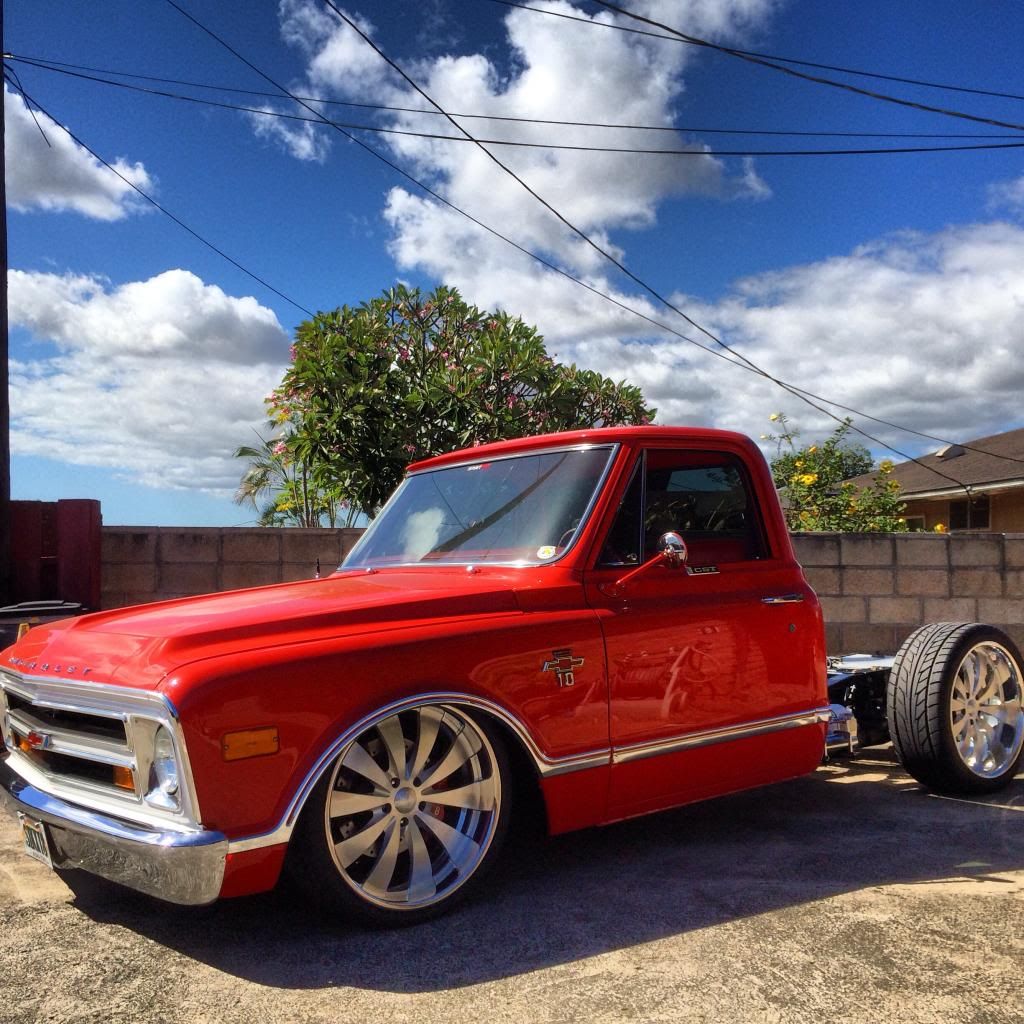 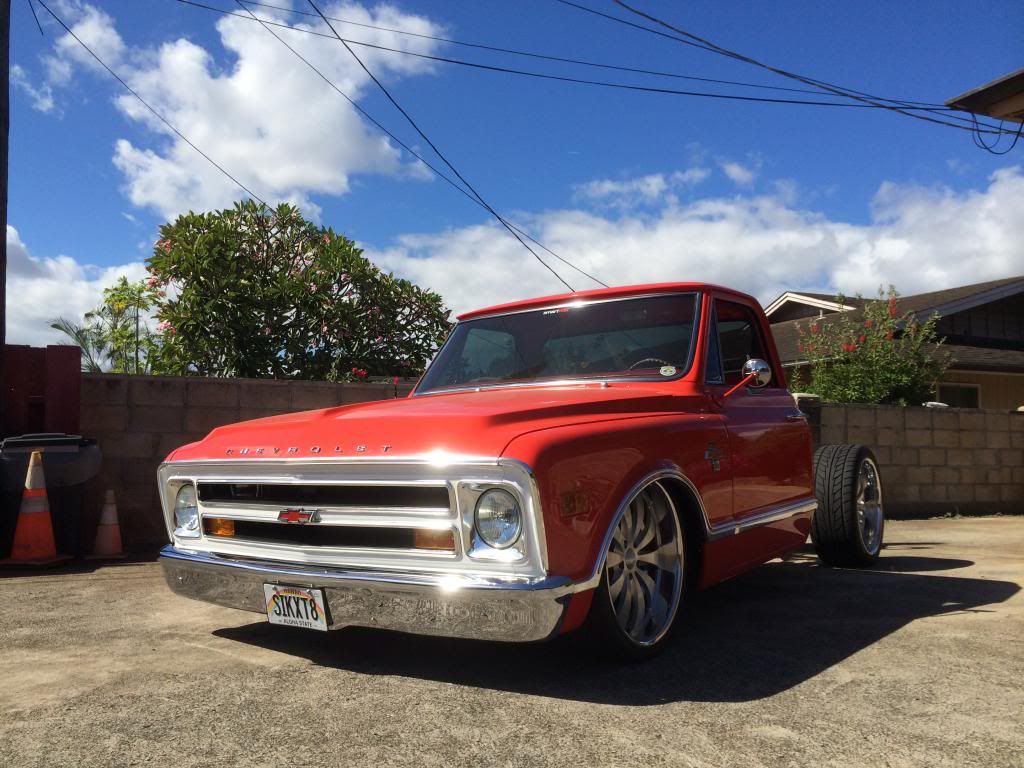 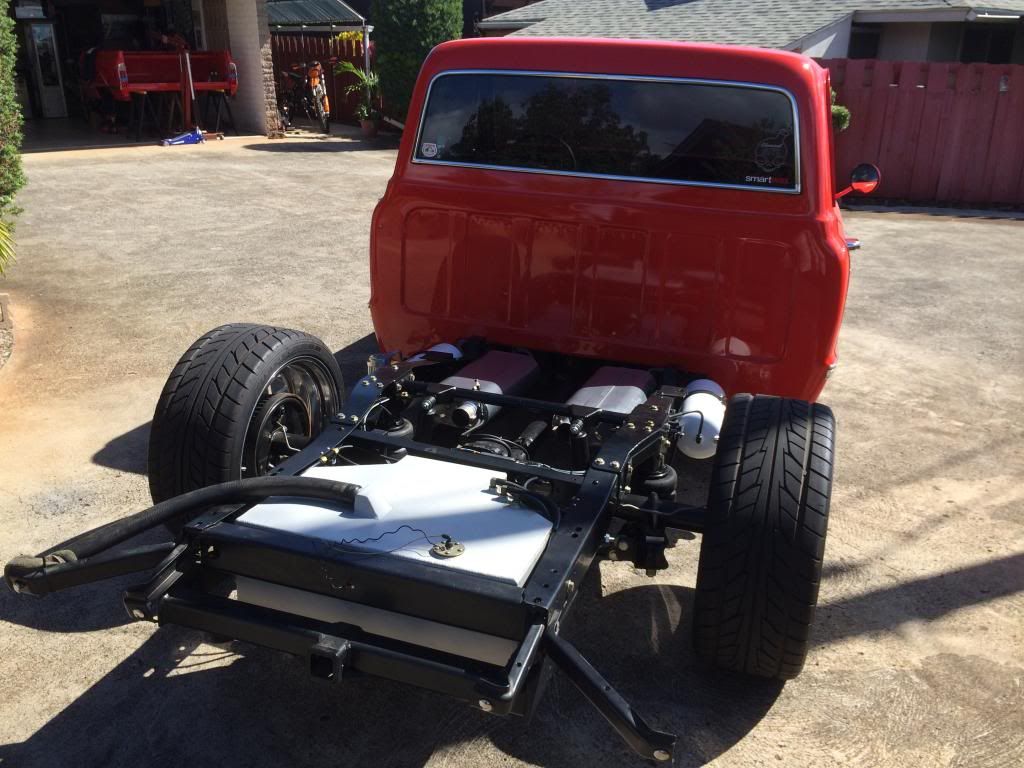 One of the things I didn't include in this thread is the details on the installation of the AccuAir ride height sensors and their placement/wire routing etc. As many of you have probably seen or experienced, there are a myriad choices and preferences for where the 'best' mounting points are. It really is preference and is also the beauty of the AccuAir system for allowing a ton of flexibility and choice on how it is installed and set up. I just didn't want to end up including too much about the AccuAir components in a Porterbuilt parts thread but I'd be happy to post up pics or answer any questions on that area as well. Dave Porter sent me a couple of great pics to help give me ideas on how others have set up their sensors and it helped me out tremendously. Ultimately, though, you can get as creative as you want with it. As long as it is in its optimum working parameters, the AccuAir eLevel system is pretty darn bulletproof too! As for initial driving impressions based on a quick loop around the block, I have to say the ride on bags is amazing. It is in no way 'airy' or 'floaty' like most may think. It is a nice firm ride, similar to how a quality drop spring would feel but with a little more give. I have yet to play with the drive height settings and determine how much pressure/height would be best for everyday driving but based on my first impression of my first spin, it is an exceptional ride. I don't see any issues regarding any loss of handling or performance either. Plus its always great to have the peace of mind of having quality components under your ass and knowing you can drive with complete confidence!  If you've made it through the whole thread and you're still here; thanks! Hopefully this thread so far has been helpful(or at least slightly entertaining to those who like to look at pics). I'll be happy to answer any questions or post up more pics at your request and help out in any way I can. Looking forward to hearing feedback and comments from you guys. I'll keep updating this thread with the rest of my non-Porterbuilt related parts of the project as it comes along as well. |
|
|

|
|
|
#10 |
|
Senior Member
 Join Date: Nov 2010
Location: Honolulu Hawaii
Posts: 313
|
Re: My Porterbuilt Experience...
|
|
|

|
|
|
#11 |
|
Registered User
Join Date: Sep 2013
Location: Evansville, IN
Posts: 1,774
|
Re: My Porterbuilt Experience...
Great write up. Helps someone like me when I go to install My PB stuff. Haven't ordered yet since I can't decide how far I want to go. Leaning towards the same setup as you but with the mild DM in front and stage 2 deluxe rear.
__________________
Ryan 1967 Red Stepside..."Laymond" http://67-72chevytrucks.com/vboard/s...40#post6441840 1972 Medium Olive SWB-Chester http://67-72chevytrucks.com/vboard/s...d.php?t=759628 1967/71 Blue SWB C10..SOLD 1977 SWB K10..my grandpa's.....never should have sold |
|
|

|
|
|
#12 | |
|
Senior Member
 Join Date: Nov 2010
Location: Honolulu Hawaii
Posts: 313
|
Re: My Porterbuilt Experience...
Quote:

|
|
|
|

|
|
|
#13 |
|
Registered User
 Join Date: Dec 2006
Location: Toms River, NJ
Posts: 5,518
|
Re: My Porterbuilt Experience...
Wow looks awesome

__________________
Keith 66 Suburban Burb Build Thread: http://67-72chevytrucks.com/vboard/s...d.php?t=751361 IG: bennett68c10 |
|
|

|
|
|
#14 |
|
67-72 parts collector,…
 Join Date: Nov 2002
Location: Mid-MO
Posts: 22,703
|
Re: My Porterbuilt Experience...
Thanks again for the great write up.
You could always address the Accuair install in a separate thread. But that's up to you. Excellent Porterbuilt thread.
__________________
Keith Convert to disc brakes. http://67-72chevytrucks.com/vboard/s...d.php?t=444823 |
|
|

|
|
|
#15 |
|
Registered User
 Join Date: Dec 2006
Location: Toms River, NJ
Posts: 5,518
|
Re: My Porterbuilt Experience...
I for one would love to see a thread on the accuair install. It would help me out tremendously when I go to install mine.
__________________
Keith 66 Suburban Burb Build Thread: http://67-72chevytrucks.com/vboard/s...d.php?t=751361 IG: bennett68c10 |
|
|

|
|
|
#16 | |
|
Registered User
Join Date: Sep 2013
Location: Evansville, IN
Posts: 1,774
|
Re: My Porterbuilt Experience...
Quote:

__________________
Ryan 1967 Red Stepside..."Laymond" http://67-72chevytrucks.com/vboard/s...40#post6441840 1972 Medium Olive SWB-Chester http://67-72chevytrucks.com/vboard/s...d.php?t=759628 1967/71 Blue SWB C10..SOLD 1977 SWB K10..my grandpa's.....never should have sold |
|
|
|

|
|
|
#17 | |
|
Senior Member
 Join Date: Nov 2010
Location: Honolulu Hawaii
Posts: 313
|
Re: My Porterbuilt Experience...
Thanks! Got a sick set up yourself! One day...
 Quote:
|
|
|
|

|
|
|
#18 | |
|
Senior Member
 Join Date: Nov 2010
Location: Honolulu Hawaii
Posts: 313
|
Re: My Porterbuilt Experience...
Quote:
 Things happen(or don't happen) for a reason. You were meant to build something greater and more bad ass!! Can't wait to see the progress!! Things happen(or don't happen) for a reason. You were meant to build something greater and more bad ass!! Can't wait to see the progress!!
|
|
|
|

|
|
|
#19 |
|
Senior Member
 Join Date: Mar 2011
Location: West Plains, Missouri
Posts: 7,559
|
Re: My Porterbuilt Experience...
Thanks for posting, great pics and great write-up...Jim
__________________
my build thread: http://67-72chevytrucks.com/vboard/s...d.php?t=459839 Jimbo's long bed step build:http://67-72chevytrucks.com/vboard/s...t=464626<br /> |
|
|

|
|
|
#20 |
|
Registered User
Join Date: Sep 2012
Location: Arizona
Posts: 222
|
Re: My Porterbuilt Experience...
When you say:
"The lower shock cross member runs from u-bolt to u-bolt between the trailing arms, with the passenger side having a dual mount/pivot point for both the crossmember and the trac bar" Do you have another close up picture of this mount (trailing arm side)? Is this mount different than the one that comes with the regular PB trac bar? This isn't pressing, I'm just trying to learn.
__________________
You remember when drinking too many beers was a bad idea? Me neither. |
|
|

|
|
|
#21 | |
|
Senior Member
Join Date: Dec 2003
Location: Mesa,Az
Posts: 3,981
|
Re: My Porterbuilt Experience...
Quote:
The trac-bar kit does not have the tabs pictured. Nate
__________________
www.PorterbuiltFabrication.com Phone: 480-297-2621 E-mail: sales@pbfab.com Find us on FaceBook under Porterbuilt Fabrication Specializing in Chassis and Suspension Components for your Classic Chevrolet Truck. We offer components from the following manufacturers: Porterbuilt Accuair Ridetech (Air Ride Technologies) Air Lift Wilwood Intro Unisteer ECE Gotta Show Air Lift Borgeson CPP Supporting this forum since 2003! |
|
|
|

|
|
|
#22 | |
|
Senior Member
 Join Date: Nov 2010
Location: Honolulu Hawaii
Posts: 313
|
Re: My Porterbuilt Experience...
Quote:
Thank you for clarifying on this! |
|
|
|

|
|
|
#23 |
|
Registered User
Join Date: May 2012
Location: Gilbert, Arizona
Posts: 256
|
Re: My Porterbuilt Experience...
Bravo Mac. I really enjoyed this write up. Beautiful truck you have there!
|
|
|

|
|
|
#24 |
|
Square
Join Date: Feb 2011
Location: Phoenix Arizona
Posts: 1,568
|
Re: My Porterbuilt Experience...
awesome write up and great details of what you did, truck looks awesome and the PB stuff is the type of quality you needed to match the rest of the truck. congrats, the stance looks killer!
__________________
Squarebody Syndicate |
|
|

|
|
|
#25 |
|
Senior Member
 Join Date: Nov 2010
Location: Honolulu Hawaii
Posts: 313
|
Re: My Porterbuilt Experience...
|
|
|

|
 |
| Bookmarks |
|
|