 |
Register or Log In To remove these advertisements. |
|
|
|
|||||||
 |
|
|
Thread Tools | Display Modes |
|
|
#26 | |
|
here, just not logged in
Join Date: Nov 2007
Location: Tx
Posts: 1,011
|
Re: home made shop tools etc?
Quote:
|
|
|
|

|
|
|
#27 |
|
Registered User
Join Date: Mar 2012
Location: Lacombe, Alberta
Posts: 288
|
Re: home made shop tools etc?
I made a sandblaster out of a pressure tank and plumbing fittings.
I still need some flex line and a nozzle. Last edited by ETsC10; 10-23-2012 at 12:59 AM. |
|
|

|
|
|
#28 |
|
Hand Crafted C-10
 Join Date: Aug 2006
Location: Burien, WA
Posts: 5,180
|
Re: home made shop tools etc?
That's a rockin addy to a shop!
How about some build details and more pics? BTW---welcome to the tool room!!
__________________
. Forum Guidelines and Rules
Buying and Selling Code of Conduct Become a Board Supporter! Truck FAQ Ellen... the boards artsy-fartsy, eclectic, truck-lovin' gal-member... |
|
|

|
|
|
#29 | ||
|
GMC's n H.D.'s too!
 Join Date: Oct 2010
Location: Nampa, Idaho
Posts: 1,583
|
Re: home made shop tools etc?
Quote:
Quote:

|
||
|
|

|
|
|
#30 |
|
Registered User
Join Date: Mar 2012
Location: Lacombe, Alberta
Posts: 288
|
Re: home made shop tools etc?
I got the idea from a video i saw on youtube. He used a propane tank instead, which i didnt feel was safe, as they are hard to drain, and propane is very explosive. The build went as follows:
First, i went to the local hardware store and purchased the following: 2 ball valves, 1 gate valve 2 90 degree fittings 2 "T" fittings 1 'nipple'- short piece of pipe threaded on both sides. this one had a hex part between the two threads. 1 bushing 3/8" to 1/4" We already had a large amount of 3/8" pipe at home from plumbing in air lines for the new compressor. I used around 3' Then, i drilled 2 holes in the top and bottom of the tank. They were 7/8" in diameter, which is approximately the same i.d. as 3/8" pipe, which doesnt make much sense to me either. Then i put together the top and bottom sections, which go as follows: Top: stubby piece of pipe-> 90-> nipple-> ball valve-> short piece of pipe-> 't' fitting-> bushing-> air line fitting The 'T" fitting also went to a short piece of pipe attached to the second ball valve. Bottom: stubby piece of pipe-> gate valve-. 'nipple'-> 'T' fitting-> short piece of pipe-> 90 The 90 on the bottom and the second ball valve on the top were then connected by the correct length piece of pipe to place the stubby pieces of pipe against the holes i drilled. I then welded it on and checked for leaks. Make sure you get everything good and tight before welding, because it cannot be taken apart without a grinder after it has been welded. mine already had a threaded hole in it for filling it, which i put a plug in, i plan on using this for filling it with sand. I still need to make a stand, and buy a section of flex line and a nozzle, but after that, i should have a very cheap sandblaster. I also cut a chunk out of the base for easier access to the gate valve. |
|
|

|
|
|
#31 |
|
Hand Crafted C-10
 Join Date: Aug 2006
Location: Burien, WA
Posts: 5,180
|
Great write-up!
Hope you don't mind if we follow you along until you have it finished! 
|
|
|

|
|
|
#32 | |
|
Registered User
Join Date: Mar 2012
Location: Lacombe, Alberta
Posts: 288
|
Re: home made shop tools etc?
Quote:
Posted via Mobile Device |
|
|
|

|
|
|
#33 |
|
Registered User
Join Date: Mar 2012
Location: Lacombe, Alberta
Posts: 288
|
Re: home made shop tools etc?
All done! I purchased a deadmans valve from princess auto, along with a 15foot air line for my blast line, and two 3/8" x 1/4" bushings to connect the air line to the 'T' fitting on the bottom of the tank and to the nozzle. I welded three pieces of rod onto the base for a stand for now. The sway bar is after about 30 seconds to 1 minute of blasting.
Last edited by ETsC10; 11-06-2012 at 10:16 AM. |
|
|

|
|
|
#34 |
|
Registered User
Join Date: Mar 2012
Location: Lacombe, Alberta
Posts: 288
|
Re: home made shop tools etc?
Etsc10, can you rotate the pics to make them right side up please? And sorry it went wide screen!
|
|
|

|
|
|
#35 |
|
Registered User
 Join Date: Aug 2005
Location: Hillsboro Oregon
Posts: 6,449
|
Re: home made shop tools etc?
I know many on here already know this but I tell everyone using a blaster; Don't use silica/play sand. Here's why.
|
|
|

|
|
|
#36 |
|
Hand Crafted C-10
 Join Date: Aug 2006
Location: Burien, WA
Posts: 5,180
|
Re: home made shop tools etc?
|
|
|

|
|
|
#37 | |
|
Hand Crafted C-10
 Join Date: Aug 2006
Location: Burien, WA
Posts: 5,180
|
Re: home made shop tools etc?
Quote:
Silica sand is a seriously dangerous health hazard!! Before I knew better, I did a bunch of blasting outside (no breeze) with the stuff and, not only did I breathe a lot of it, but it also blew everywhere...its nasty dust can not be contained. Play sand is poorly refined and not good for the equipment... cheap for good reason and probably best not to snort that either. |
|
|
|

|
|
|
#38 |
|
Registered User
Join Date: May 2011
Location: Anderson SC
Posts: 3,903
|
Re: home made shop tools etc?
Very important info on blasting with sand! If you're going to do it, make sure you wear a GOOD particulate filter, and do it outdoors! As said, the dust gets everywhere and it'll make a mess of your shop very quickly, not to mention that you'll have the hazardous dust everywhere.
I do blast with sand occasionally (did a couple wheels yesterday) bud I do it outdoors and wear a full paint suit with a respirator. I change the respirator cartridges out for 3M P100 filters which are very effective at filtering.
__________________
Project Goldilocks '66 C10 Short Fleet BBW Build '65 C10 Highly Detailed Stock Restoration Thread '78 Camaro Targa Roof Build '55 International Metal/Body/Paint Work '66 F100 Full Rotisserie Restoration '40 Packard 120 Convertible Coupe Restoration How To Restore and Detail an Original Gauge Cluster How To Detail Sand Body Panels, Edges, Corners, Etc |
|
|

|
|
|
#39 |
|
Registered User
Join Date: May 2011
Location: Anderson SC
Posts: 3,903
|
Re: home made shop tools etc?
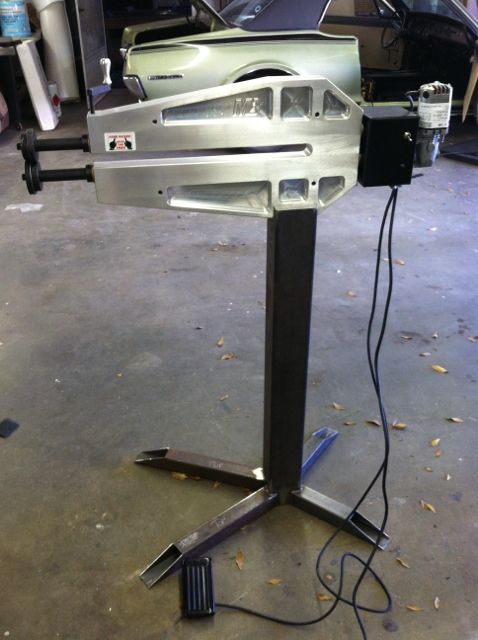
I built a stand for our new bead roller last week with 4x4 and 2x2 tubing, both 1/8" wall. I angle cut the end of the legs so they're not as easy to trip over.
 Still need to get some plate to weld over the angle cuts and have it powdercoated. Still need to get some plate to weld over the angle cuts and have it powdercoated.  I also built my work/paint mixing table and stand for the shrinker/stretcher using 4" and 2" tubing. I don't have a finished pic of the table, but it has a 1/2" plate steel top with a 16g stainless cover that wraps down the edges about 2-3" and adjustable legs welded to the bottom. Both of these have been powdercoated semigloss black.
__________________
Project Goldilocks '66 C10 Short Fleet BBW Build '65 C10 Highly Detailed Stock Restoration Thread '78 Camaro Targa Roof Build '55 International Metal/Body/Paint Work '66 F100 Full Rotisserie Restoration '40 Packard 120 Convertible Coupe Restoration How To Restore and Detail an Original Gauge Cluster How To Detail Sand Body Panels, Edges, Corners, Etc |
|
|

|
|
|
#40 |
|
Registered User
Join Date: Mar 2004
Location: Hoytsville, Utah
Posts: 3,365
|
Re: home made shop tools etc?
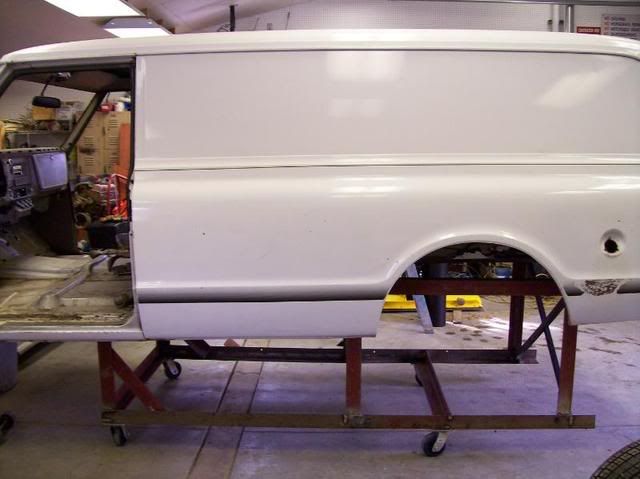
I built this rack to hold my Panel body:
   It took 8 men and a boy to lift the body onto it, though. I'll have an overhead hoist rigged up to put it back on the frame 
__________________
'68 Panel Project Boogie Chillin' '68 C-10 Ol' Green |
|
|

|
|
|
#41 |
|
Registered User
 Join Date: Jul 2010
Location: Ft. Worth, Texas
Posts: 40
|
Re: home made shop tools etc?
My old man made this temporary A-frame with some scrap wood and a 4x4 beam. I made the bed lifting device that you can barely see in the picture out of some 3/4x 2inch inch bar stock and two pieces of 2 1/2 x 24 inch square tubing. Welded the bar stock on the bottom side of the tubing pieces standing on end. Find the sweet spot that balances the bed and makes lifting the bed off and on easy.
|
|
|

|
|
|
#42 |
|
Registered User
Join Date: Jul 2011
Location: strausstown pa
Posts: 3,394
|
Re: home made shop tools etc?
Every shop needs a full selection of bfh's I have quite a few as one can never have too many. here's one I made from rock maple oviously its not for hammering everthing but it sure is fun for smashing stuff
 who doesnt like smashing sh*t every now and then who doesnt like smashing sh*t every now and then
__________________
81 camaro 355 4/spd 342 posi my first love  . .67 swb step 454/4spd ott 373 posi 4/7 drop. 2000 s10 zr2 little blue truck that never gets stuck. '74 heald super bronc vt8. tecumseh powered moon rover. |
|
|

|
|
|
#43 |
|
Hollister Road Co.
Join Date: Apr 2005
Location: Houston
Posts: 6,131
|
Re: home made shop tools etc?
I'll bet that will turn you thumb into a ping pong paddle in one hit
|
|
|

|
|
|
#44 | |
|
Registered User
Join Date: Jul 2011
Location: strausstown pa
Posts: 3,394
|
Re: home made shop tools etc?
Quote:
 If you can manage that it will If you can manage that it will
__________________
81 camaro 355 4/spd 342 posi my first love  . .67 swb step 454/4spd ott 373 posi 4/7 drop. 2000 s10 zr2 little blue truck that never gets stuck. '74 heald super bronc vt8. tecumseh powered moon rover. |
|
|
|

|
|
|
#45 |
|
Registered User
Join Date: Dec 2010
Location: Carnation, Wa
Posts: 142
|
Re: home made shop tools etc?
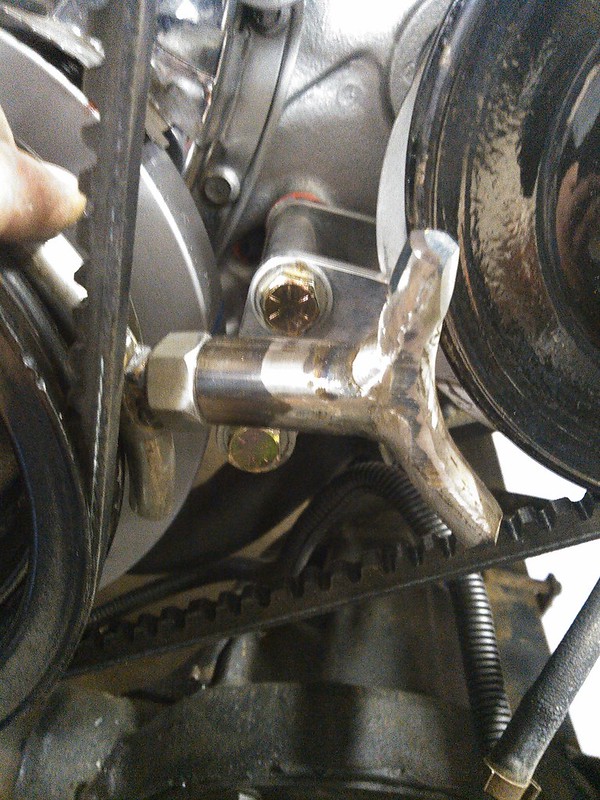
[IMG]
 12.22.15 tension by Corey Green, on Flickr[/IMG] 12.22.15 tension by Corey Green, on Flickr[/IMG]I didn't like my options on pry locations to tighten my power steering belt. I cut down 2 U bolts to match the radius of the pulleys, welded a bolt in the middle of one U, and welded a sleeve to fit over the threads to the other U. I back the nut all the way down the threads, then put the sleeve over the threads and position my device between pulleys with the belt in place. I wrench the nut down to expand separate the 2 pulleys and tighten all the adjustment bolts on my engine brackets, then back my nut down and loosen up spreader to remove it. No dents on the power steering tank. |
|
|

|
|
|
#46 |
|
Senior Member
 Join Date: Jul 2009
Location: Tomball, Texas
Posts: 1,592
|
Re: home made shop tools etc?
After dinging the sides of my cab roof using straps to lift it, I built this jig. The only point it contacts the cab is the 2x4's in the door frame. Take out 1 bolt in the uprights and it opens wide enough to slide across the cab. Drill a couple new holes in the uprights and move the 2x4's and its adjustable to fit any cab.
__________________
Rick 78 GMC K15 SWB, 350/NV4500/NP205/4.10s Project Hazel 71 GMC C25 350/TH400 - Project Angie 59 Chevy SWB Stepside (next in line? Not sure now  ) )2001 GMC Sierra K2500 |
|
|

|
|
|
#47 |
|
Senior Member
 Join Date: Nov 2013
Location: East Tennessee
Posts: 2,203
|
Re: home made shop tools etc?
I have bunch of specialty tools I've made....
these are the latest two....I replaced several brake lines and needed these... Tube straighteners for 1/4" and 3/8" tubing...
__________________
1967 C10 Step side 1968 C10 Step side 1970 Chevrolet K/5 Blazer 1972 Chevrolet K/5 Blazer ............. 
|
|
|

|
|
|
#48 | ||
|
Registered User
Join Date: May 2009
Location: Motor City
Posts: 9,245
|
Re: home made shop tools etc?
Quote:
Quote:
I got the idea from my dad: he had a fifth wheel hitch in his truck, so he would unbolt the box but leave the hitch in and pick it up via a pin in the hitch. He would also use the same deal to remove the hitch itself when needed (obviously leaving the bed bolted down and unbolting the hitch). K
__________________
Chevrolet Flint Assembly 1979-1986 GM Full Size Truck Engineering 1986 - 2019 Intro from an Old Assembly Guy: http://67-72chevytrucks.com/vboard/s...d.php?t=342926 My Pontiac story: http://forums.maxperformanceinc.com/...d.php?t=560524 Chevelle intro: http://www.superchevy.com/features/s...hevy-chevelle/ |
||
|
|

|
|
|
#49 | |
|
Registered User
Join Date: May 2009
Location: Motor City
Posts: 9,245
|
Re: home made shop tools etc?
Quote:
I'm sure dad made it inside the shop at Chevrolet and then brought it home. I distinctly remember asking him how he got it out the gate and he said "...I painted it black and carried it out like a lunchpail".  At the time (as a child) that seemed like a reasonable explanation. I wish now I could ask him what really happened. K
__________________
Chevrolet Flint Assembly 1979-1986 GM Full Size Truck Engineering 1986 - 2019 Intro from an Old Assembly Guy: http://67-72chevytrucks.com/vboard/s...d.php?t=342926 My Pontiac story: http://forums.maxperformanceinc.com/...d.php?t=560524 Chevelle intro: http://www.superchevy.com/features/s...hevy-chevelle/ |
|
|
|

|
|
|
#50 |
|
Registered User
Join Date: Apr 2017
Location: india
Posts: 2
|
Re: home made shop tools etc?
Good.
__________________
love status |
|
|

|
 |
| Bookmarks |
|
|