
 |
|
|
#26 |
|
Registered User
Join Date: Jul 2011
Location: Pryor,OK
Posts: 69
|
Re: Build #2 Crusader!
That's funny, I have almost the same crew cab and have picked out the same wheels!
Posted via Mobile Device |
|
|

|
|
|
#27 | |
|
Still Learning
Join Date: Jul 2009
Location: Central Oklahoma
Posts: 10,108
|
Re: Build #2 Crusader!
Quote:
|
|
|
|

|
|
|
#28 |
|
Windy Corner of a Dirty Street
Join Date: Jun 2003
Location: Pueblo West, Colorado
Posts: 2,926
|
Re: Build #2 Crusader!
Looks like a great project Mike. Looking forward to watching this built take place. I get out to the Elkhart area several times a year and these old trucks are pretty rare out in the salt belt. The nice thing about the Elkhart area is the access to a lot of new take off parts that the RV and conversion companies prune off perfectly good vehicles. I stopped by a few of those take off peddlers over the years and found a bunch of nice stuff (bucket seats, steering wheels, wheels, etc). Just too costly to ship most of it to the west.
Iíd love to come see your projects some time. I work for a motorized stripped chassis suppler to the RV and stepvan industry and get to your area way too many times a year. Usually stay at the Hilton Garden Inn off 19 at the toll road. It seems the people at Texas Roadhouse across the bridge from the hotel in your town recognize me more than my own neighbors here at home do.  Iím well connected with the crew at Naquinís if you need a contact for GM parts. Iím well connected with the crew at Naquinís if you need a contact for GM parts. I had to laugh when I read the part about the steering column as I just picked up an í89 Suburban that needed the same work. All 4 bolts in the tilt mechanism were backed out and actually tore up the upper bowl. Such a common issue on those old Saginaw steering columns. The Silver Dollar turned out great! Canít wait to see what you do with the crew cab. Momma will be proud to cruise that around.
__________________
Current vehicle collection: 1978 Chevrolet K10, 8.1L, NV4500, NP205 1989 Chevrolet Suburban, 8.1L, NV4500, NP241 1993 Chevrolet C1500 Sportside, TBI 7.4L, 4L60E 2001 Chevrolet K2500HD, Ext Cab, SWB, 8.1L, ZF 6 speed 2014 Chevrolet Impala LTZ 3.6L Vortec 8.1L because life is too short to tolerate underpowered vehicles
|
|
|

|
|
|
#29 | |
|
Account Suspended
Join Date: Aug 2007
Location: USA
Posts: 1,223
|
Re: Build #2 Crusader!
Quote:
|
|
|
|

|
|
|
#30 |
|
Account Suspended
Join Date: Aug 2007
Location: USA
Posts: 1,223
|
Re: Build #2 Crusader!
So deb sends me a link to a craigslist add for a 71 shortbed that looks pretty decent and says we should go look at it. Does she not know Im a little busy! she also know I have a weakness for those old 67-72's like some people and lost dogs I feel the need to rescue and save everyone I come across. So i called the guy and im going to take a look today. If I get this thing Im gonna have to abandon my little 86 c/10 shortbed project. Ill let you guys know how it comes out.
oh and by the way yousesteers cutting the floor is certainly easier said than done. I stared at it last night for about three hours tiring to figure the best way, how much and where to cut it. so it would fold right back down on itself. Im sure there is a mathematical equation for this, but I dont think I'm smart enough to figure it out. so im just going to cut it by eye and hope for the best. |
|
|

|
|
|
#31 |
|
Registered User
Join Date: Nov 2011
Location: Paris, MO
Posts: 290
|
Re: Build #2 Crusader!
I kinda eye balled it and decided where to cut then ran a level around it and cut it out with the sawzall. I cot it all pushed down then took some self tapping screws and screwed the floor boards together then took a hammer and persauded them to fit together. After I had the fit like I wanted I ground the paint off and welded it all back in you are right it is easier said than done I wish I had taken pictures to help you guys out but I never think of it until I am done. I just made sure they were level when I got done. I am no body man some guys on here would cringe if they had seen what I did and how I done it but I am more of a practical guy and on the floor board no one is going to see them after the floor mats are put back in.
__________________
Clint Youse Paris, MO 1984 Chevrolet 3+3 K30 with Cummins 1966 IH Scout has been a work in progress for 16 yrs |
|
|

|
|
|
#32 | |
|
Account Suspended
Join Date: Aug 2007
Location: USA
Posts: 1,223
|
Re: Build #2 Crusader!
Quote:
We got back on the truck today, me and the youngster tore apart both sides of the front end. Im going to change ball joints, tie-rods, brake hoses, shocks, springs, and etc. I was going to change control arm bushing too but they feel pretty good the PO must have had everything greased regularly. like your suppose too. |
|
|
|

|
|
|
#33 |
|
Account Suspended
Join Date: Aug 2007
Location: USA
Posts: 1,223
|
Re: Build #2 Crusader!
I wish I could say i got a lot done on the crew over this holiday break but I didnt. me and the boy took the front end apart, and now he is in the Bahamas. So I guess he is will be missing out on all the fun of putting it back together. (sucker). After everything got cleaned up. I put in new upper and lower ball joints, coil springs, shocks, idler arm Pittman arm, plus new steering box.
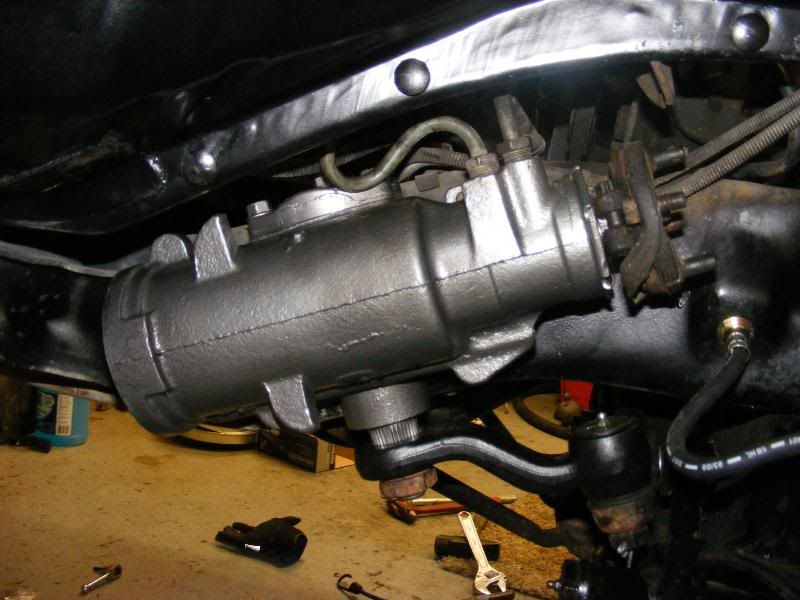 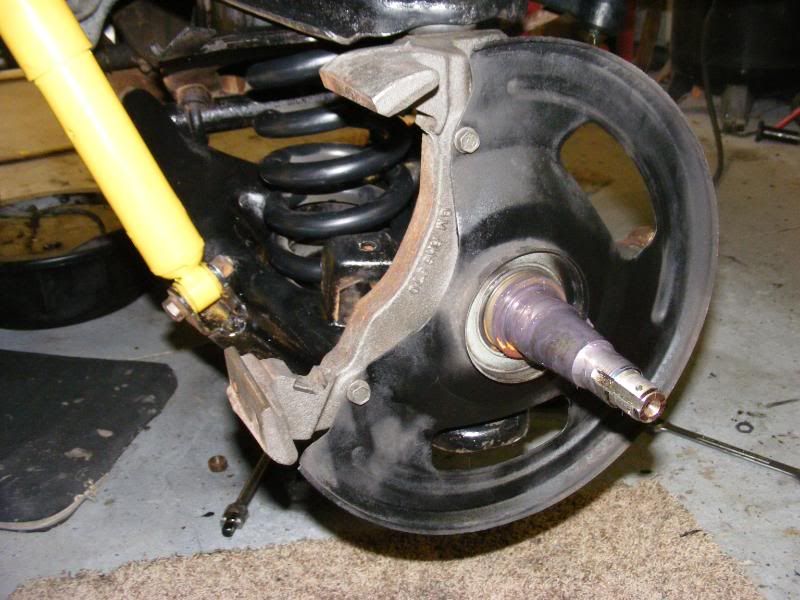 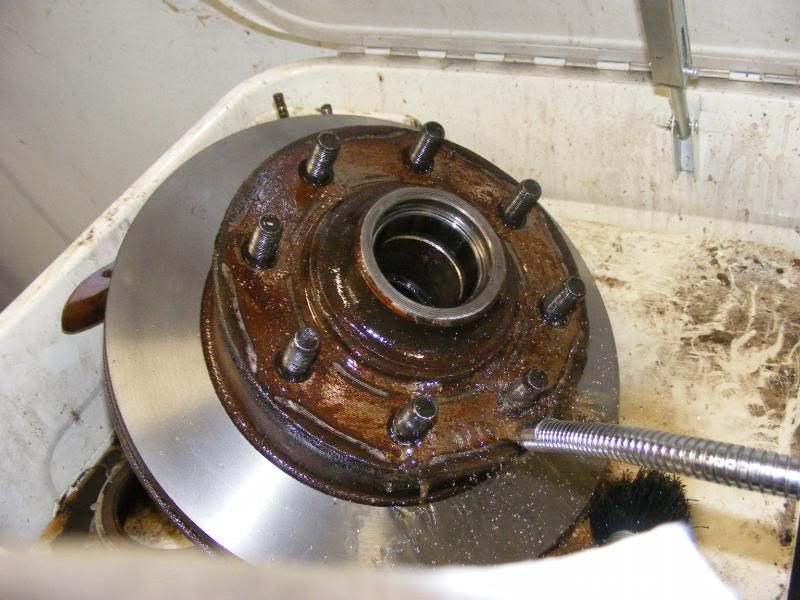 I want this truck to get the best mileage it can possibly get for a big 1 ton. So the plan was to use amsoil fluids everywhere, and that includes wheel bearing grease. The grease seams a little thicker and denser than other grease iv used in the past. in fact it was the exact opposite of how I thought it would be. Heres a pic of me hand packing them pushing grease though the bearing until it starts to squezze out the other side, and then sealing them up in the rotor with a new seal. I have used Amsoil products in the past (although not any grease) with very good results. 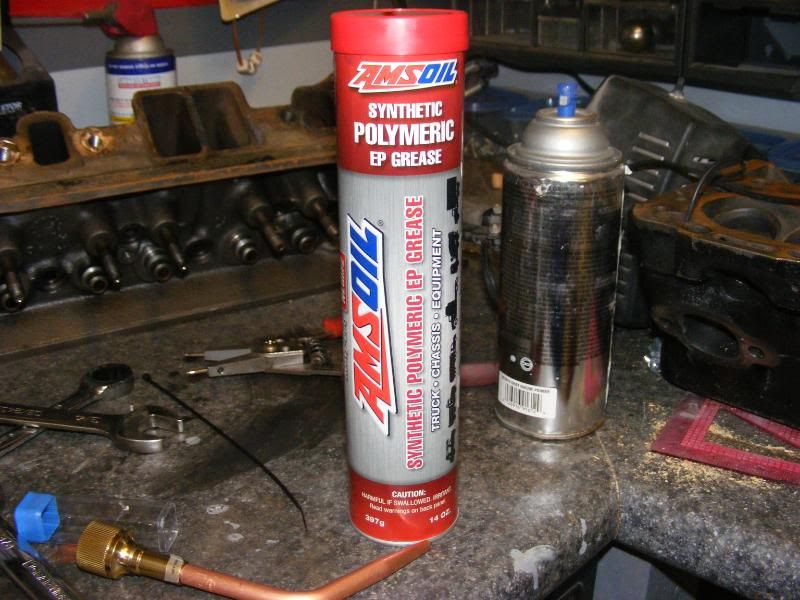 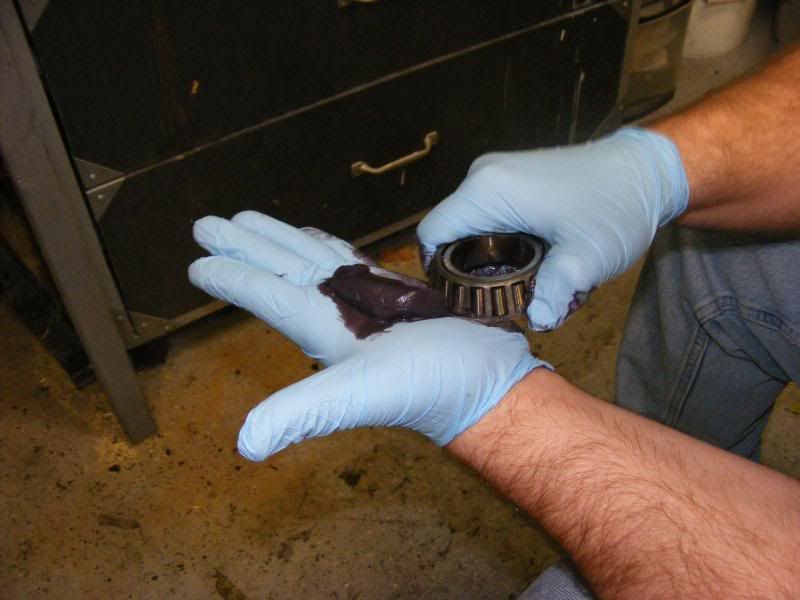 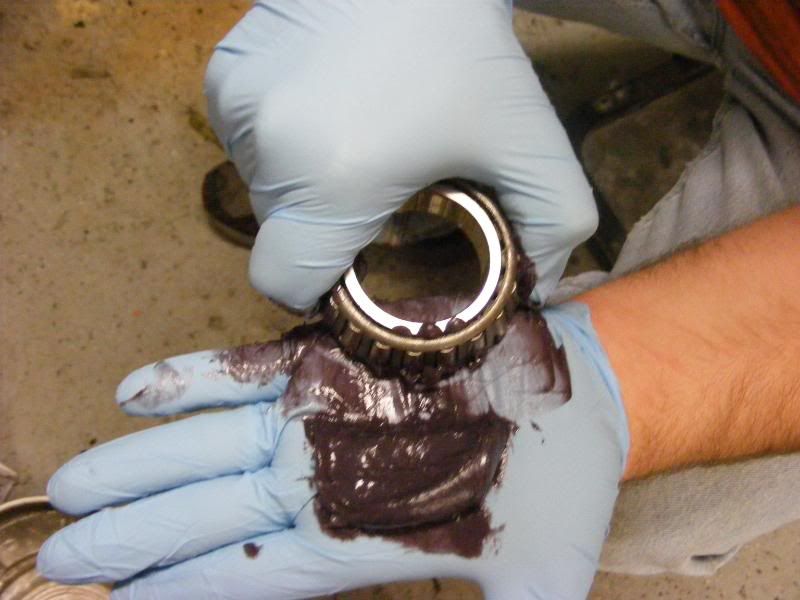 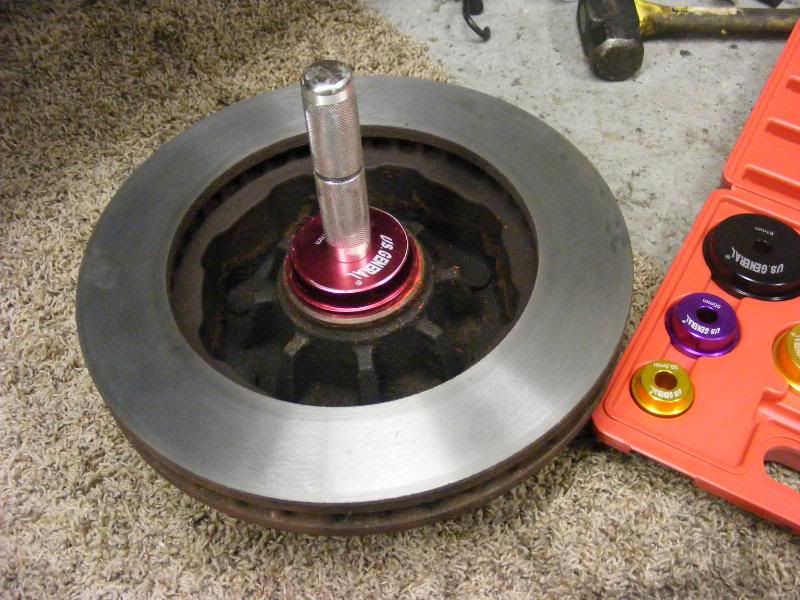 The brake pads were almost wore out so I put on some new pads, the brake hoses were cracked and split so on went new hoses turned the rotor and since all the braking was going to be new, including the M/C. I opted for some new front calipers too. 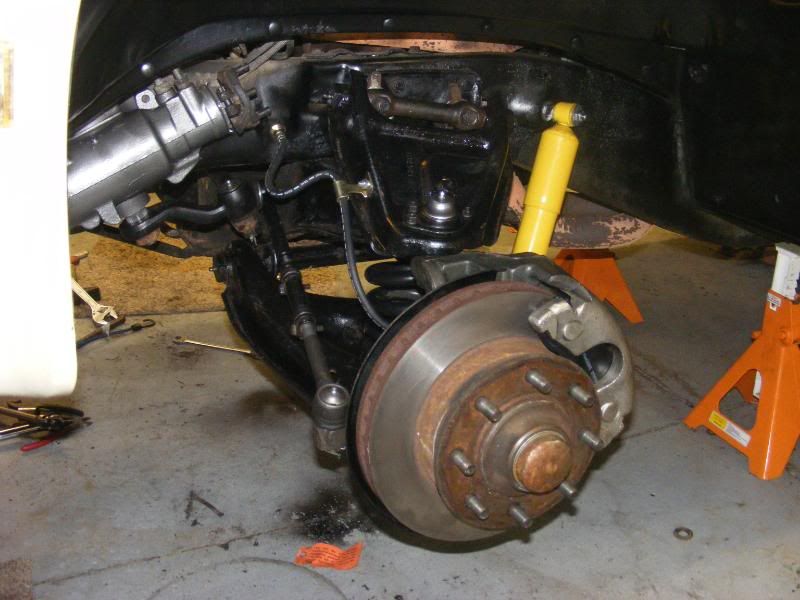 when I was all done with the front end. I put on the trucks new shoes. WOW! what a attitude adjustment. Deb seams very pleased with the look as well. 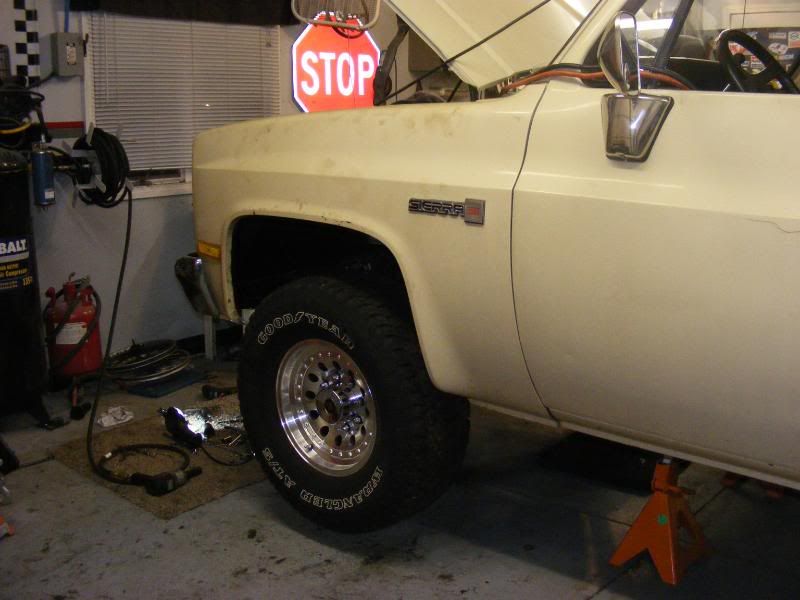
|
|
|

|
|
|
#34 |
|
Still Learning
Join Date: Jul 2009
Location: Central Oklahoma
Posts: 10,108
|
Re: Build #2 Crusader!
Nice progres Mike! It's amazing how that series of pictures makes rebuilding a front suspension like a snap. I know how much time and work goes into it. I think your son is pretty smart to bail on the hard part

|
|
|

|
|
|
#35 |
|
Account Suspended
Join Date: Aug 2007
Location: USA
Posts: 1,223
|
Re: Build #2 Crusader!
|
|
|

|
|
|
#36 |
|
Account Suspended
Join Date: Aug 2007
Location: USA
Posts: 1,223
|
Re: Build #2 Crusader!
I got my engine block back from the machinest the other day. He hot tanked it, bored it .30 over and polished my crank. I went to throw it up on the stand, and there is that broken bell housing bolt I forgot to deal with months ago when I tore the engine down. I tried drilling it but Im sure it was a hardened bolt and I couldn't even get a small hole in it.
When I was at the swap meet a few moths back I bought a Harris cutting torch and regulators new in the box and have been tring ever since to find some decent used tanks at a good price. well no can do! So I bit the bullet and bought some new tanks and a cart. from the local welding supplier. When I was in high school shop class about 20 years ago my shop teacher showed me how to burn out broken bleeder screws in calipers. I must have been pretty good at it because I can remember doing quite a few of them. most of the dumb @ss kids in class would break em off when we would rebuild calipers. Anyway I figured it should work the same on this. So I fired up my new torch and had at it. I had that broken bolt out and on the floor in a pile of molten metal. I tapped the hole and had it on the stand in a matter of minutes. That was almost worth the price of the torch and tanks. Almost 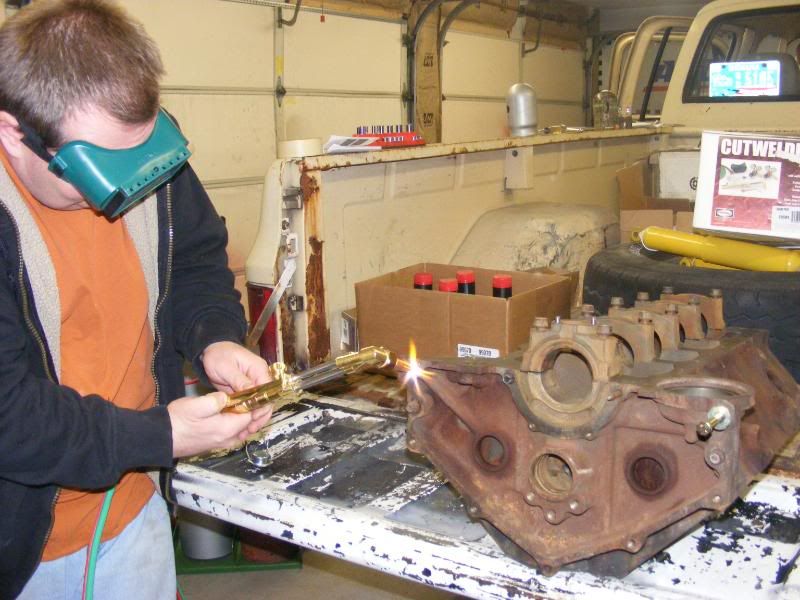 with the block on the stand, I painted it cast iron gray and oiled it up so it can sit in the corner of the garage until I get the rear disc conversion and the seats done. I also got my $20 swap meet piston hung on the rods. 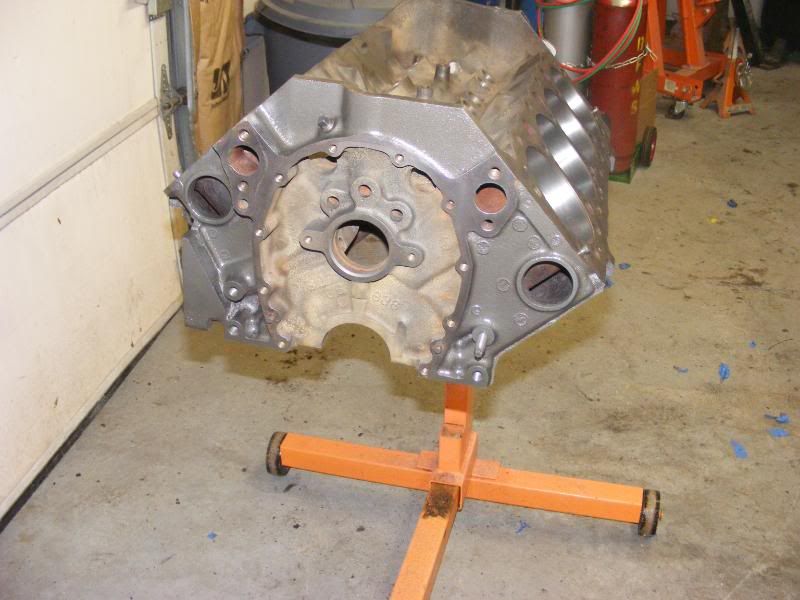 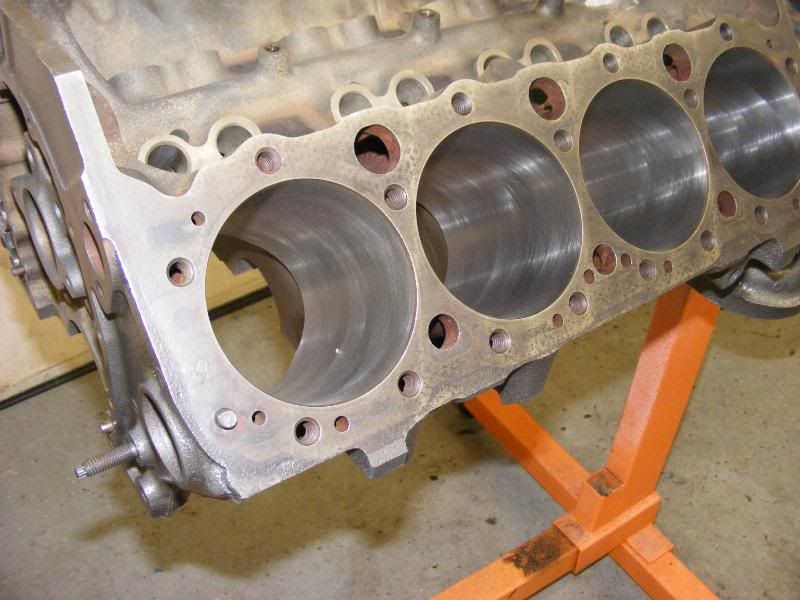 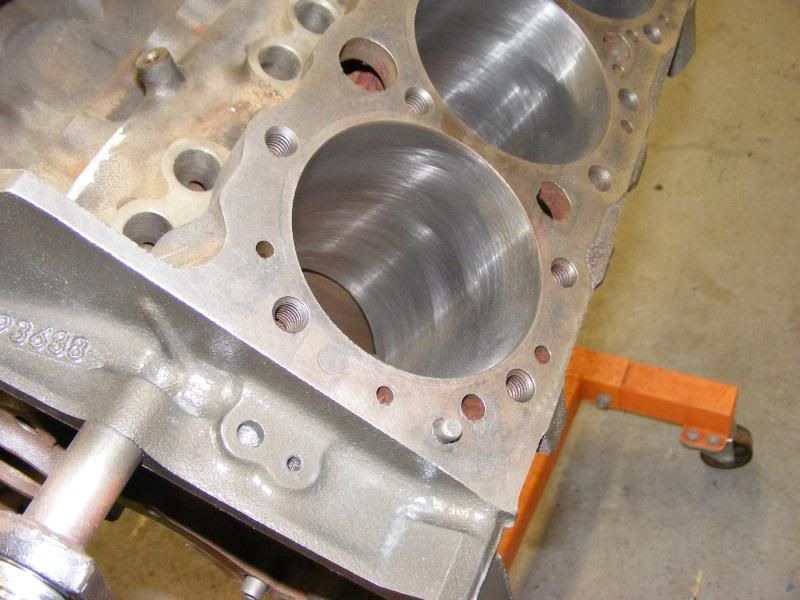 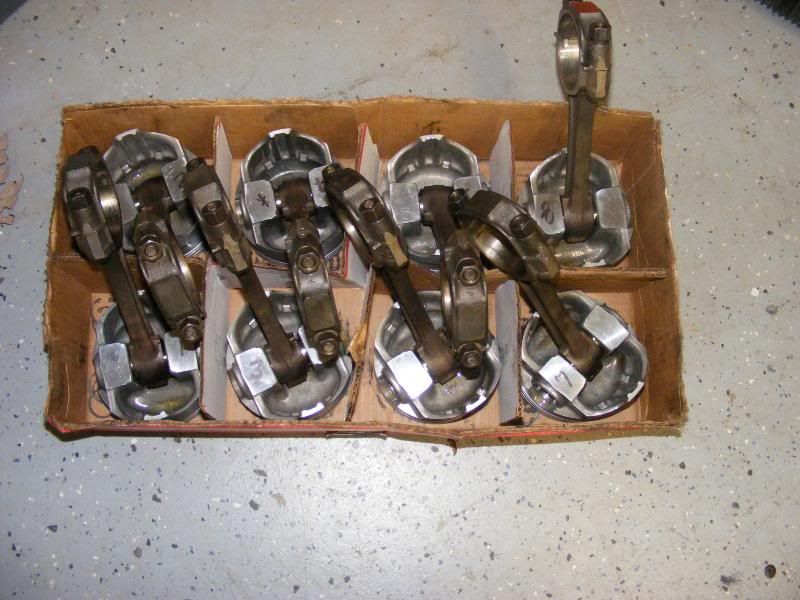 some of you will notice: that is a pretty big dish. and you would be right 21.5 cc 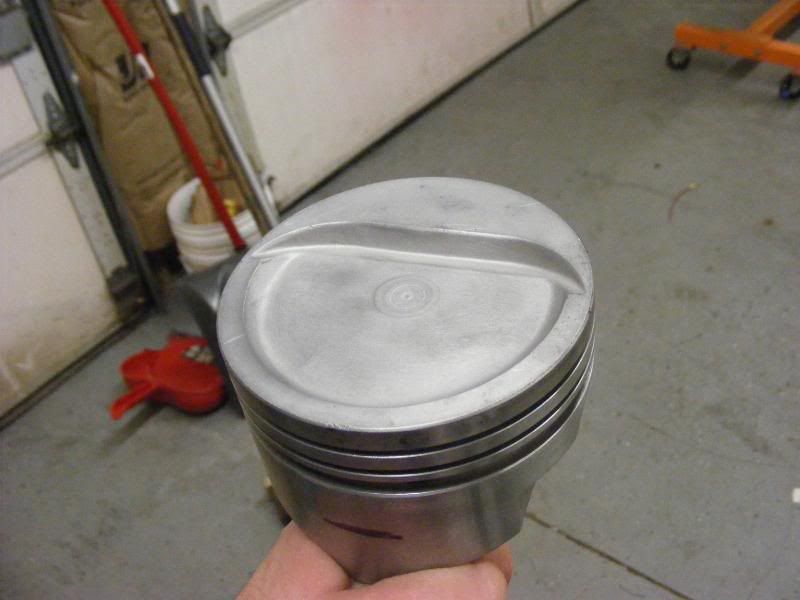
Last edited by mrhino; 12-31-2011 at 05:38 PM. |
|
|

|
|
|
#37 |
|
Registered User
Join Date: Dec 2011
Location: Elkhart, IN
Posts: 1,308
|
Re: Build #2 Crusader!
Cool truck, am I going to see this truck around town?
__________________
1985 Chevrolet K10 Custom Deluxe---SOLD 1997 Ram 2500 5.9 Cummins 1985 Chevrolet Camaro Z28 1987 Chevrolet K10 Silverado "The Beast" build 1987 Silverado http://67-72chevytrucks.com/vboard/s...=1#post6150257 |
|
|

|
|
|
#38 |
|
Still Learning
Join Date: Jul 2009
Location: Central Oklahoma
Posts: 10,108
|
Re: Build #2 Crusader!
The motor looks good. I like the torch tip too. I have had my share of broken bolts too. Thanks for sharing.
|
|
|

|
|
|
#39 |
|
Account Suspended
Join Date: Aug 2007
Location: USA
Posts: 1,223
|
Re: Build #2 Crusader!
more than likely. this one Im doing for my wife and with my wife.
Fortunately I dont break to many. It takes less time to remove one slowly than it is to break one off real quick. |
|
|

|
|
|
#40 |
|
Registered User
Join Date: Dec 2011
Location: Elkhart, IN
Posts: 1,308
|
Re: Build #2 Crusader!
This what the shortbed looks like that the guy has.

__________________
1985 Chevrolet K10 Custom Deluxe---SOLD 1997 Ram 2500 5.9 Cummins 1985 Chevrolet Camaro Z28 1987 Chevrolet K10 Silverado "The Beast" build 1987 Silverado http://67-72chevytrucks.com/vboard/s...=1#post6150257 |
|
|

|
|
|
#41 |
|
Account Suspended
Join Date: Aug 2007
Location: USA
Posts: 1,223
|
Re: Build #2 Crusader!
Got back on installing the front seats. after tring to precisely measure where to cut the floor to drop the hump a few inches. i gave up and just winged it. laid a piece of 1.5 tape around where it looked right with the eyeball and just cut that piece out. then folded it down making the floor flat who- hoo. thew the seat up in there and it is at the perfect ride height. unfortunately now there is a 1" in gap around the hole that i have to fill. next time I think ill only take out about 3/4 of a inch or so.
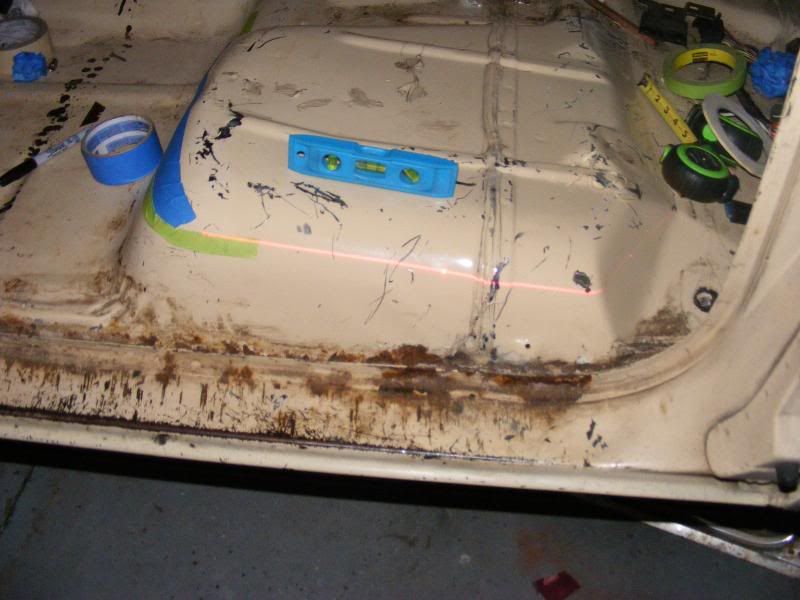 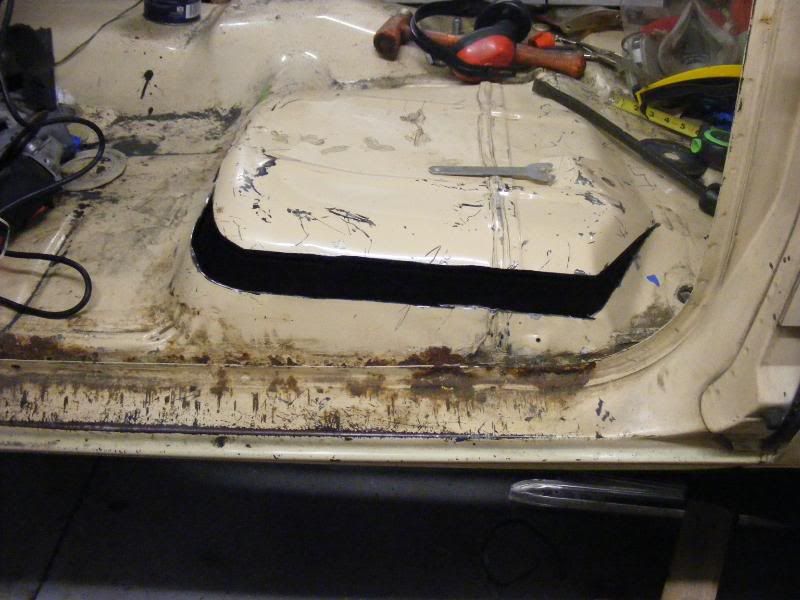 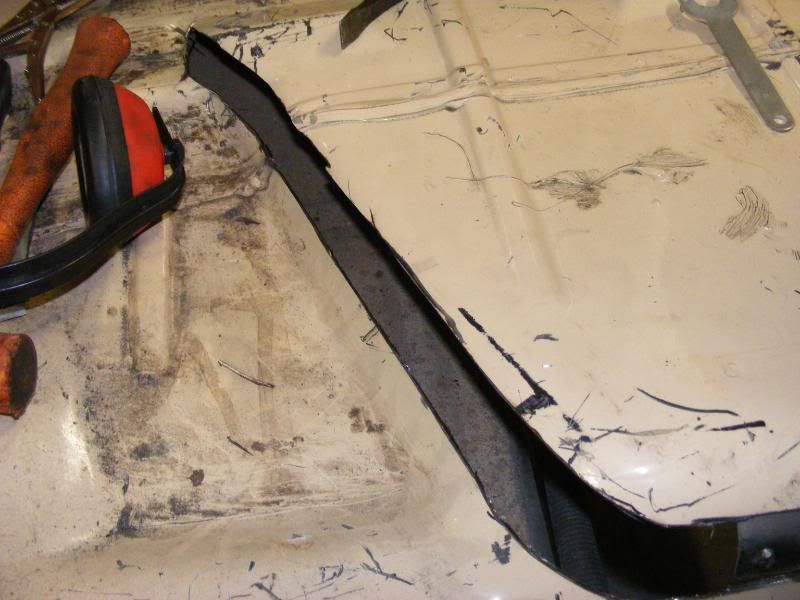 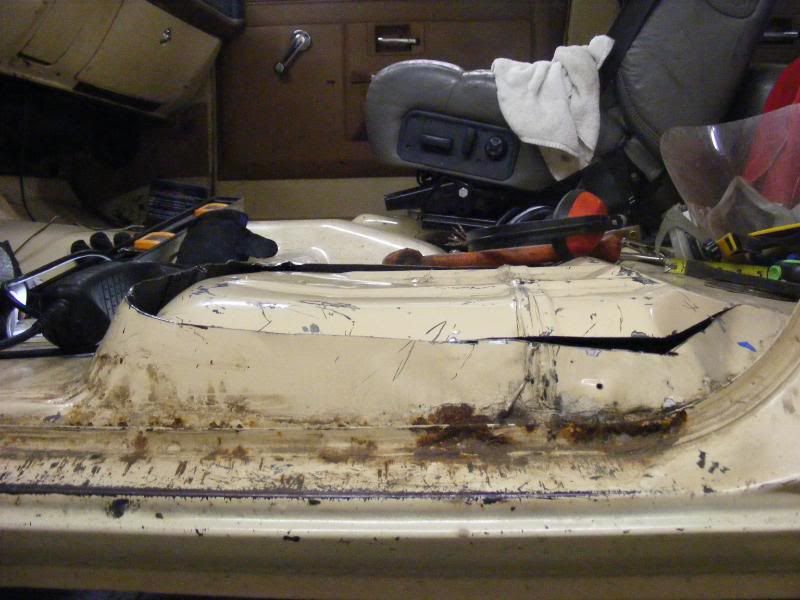 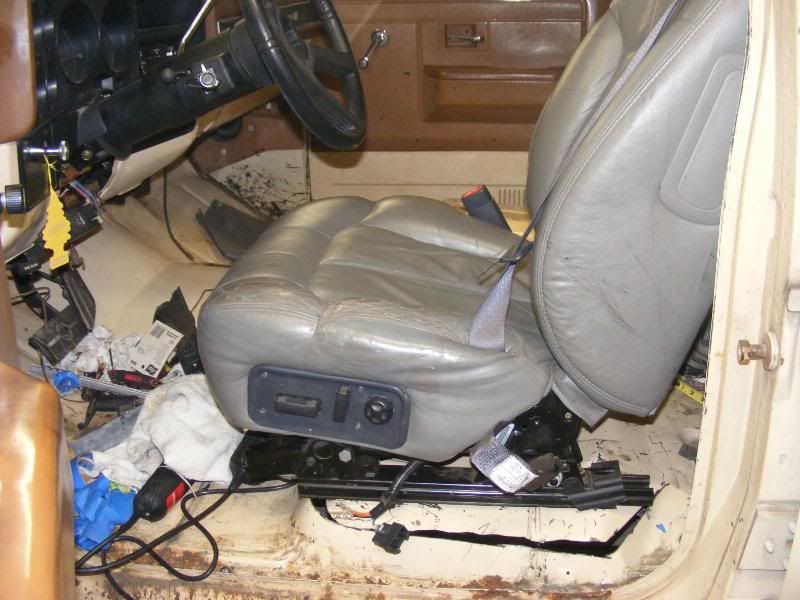 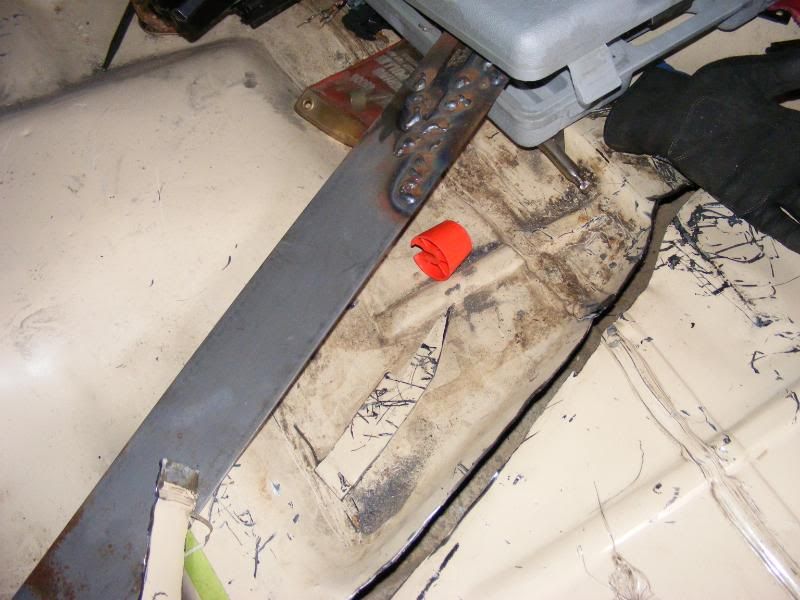 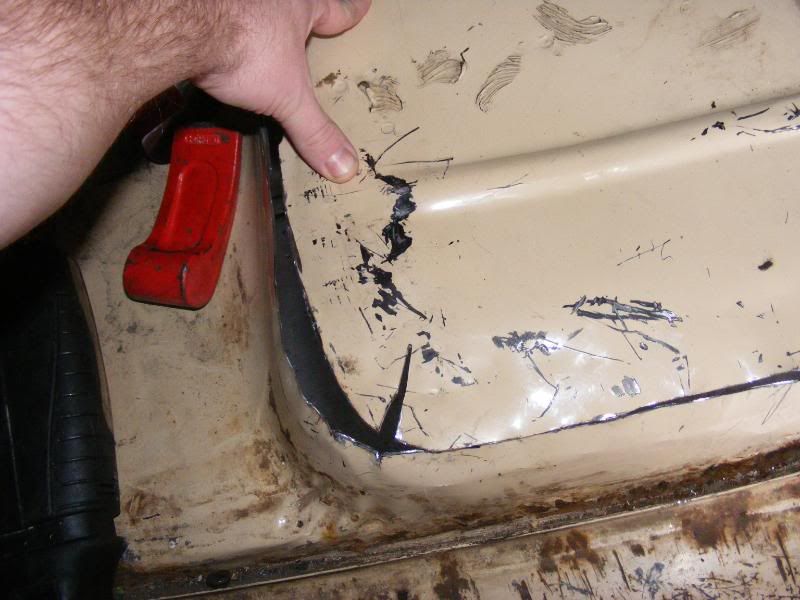 Now I dont know whether to try and make the piece work or just get a whole new piece of sheet metal and weld that in. I think I would have to mount some kinda bracing underneath new metal to give it some strength. what do you guys think? any sugestions |
|
|

|
|
|
#42 |
|
Registered User
Join Date: Dec 2011
Location: Elkhart, IN
Posts: 1,308
|
Re: Build #2 Crusader!
Nice work on the truck so far.
__________________
1985 Chevrolet K10 Custom Deluxe---SOLD 1997 Ram 2500 5.9 Cummins 1985 Chevrolet Camaro Z28 1987 Chevrolet K10 Silverado "The Beast" build 1987 Silverado http://67-72chevytrucks.com/vboard/s...=1#post6150257 |
|
|

|
|
|
#43 |
|
Account Suspended
Join Date: Aug 2007
Location: USA
Posts: 1,223
|
Re: Build #2 Crusader!
I dig! here is a pick of my 86 shortbed right now and what I want it to look like when its done. hopefully sooner than later.
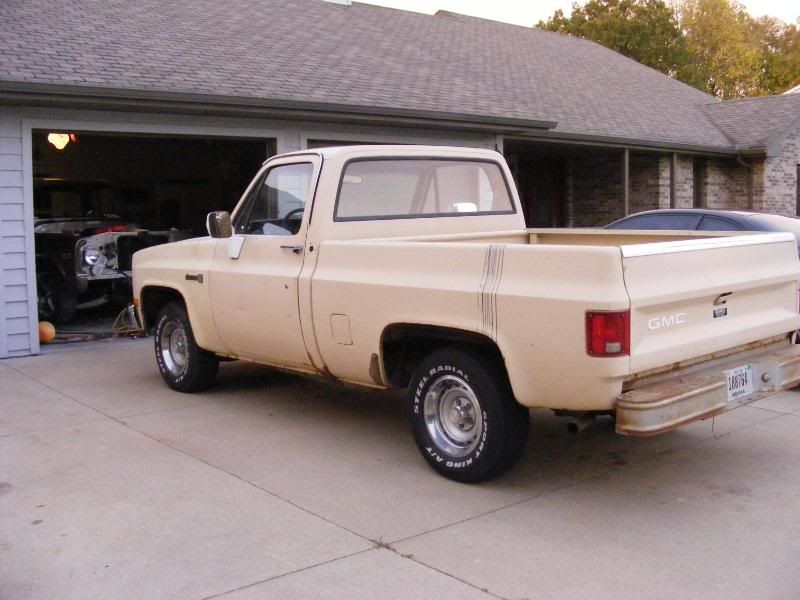 been playing around with the wheels, I have already bought the gray ones, just not sure If I like them more or less than the black ones. 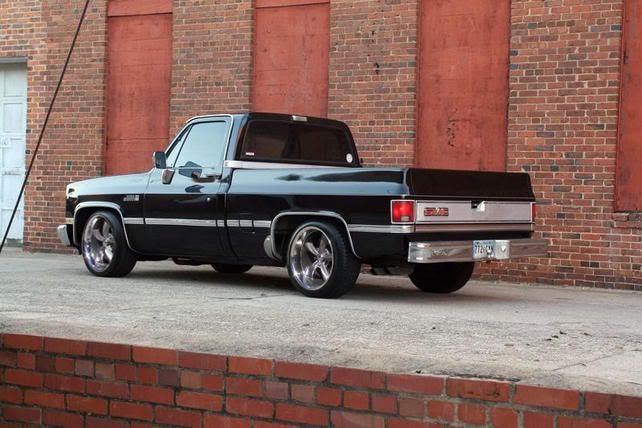 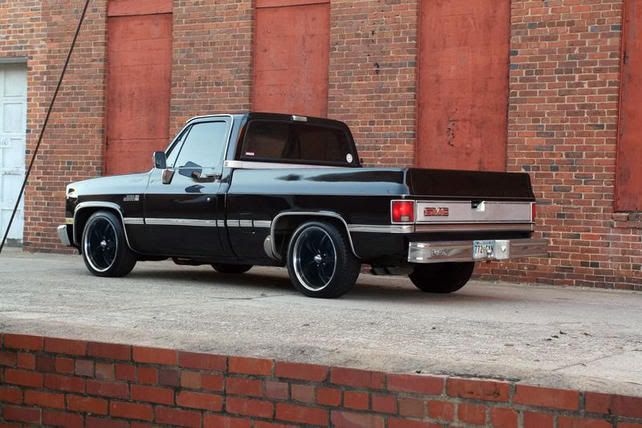 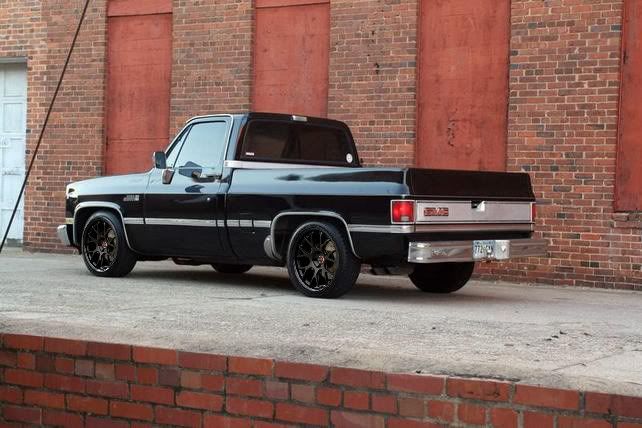
|
|
|

|
|
|
#44 |
|
Registered User
Join Date: Dec 2011
Location: Elkhart, IN
Posts: 1,308
|
Re: Build #2 Crusader!
Black goes good with it, but the gray also makes a very good contrast that more likely turn heads if thats what youre trying to get.

__________________
1985 Chevrolet K10 Custom Deluxe---SOLD 1997 Ram 2500 5.9 Cummins 1985 Chevrolet Camaro Z28 1987 Chevrolet K10 Silverado "The Beast" build 1987 Silverado http://67-72chevytrucks.com/vboard/s...=1#post6150257 |
|
|

|
|
|
#45 |
|
Registered User
Join Date: Nov 2011
Location: Paris, MO
Posts: 290
|
Re: Build #2 Crusader!
It looks like you cut the piece completly out I left mine and then persuaded it with a hammer to all come back together. It looks good
__________________
Clint Youse Paris, MO 1984 Chevrolet 3+3 K30 with Cummins 1966 IH Scout has been a work in progress for 16 yrs |
|
|

|
|
|
#46 |
|
6>8 Plugless........
 Join Date: Sep 2007
Location: Prairie City, Ia
Posts: 17,143
|
Re: Build #2 Crusader!
Great progress Mr.Hino! That crew is pretty dang clean for an old work truck that had a lift gate in it. On your floor, I think it might be easier to use the piece you removed and trim it and place it back in there. Try to tack it and beat it around to fit the gap and hopefully fill in the voided area. Yes, I do think einforcing it would help when done. Maybe with a brace under the seat bolts or something. Keep at it, you're making great progress!
__________________
Ryan 1972 Chevy Longhorn K30 Cheyenne Super, 359 Inline 6 cylinder, Auto Trans, Tilt, Diesel Tach/Vach, Buckets, Rare Rear 4-link and air ride option Build Thread 1972 GMC Sierra Grande Longhorn 4x4 1972 Chevy Cheyenne Super K20 Long Step side tilt, tach, tow hooks, AC, 350 4 speed 1972 C10 Suburban Custom Deluxe 1969 Chevy milk truck 1971 Camaro RS 5.3 BTR STG3 Cam Super T10 1940 Ford 354 Hemi 46RH Ford 9" on air ride huge project Tired of spark plugs? Check this out. |
|
|

|
|
|
#47 |
|
Registered User
Join Date: Feb 2011
Location: newcastle texas
Posts: 41
|
Re: Build #2 Crusader!
Cut the top section completely off. Take a section out of the remaining floor to get the drop you need. Split the top section down the middle and lay it on top with the corners and sides lined up and tack the top section back on. You will have to add a small strip down the middle of the top section and one across the back. You can add some thicker plate strips under the floor to make it stiffer and more support for the bolts. Mike
|
|
|

|
|
|
#48 | ||||
|
Account Suspended
Join Date: Aug 2007
Location: USA
Posts: 1,223
|
Re: Build #2 Crusader!
Quote:
Quote:
Quote:
Quote:
|
||||
|
|

|
|
|
#49 | |
|
Registered User
Join Date: Dec 2011
Location: Elkhart, IN
Posts: 1,308
|
Re: Build #2 Crusader!
Quote:

__________________
1985 Chevrolet K10 Custom Deluxe---SOLD 1997 Ram 2500 5.9 Cummins 1985 Chevrolet Camaro Z28 1987 Chevrolet K10 Silverado "The Beast" build 1987 Silverado http://67-72chevytrucks.com/vboard/s...=1#post6150257 |
|
|
|

|
|
|
#50 |
|
Account Suspended
Join Date: Aug 2007
Location: USA
Posts: 1,223
|
Re: Build #2 Crusader!
now that the boy is back from his trip. he wanted to help out in the garage again. So I started him off in taking apart the rear brakes, diff cover, remove old shocks and install some new ones, all the dirty stuff. he wears the grease like a badge of honor.
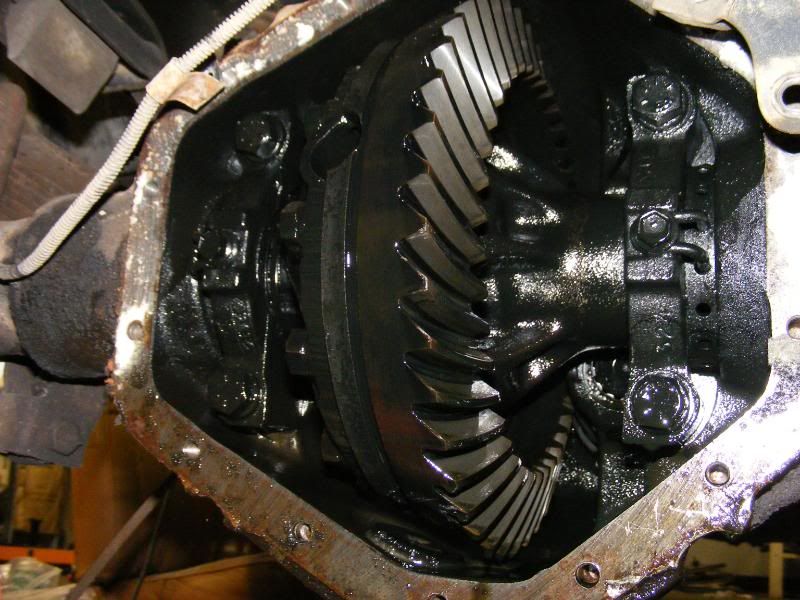 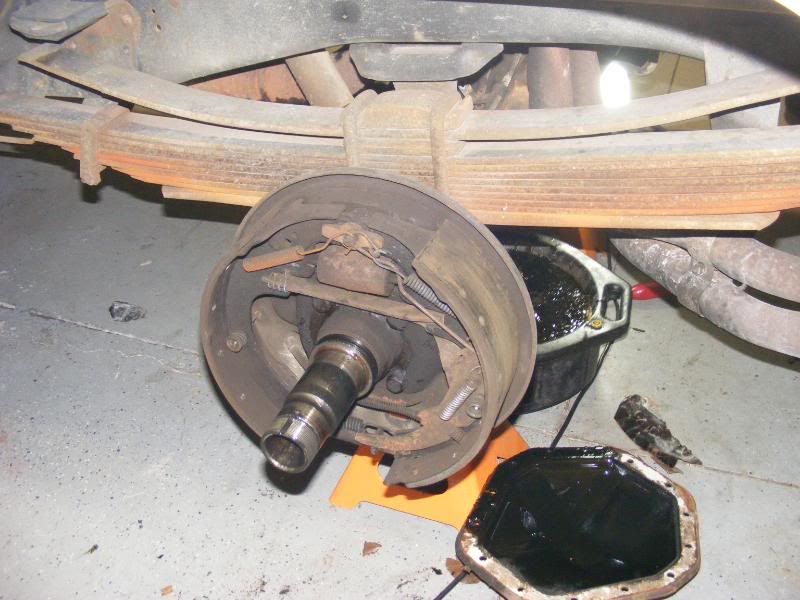 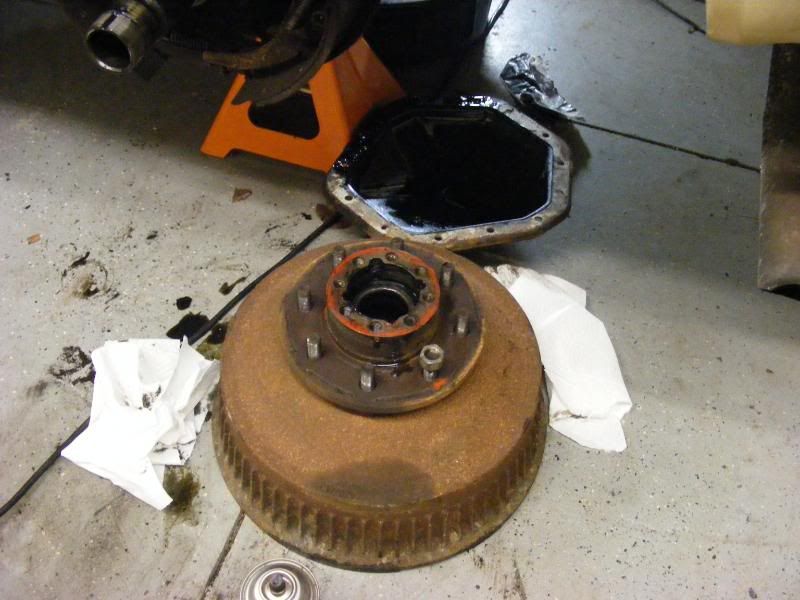 Deb even come out for a few minutes to pound on some studs 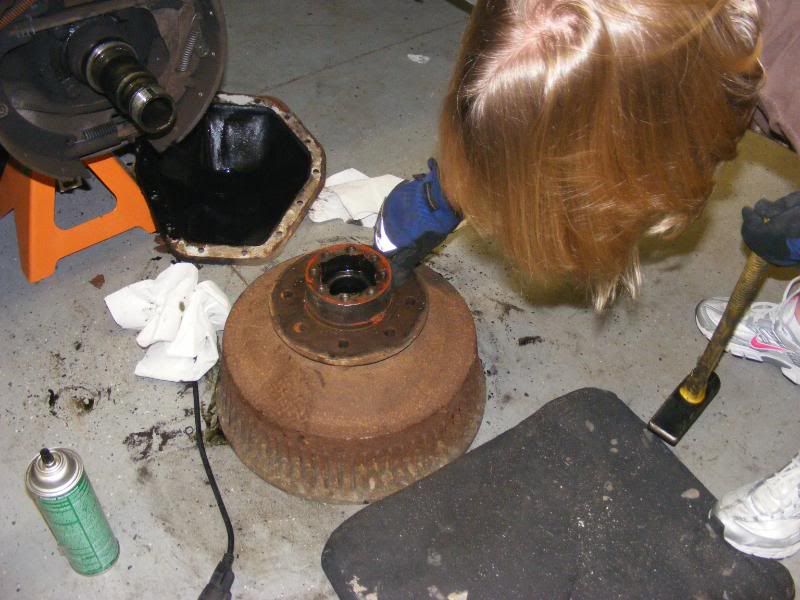 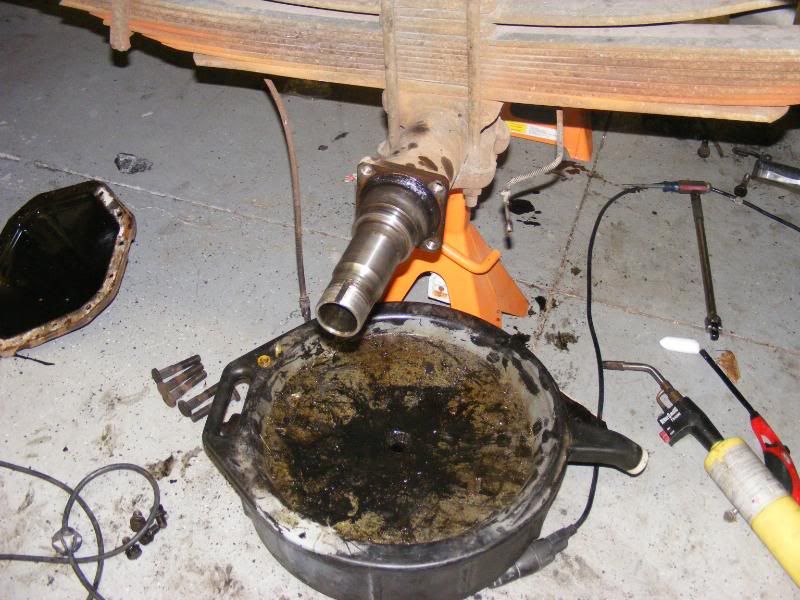 I took the old seals out and checked the bearings. Had one inner bearing was starting to turn for the worse. So I figured it would be in my best interests just to change them all. Here is some photos of rebuilding the hub, and installing the rear discs brackets, and calipers. pop the seal out, watch your toes, the inner bearing just falls out of your foot. 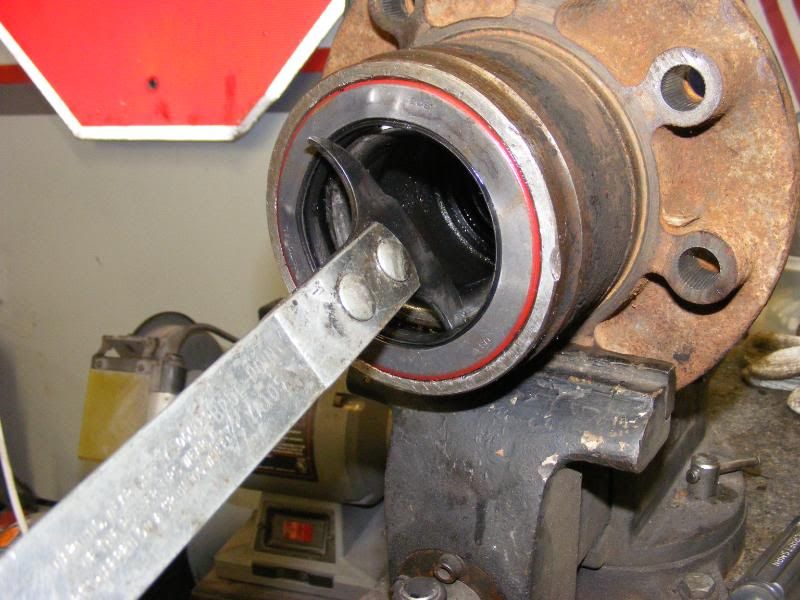 turn it upside down and with a brass drift knock out the race. 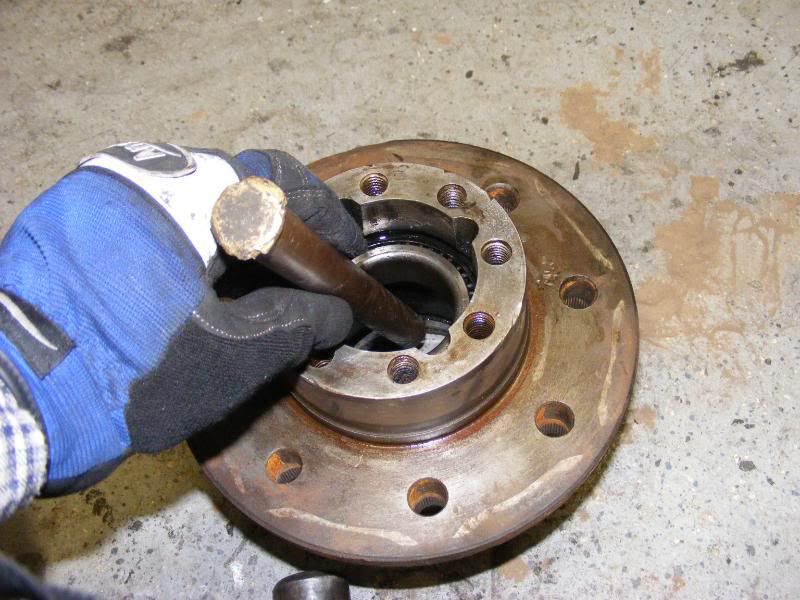 then drive the front bearing and race out together from the front. 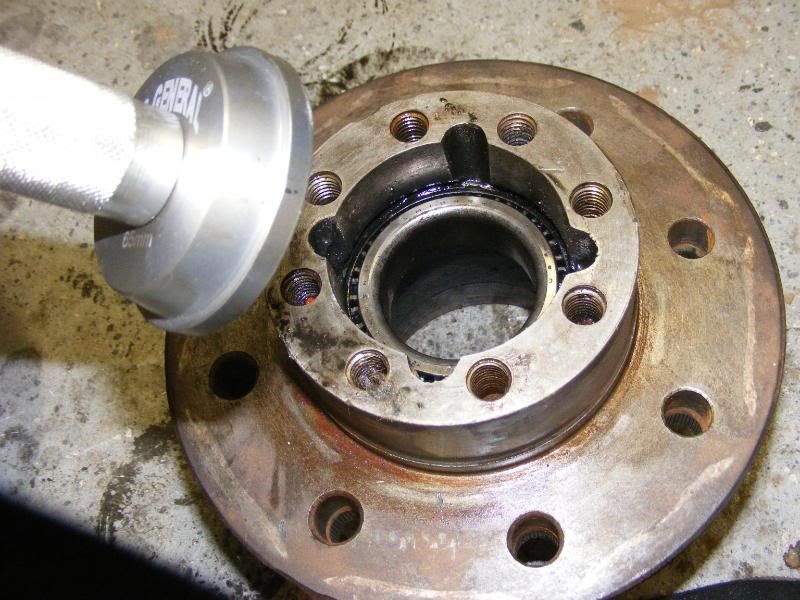 then clean Hub 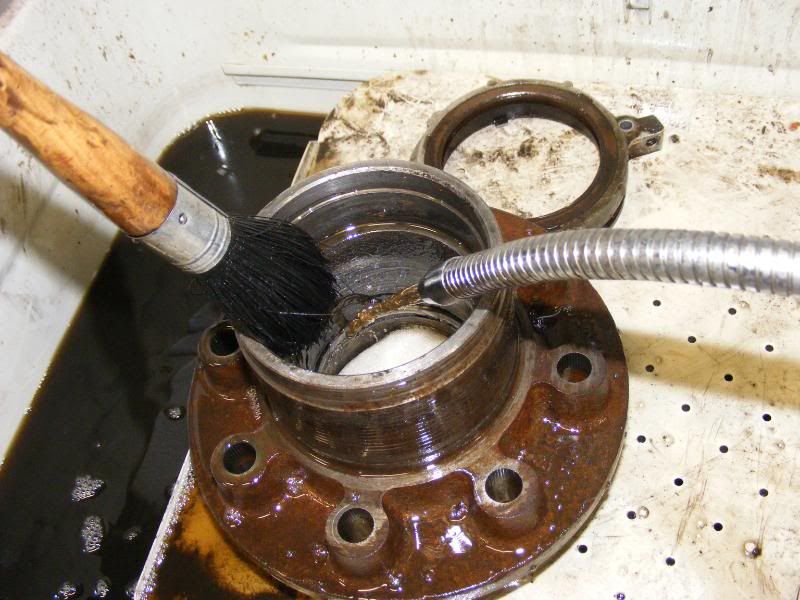 with new bearing and seal everything goes back together in reverse. 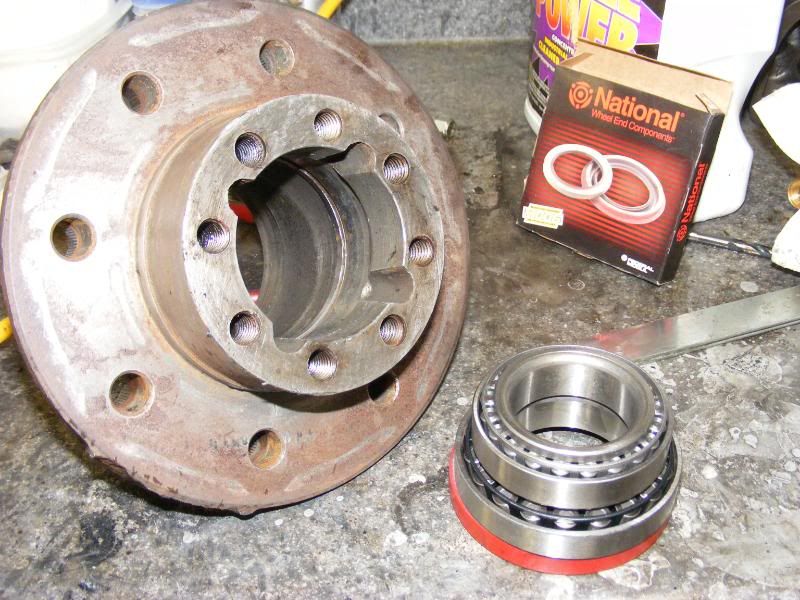 drop in inner bearing, then pound in the race (upside down from the normal way) pound it far enough down that you can get the snap ring in. then pound in the inner race, drop in the bearing and then finish off with a new seal. 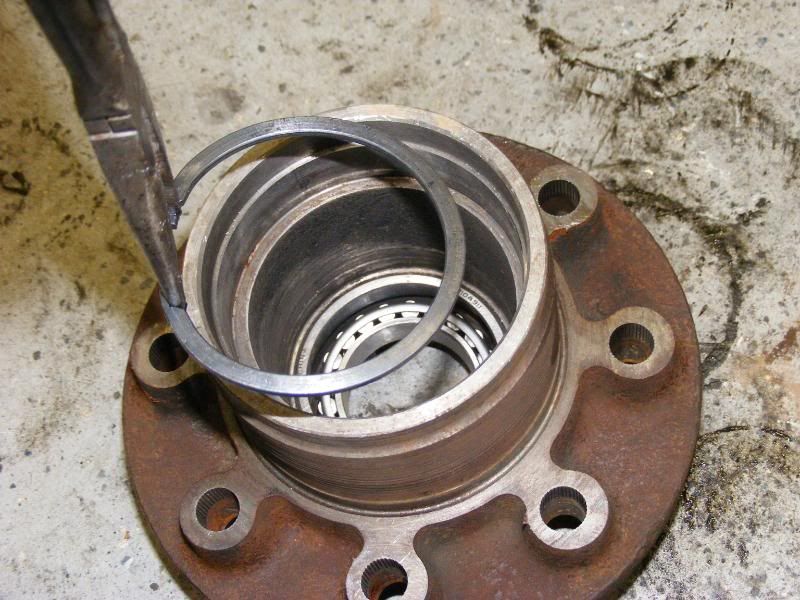 cleaned the rotor, and installed it on to the hubs by pounding in all the studs 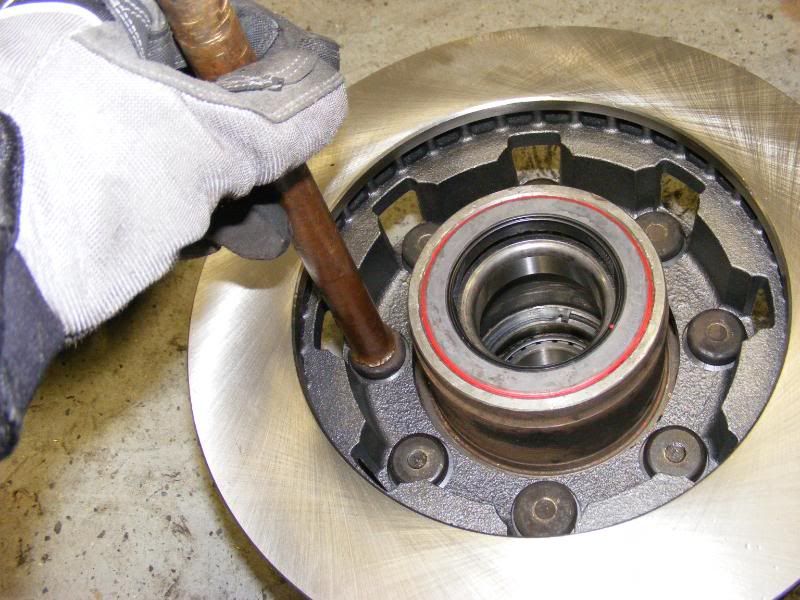 cleaned the axle spindle and dressed it with some emery cloth 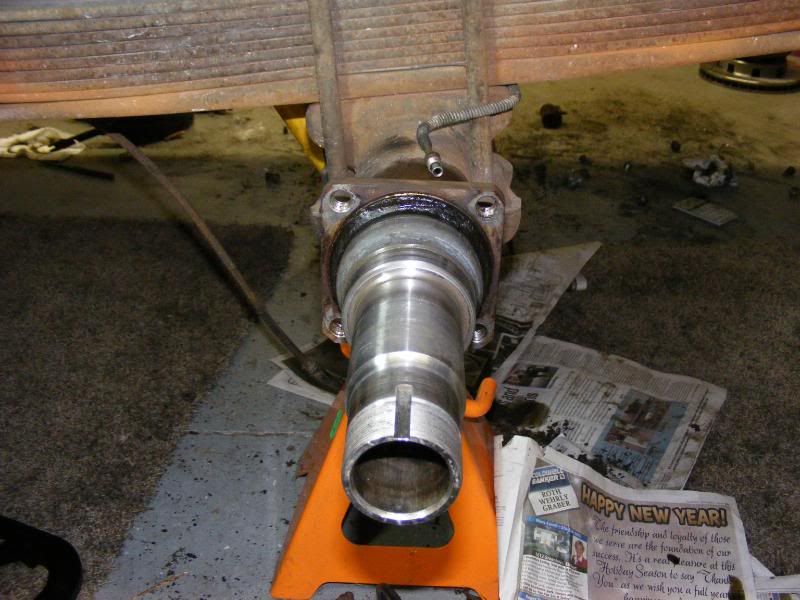 I degreased the new brake brackets, then painted and bolted them on with the supplied Grd 8 bolts. the brackets came from Great lakes Offroad  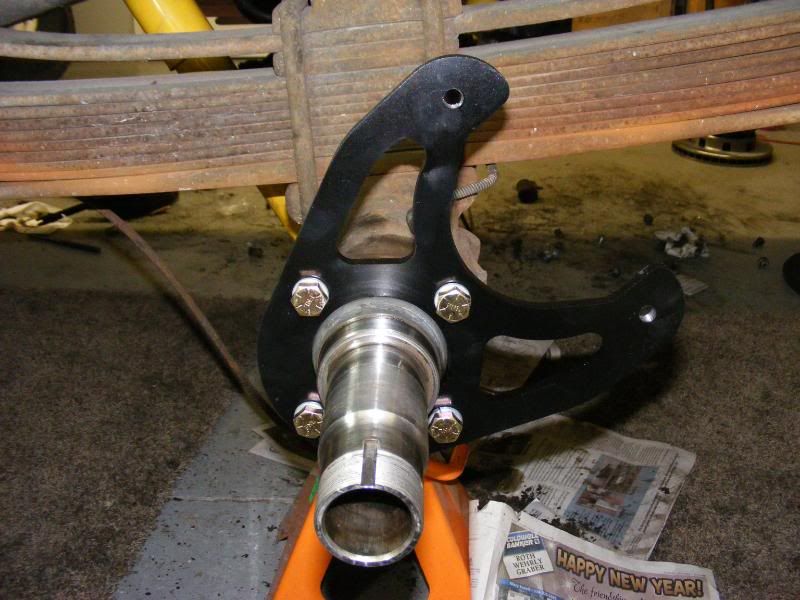 thew the hub and rotor on next and tightened up the lock nuts. slide in the cleaned axle and threaded in the bolts. 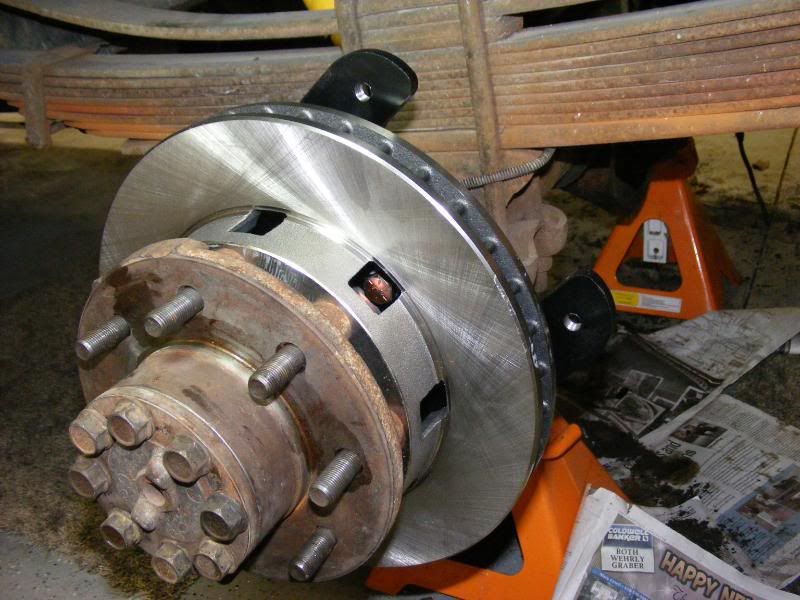 Next was the caliper and pads everything fell right into place. I still have to hook up the rear brake hoses but that should be to hard. I will thread them on to the existing steel line that was there from the drum brake setup and secure them with some sorta bracket. 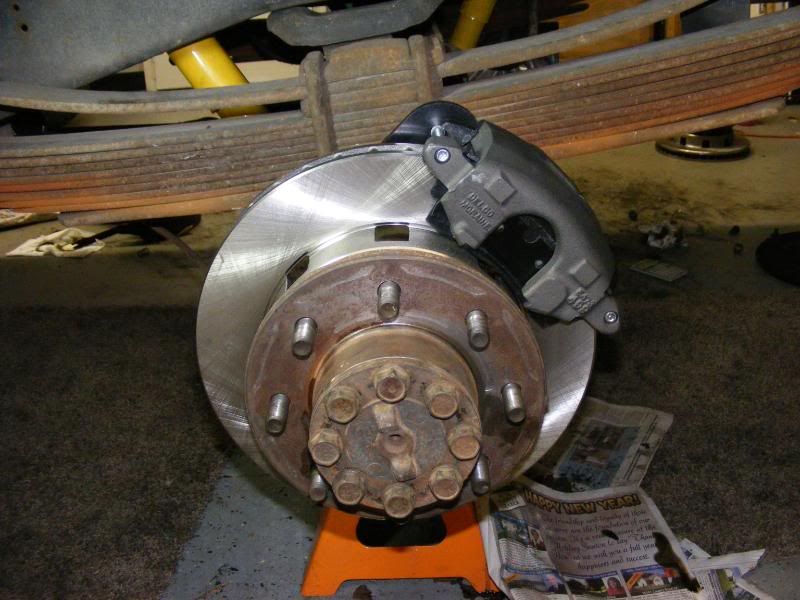 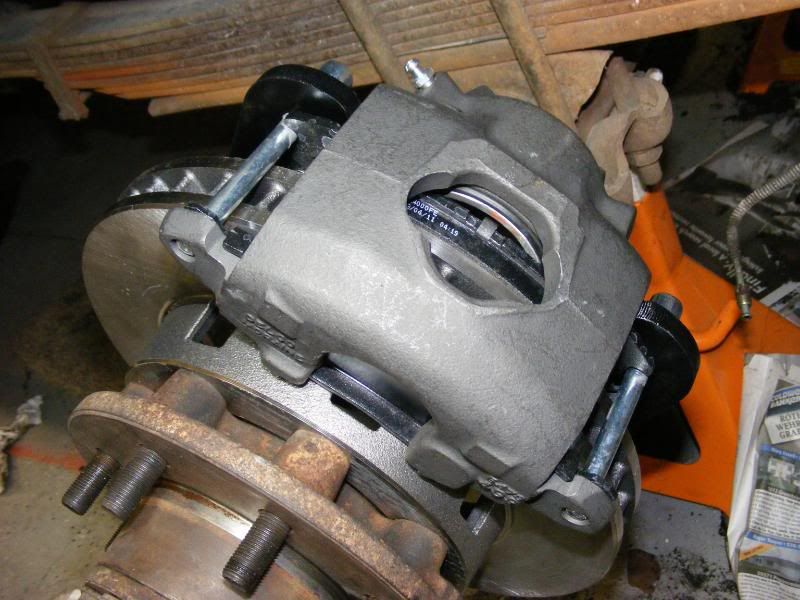 all in all it is a very easy conversion. the majority of the time spent was in the cleaning process. I was going to weigh everything that I took off and compare the weight to the disc set up. Im sure its at least 50 lbs. I betcha I have about the same amount of money into it as it would cost just to replace both drums. not including wheel cylinder, hardware kits or shoes. I left the diff open for now because I cant decide on weather to change rear gears from 4:10's to 3:73's The main reason I would change is to get Highway cruising rpm a little lower to save fuel, but i'm afraid the in town (stop light to stop light) fuel consumption would suffer,from trying to get this huge b!tch moving. towing might suffer as well. any thoughts on that would be appropriated. |
|
|

|
 |
| Bookmarks |
| Tags |
| black, disc, paint, seats, shortbed |
|
|