
 |
|
|
#26 |
|
Registered User
Join Date: Apr 2016
Location: Hollister, Ca
Posts: 86
|
Re: 76 Stepside Resto
So here are a few pics of todays progress!
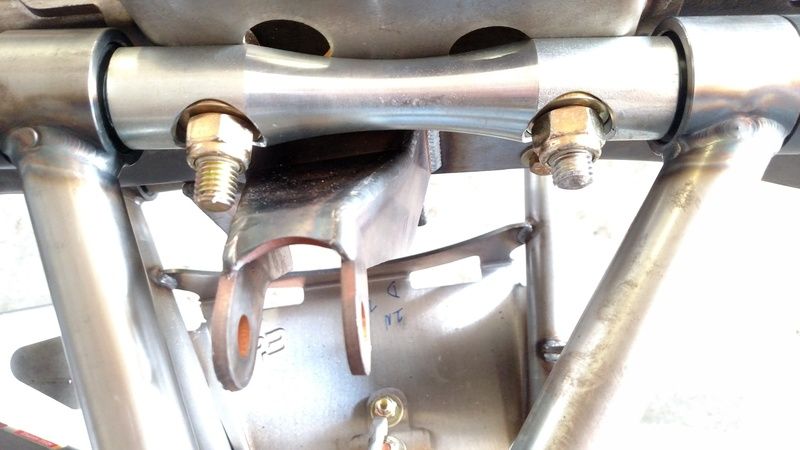 I think I received too long of bolts for the upper A arms, so I purchased 2 3/4" bolts from my local hardware store. They were still a bit too long, so I ground down one about 1/4", now it fits perfect! 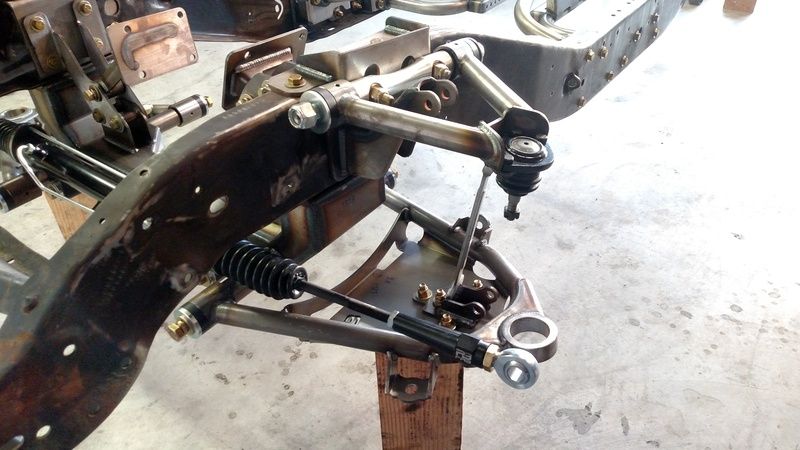 Upper & Lower installed with upper Ball Joint. 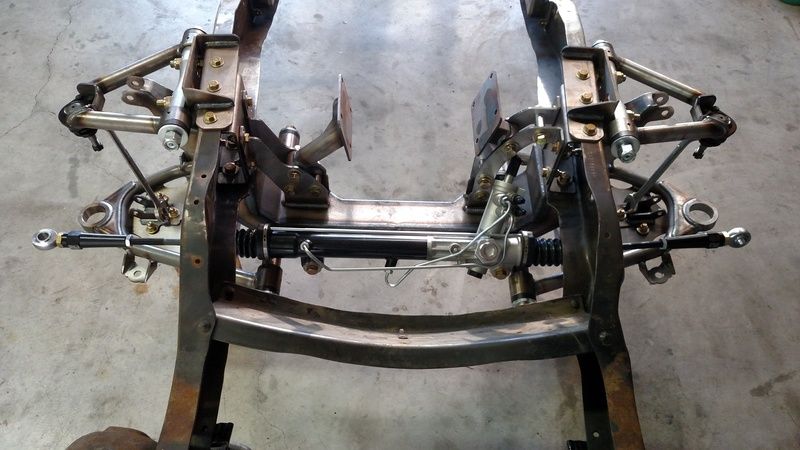 Both sides on, plus Rack Installed and motor mounts. |
|
|

|
|
|
#27 |
|
Registered User
Join Date: Apr 2016
Location: Hollister, Ca
Posts: 86
|
Re: 76 Stepside Resto
I also put together my rear coilovers. Not sure anyone cares, but i could not find a step-by-step anywhere online so....
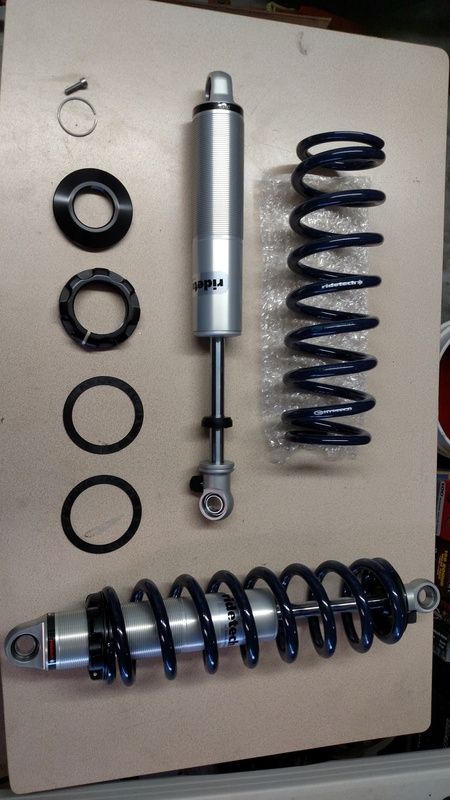 Everything laid out. 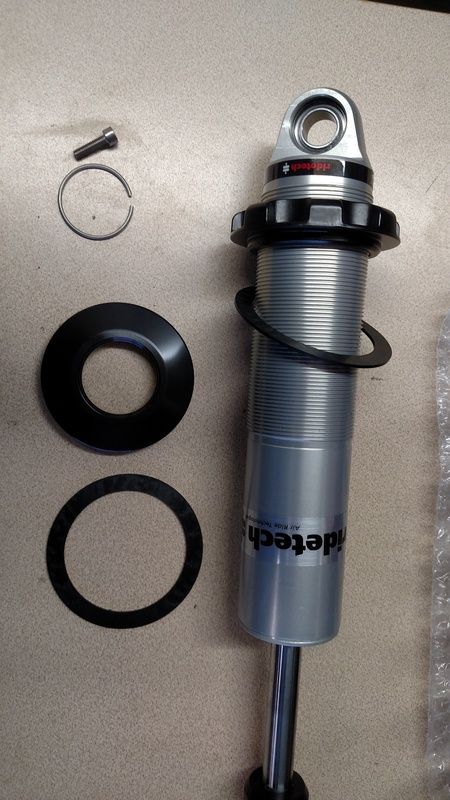 Lower ring threaded on and also lower plastic washer.  You have to remove the Adjustment knob to install the upper ring. 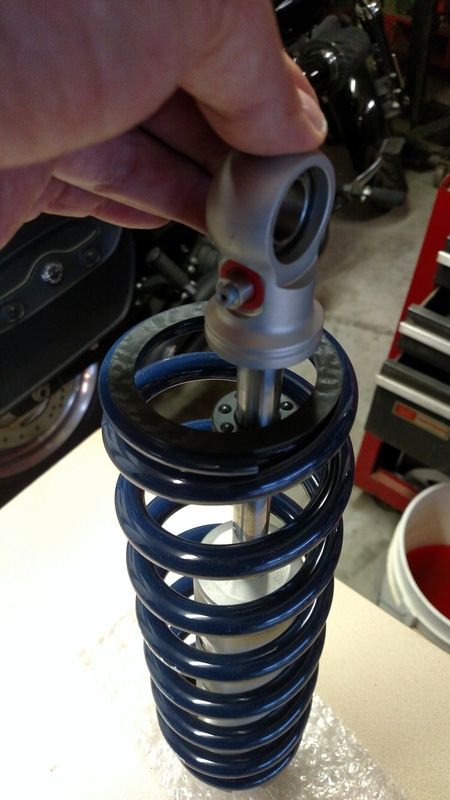 Slide the coil on followed by the top washer. 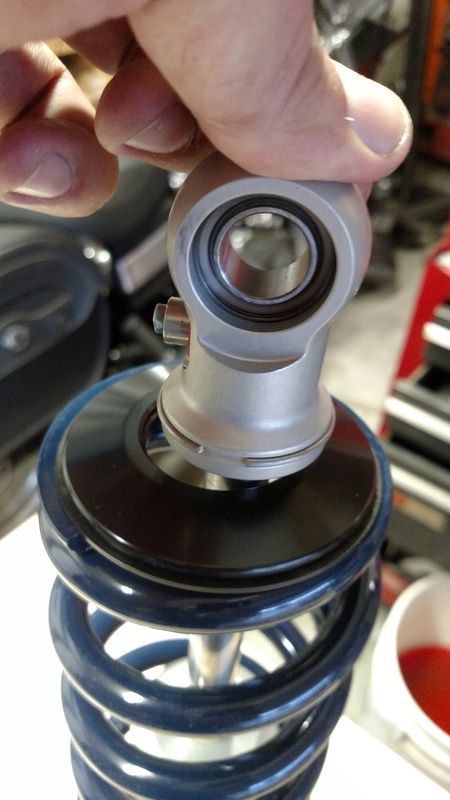 Install the top ring, then install the snap ring onto the top of the shock. This locks the top ring into place. 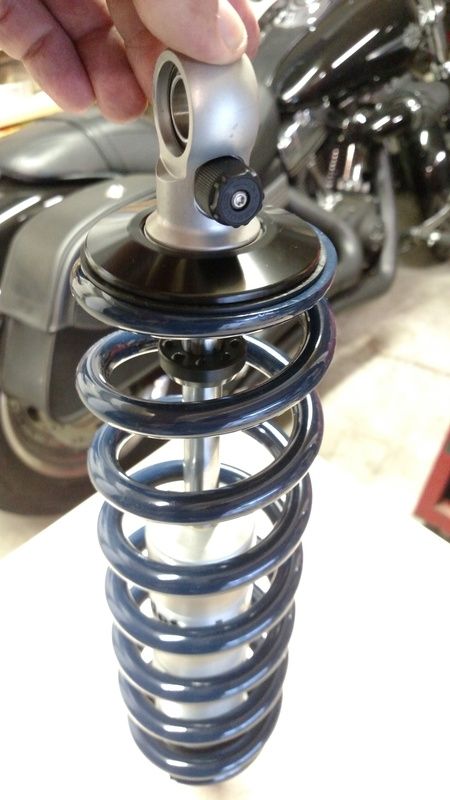 Tighten the lower ring until its snug and reinstall the adjustment knob. Not that hard. But took me a minute since I dont play with Coilovers everyday. 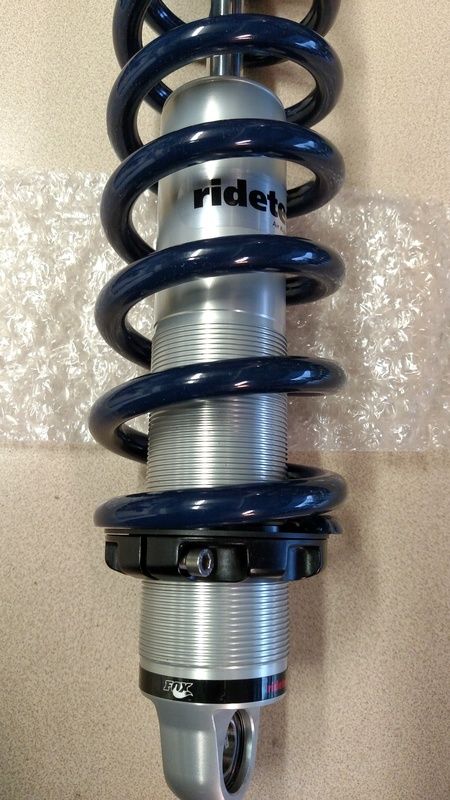 The lower ring has a screw for a Lock-down once tightened and ride height set.  Also kinda cool, I did not realize these are Fox Shocks. I thought Fox was its own brand. Last edited by TurboLS; 04-13-2016 at 02:18 AM. |
|
|

|
|
|
#28 |
|
Registered User
Join Date: Apr 2016
Location: Hollister, Ca
Posts: 86
|
Re: 76 Stepside Resto
So now the question of the day. Too Powdercoat, or Not too Powdercoat?
This has been on mind mind for a while. I want to get parts coated, but when? I know I need to mock-up my suspension 1st. It needs to have tires on the ground, engine and tranny installed so i can set me rear pinion angle and finish my welding. But to put the front end on the ground I need the lower ball joints pressed in. So, to prevent me from pressing them in, pressing them out for coating, then back in again for final assembly, im going to get all my front end parts coated now. Does that make sense? Some of you might say install the motor and tranny, set the rear end at ride height and set pinion angle. And that would work. I just dont think I would be comfortable with that weight on 2 jack stands for days. I do live in California, EARTHQUAKES!! But if i could get the front put together, tires on the ground than the only thing on jack stands will be the rear. No biggie. I may be over thinking this, but too much money invested to gamble with. Sorry for the rant. |
|
|

|
|
|
#29 |
|
I have no time for this
Join Date: Dec 2002
Location: Fort St John B.C. CANADA
Posts: 434
|
Re: 76 Stepside Resto
The reason for the long bolts is so you can shim the upper control arm and set the camber and caster.
__________________
1986 Chevy short box ( PROJECT ) 1994 Chevy Blazer lifted 6" 2009 Gmc 2500 HD 1999 Hugger orange Camaro SS 2007 BMW X5 Sport |
|
|

|
|
|
#30 |
|
Registered User
Join Date: Apr 2016
Location: Hollister, Ca
Posts: 86
|
Re: 76 Stepside Resto
I understand that. But they are TOO long. And do not allow the A arm to be installed. The Coilover mount is in the way. I had to grind down 1 bolt to make the arm actually bolt on.
__________________
1976 C-10 Stepside 2005 Chevy Avalanche Z71 2008 Subaru Wrx - Modified Track Car 2012 Harley Davidson Fatbob Custom My build Thread - http://67-72chevytrucks.com/vboard/s...d.php?t=703077 Last edited by TurboLS; 04-13-2016 at 08:01 PM. |
|
|

|
|
|
#31 |
|
Registered User
Join Date: Jul 2009
Location: San Jose Ca
Posts: 2,871
|
Re: 76 Stepside Resto
Nice build.
__________________
David Used parts build: http://67-72chevytrucks.com/vboard/s...d.php?t=638991 My brother's Nova: http://www.67-72chevytrucks.com/vboa...d.php?t=727985 Rear suspension rework: http://www.67-72chevytrucks.com/vboa...d.php?t=750557 Instagram: myfabguy |
|
|

|
|
|
#32 |
|
Registered User
Join Date: Apr 2016
Location: Hollister, Ca
Posts: 86
|
Re: 76 Stepside Resto
So I didn't want too, but to prevent an additional disassembly in the future, I torn down everything, boxed it up and dropped it off for Powdercoat. Will have it all back next Tuesday. This gives me some time to clean up and focus on what's next.
__________________
1976 C-10 Stepside 2005 Chevy Avalanche Z71 2008 Subaru Wrx - Modified Track Car 2012 Harley Davidson Fatbob Custom My build Thread - http://67-72chevytrucks.com/vboard/s...d.php?t=703077 |
|
|

|
|
|
#33 |
|
Registered User
Join Date: Apr 2016
Location: Hollister, Ca
Posts: 86
|
Re: 76 Stepside Resto
So got back all my parts from Powdercoat today. They look damn good! I'll get pics of that stuff up soon.
For now I've started to clean up the frame. Weld up all unnecessary holes basically. I figured I'm here, might as well do it and get to play with the new welder at the same time. Should have all the holes filled and ground flat by tomorrow, then frame off to get Mediablasted.
__________________
1976 C-10 Stepside 2005 Chevy Avalanche Z71 2008 Subaru Wrx - Modified Track Car 2012 Harley Davidson Fatbob Custom My build Thread - http://67-72chevytrucks.com/vboard/s...d.php?t=703077 |
|
|

|
|
|
#34 |
|
Registered User
Join Date: Jan 2010
Location: butler pa
Posts: 328
|
Re: 76 Stepside Resto
looking real nice
|
|
|

|
|
|
#35 |
|
Registered User
Join Date: Dec 2009
Location: Snohomish, Washington
Posts: 1,187
|
Re: 76 Stepside Resto
Checking in for this one, need to see more coilover kits on the 73-87 c10s! Looks sweet so far!
__________________
Matt |
|
|

|
|
|
#36 |
|
Registered User
Join Date: Apr 2016
Location: Hollister, Ca
Posts: 86
|
Re: 76 Stepside Resto
Got a few things done today. I decided the C-Notch that was cut from the frame did not make me feel comfortable. With Porterbuilts Notch installed its major BEEF. But when it's not on there is not much frame left in that area. And I need to transport the frame to and from the Blasting shop where they will be moving the frame around and flipping it over.
So, I took some 2"x3/16" flat stock and bent it to the shape of the notch then welded it in. Yes, I know, the welds look like crap. But I had to run multiple Tack welds instead of continuous to prevent warping. I was planning on grinding the bottom anyway. Also decided to fix my problem of not enough frame on the bottom to bolt the Notch plates and rear crossmember on. I had to cut a section out completely where the frame originally curved down. Then took the same 3/16" plate and welded that in. I set the notch plates on and it fits perfect!
__________________
1976 C-10 Stepside 2005 Chevy Avalanche Z71 2008 Subaru Wrx - Modified Track Car 2012 Harley Davidson Fatbob Custom My build Thread - http://67-72chevytrucks.com/vboard/s...d.php?t=703077 |
|
|

|
|
|
#37 |
|
Registered User
Join Date: Apr 2016
Location: Hollister, Ca
Posts: 86
|
Re: 76 Stepside Resto
Thanks Muthstryker. I agree, too many Bagged C10s out there. Bags are cool, but I don't care for layin frame. I'm in it for performance. Bags might be a nice balance between comfort and performance, but there is a reason race cars don't run bags!
__________________
1976 C-10 Stepside 2005 Chevy Avalanche Z71 2008 Subaru Wrx - Modified Track Car 2012 Harley Davidson Fatbob Custom My build Thread - http://67-72chevytrucks.com/vboard/s...d.php?t=703077 |
|
|

|
|
|
#38 |
|
Registered User
Join Date: Apr 2016
Location: Hollister, Ca
Posts: 86
|
Re: 76 Stepside Resto
So been busy at work the last 2 weeks, but was finally able to get the frame done. Well primered anyway. Took hours to fill and grind all the unnecessary holes in the frame. Did I have to, No. But I think it's gonna look pretty damn good after I lay down black.
Got the frame to my Powder Coat shop for media blasting. Was expecting it tomorrow. But he fit me in between other jobs and got it done in 2 hours. Even delivered to my house. Was well worth it! Got 2 good coats of Etch Primer down tonight. Light scuff tomorrow then shoot black. This thing is finally moving forward! 
__________________
1976 C-10 Stepside 2005 Chevy Avalanche Z71 2008 Subaru Wrx - Modified Track Car 2012 Harley Davidson Fatbob Custom My build Thread - http://67-72chevytrucks.com/vboard/s...d.php?t=703077 |
|
|

|
|
|
#39 |
|
Registered User
Join Date: Apr 2016
Location: Hollister, Ca
Posts: 86
|
Re: 76 Stepside Resto
Daily update.... The frame is painted! Came out great. Once again proving, prep is key. Yes, the back 1 1/2 feet of frame is still in primer. Once the C notch and crossmember are back in place I'm going to remove the rear crossmember to finish cleaning up that part of the frame. Could not get the grinder in there with it in place.
Also got the forward 4 link mounts installed. And I know the kit was designed to handle the stress but I did not feel comfortable with my whole rear suspension riding on 4 bolts per side. So I went ahead and burned in the brackets. 4 stitch welds per side. They came out clean enough for Mig, and gonna make it that much stronger. Starting tomorrow, this project is gonna get kicked into high gear!!!
__________________
1976 C-10 Stepside 2005 Chevy Avalanche Z71 2008 Subaru Wrx - Modified Track Car 2012 Harley Davidson Fatbob Custom My build Thread - http://67-72chevytrucks.com/vboard/s...d.php?t=703077 |
|
|

|
|
|
#40 |
|
Registered User
Join Date: Jul 2009
Location: San Jose Ca
Posts: 2,871
|
Re: 76 Stepside Resto
Looking good! I wouldnt worry about warping 3/16'' steel unless you are running a bead thats really long (I keep most of mine under 6 inches).
The bolts would have probably been enough (something else will break before them). I would make sure you have enough paint or seam sealer (or weld) to make sure no water gets in between the mounts and the frame. There is a local C10 club in San Jose that has weekly meets (mine isnt running so I havent had the pleasure to join) they are on instagram if you are interested.
__________________
David Used parts build: http://67-72chevytrucks.com/vboard/s...d.php?t=638991 My brother's Nova: http://www.67-72chevytrucks.com/vboa...d.php?t=727985 Rear suspension rework: http://www.67-72chevytrucks.com/vboa...d.php?t=750557 Instagram: myfabguy |
|
|

|
|
|
#41 |
|
Registered User
Join Date: Apr 2016
Location: Hollister, Ca
Posts: 86
|
Re: 76 Stepside Resto
Made some big progress today. Got almost all the front end together. This is, hopefully, my final assembly. Just need to get the brakes and Coilovers in. Funny how much longer assembly is when your taking your time and not trying to damage the powder coating.
Side note: It is mentioned in the installation instructions, but I missed it, the steering rack threaded rods do need to be cut to get correct Toe angle. I put it all together and tried to figure out what I missed because both spindles were pointing back with the rack centered.
__________________
1976 C-10 Stepside 2005 Chevy Avalanche Z71 2008 Subaru Wrx - Modified Track Car 2012 Harley Davidson Fatbob Custom My build Thread - http://67-72chevytrucks.com/vboard/s...d.php?t=703077 |
|
|

|
|
|
#42 |
|
Registered User
Join Date: Apr 2016
Location: Hollister, Ca
Posts: 86
|
Re: 76 Stepside Resto
For the 1st time my new front end is sitting on its own tires! Looks amazing. Completely happy with this kit. Can't wait til the cab is back on. But 1st the motor and tranny are going in for rear end pinion angle setup.
Side note: the rack and pinion had to be trimmed to get the Toe correct. I started by cutting 1" off each threaded end. Got it set damn near perfect for a tape measure alignment.
__________________
1976 C-10 Stepside 2005 Chevy Avalanche Z71 2008 Subaru Wrx - Modified Track Car 2012 Harley Davidson Fatbob Custom My build Thread - http://67-72chevytrucks.com/vboard/s...d.php?t=703077 |
|
|

|
|
|
#43 |
|
Registered User
Join Date: Apr 2016
Location: Hollister, Ca
Posts: 86
|
Re: 76 Stepside Resto
Had a couple hours to do some work tonight. Was hoping a buddy would show up to give me a hand setting the motor/tranny in place but he couldn't make it. Had to pull a solo mission to get it done. Not impossible, just having a second set of hands would have made it a bit easier.
Either way, got the motor and tranny bolted together and set in place. The new truss mounts were a bit tricky. Just like the instructions say, keep all truss hardware loose. After the motor mounts were in, tightened everything down. Set in the transmission mount plate and just set the Energy Suspension mount in place and removed the jack. The bolts I had for the mount are not correct, nothing a trip to the hardware store can't fix. Hopefully tomorrow get the rear end pinion angle set and start welding up the rear 4 Link brackets.
__________________
1976 C-10 Stepside 2005 Chevy Avalanche Z71 2008 Subaru Wrx - Modified Track Car 2012 Harley Davidson Fatbob Custom My build Thread - http://67-72chevytrucks.com/vboard/s...d.php?t=703077 |
|
|

|
|
|
#44 |
|
Registered User
Join Date: Apr 2016
Location: Hollister, Ca
Posts: 86
|
Re: 76 Stepside Resto
This part by far has been the most stressful of this whole project. I think it's because I'm merging two kits together (Porterbuilt Rear 4 Link and the Schriener 9" housing). I must have measured at least 20 times at every point possible. Maybe it's just me overthinking things again, but I was nervous.
So far, got the rear end perfectly centered, 4 Link brackets straight, and pinion angle set. The engine and transmission mounted was at 5 1/2* Down, so I set the rear housing 4 1/2* Up. I was told by Nate at Porterbilt I should have a 1* difference between the 2. I ended the nights work by getting it all tacked in. Double checked that all my measurements were still dead on. Hopefully tomorrow I will have time to burn in the brackets fully. On a side note, the Panhard bar Porterbuilt sends is only welded on 1 side, it's tacked on the other. They send the bars a little long to account for differences in frames and possible assembly deviations. After my rear was tacked, I set the bar in on the drivers side mount and measured on the lower passenger mount. I will be removing 1" from this bar. That will put me right where I need to be plus give me some room for adjustment. (Pics of this to follow)
__________________
1976 C-10 Stepside 2005 Chevy Avalanche Z71 2008 Subaru Wrx - Modified Track Car 2012 Harley Davidson Fatbob Custom My build Thread - http://67-72chevytrucks.com/vboard/s...d.php?t=703077 |
|
|

|
|
|
#45 |
|
Registered User
Join Date: Nov 2015
Location: Smethport, PA
Posts: 1,213
|
Re: 76 Stepside Resto
It isn't as critical on a lowered truck as it was on my rock crawler, but have you cycled the suspension fully? straight up/down, right up/left down, left up/right down. Now is the time to ensure everything moves as it should before you burn everything in for good.
__________________
85 K30 crew cab dually - Project http://67-72chevytrucks.com/vboard/s...d.php?t=694939 87 Wrangler Rock Crawler - Reason for the project http://www.wranglerforum.com/f330/da...ld-122601.html 04 1500 crew cab http://67-72chevytrucks.com/vboard/s...d.php?t=786514 |
|
|

|
|
|
#46 | |
|
Registered User
Join Date: Apr 2016
Location: Hollister, Ca
Posts: 86
|
Re: 76 Stepside Resto
Quote:
__________________
1976 C-10 Stepside 2005 Chevy Avalanche Z71 2008 Subaru Wrx - Modified Track Car 2012 Harley Davidson Fatbob Custom My build Thread - http://67-72chevytrucks.com/vboard/s...d.php?t=703077 |
|
|
|

|
|
|
#47 |
|
Registered User
Join Date: Dec 2005
Location: baytown
Posts: 243
|
Re: 76 Stepside Resto
That's a nice work
|
|
|

|
|
|
#48 |
|
Registered User
Join Date: Apr 2016
Location: Hollister, Ca
Posts: 86
|
Re: 76 Stepside Resto
Thanks Higgie!
So I ran into my 1st big issue, and Nate from Porterbuilt is working with me to correct it. When installing my rear Coilovers, my lower mount were about 1" off from sliding fully on the studs and my coil was actually hitting my lower crossmember. It looks like they may have sent me the incorrect lower crossmember/Coilover mount. I will know for sure tomorrow. In the mean time, I decided I need to keep moving forward if I'm going to meet my August goal. So tonight I got the new fuel tank mounted. Took about an hour. I gotta say, I like the bare Aluminum. But for protection from road junk and debris, I think I'm going to get in powdercoated.
__________________
1976 C-10 Stepside 2005 Chevy Avalanche Z71 2008 Subaru Wrx - Modified Track Car 2012 Harley Davidson Fatbob Custom My build Thread - http://67-72chevytrucks.com/vboard/s...d.php?t=703077 |
|
|

|
|
|
#49 |
|
Registered User
Join Date: Apr 2016
Location: Hollister, Ca
Posts: 86
|
Re: 76 Stepside Resto
Wow, time flies when you have a 3 year old. Can't believe it's been 6 months since my last update. Had some design changes with the rear end Coilovers from Porterbuilt. Finished up some frame work. And bottom of the cab prep before it goes back on. Pics to come!
__________________
1976 C-10 Stepside 2005 Chevy Avalanche Z71 2008 Subaru Wrx - Modified Track Car 2012 Harley Davidson Fatbob Custom My build Thread - http://67-72chevytrucks.com/vboard/s...d.php?t=703077 |
|
|

|
|
|
#50 |
|
Registered User
Join Date: Apr 2016
Location: Hollister, Ca
Posts: 86
|
Re: 76 Stepside Resto
So, after months of lagging on this build I'm back at it hard again. Nate from Porterbuilt has been a huge help. It took about 2 months to get this rear Coilover setup straightened out. But between family, vacations, work, and life, Nate and I finally had some time to get it right. We decided it would be best to change to an Outboard Coilover setup rather than Inboard. My Ford 9" caused some issues with the larger center housing and the lower bracket when fitted would have been too close to the ground for my liking. Nate got me the New brackets at the beginning of the week, I got them on and Coilovers installed. I must say it looks Awesome. Beefy as always and fit perfect.
__________________
1976 C-10 Stepside 2005 Chevy Avalanche Z71 2008 Subaru Wrx - Modified Track Car 2012 Harley Davidson Fatbob Custom My build Thread - http://67-72chevytrucks.com/vboard/s...d.php?t=703077 |
|
|

|
 |
| Bookmarks |
|
|