
 |
|
|
#51 | |
|
Registered User
Join Date: Dec 2010
Location: washington NJ
Posts: 766
|
Re: 46 pickemup in NJ "the Rebuild"
Quote:
|
|
|
|

|
|
|
#52 |
|
SAVING ONE TRUCK AT A TIME
 Join Date: Feb 2010
Location: sherwood oregon
Posts: 1,141
|
Re: 46 pickemup in NJ "the Rebuild"
its a couple inches to one side.and yes it will not be visible.the cougar tank looks good and is similar in size to what i used.you will just need to change to a gm sending unit.
__________________
53-suburban (99% done) 40-pick up (99.9% done) 12-cc lb dually D-max (dd) 61-crew cab D-max "PAY LESS FOR WHAT YOU NEED PAY MORE FOR WHAT YOU WANT" 53 BURBAN BARN FIND:http://67-72chevytrucks.com/vboard/s...d.php?t=404091 1940 PROJECT MOON SHINE:http://67-72chevytrucks.com/vboard/s...d.php?t=551088 1961 CREW MAX: http://67-72chevytrucks.com/vboard/s....php?p=6957999 |
|
|

|
|
|
#53 |
|
SAVING ONE TRUCK AT A TIME
 Join Date: Feb 2010
Location: sherwood oregon
Posts: 1,141
|
Re: 46 pickemup in NJ "the Rebuild"
it also looks looks the filler is not centered on the cougar tank.
__________________
53-suburban (99% done) 40-pick up (99.9% done) 12-cc lb dually D-max (dd) 61-crew cab D-max "PAY LESS FOR WHAT YOU NEED PAY MORE FOR WHAT YOU WANT" 53 BURBAN BARN FIND:http://67-72chevytrucks.com/vboard/s...d.php?t=404091 1940 PROJECT MOON SHINE:http://67-72chevytrucks.com/vboard/s...d.php?t=551088 1961 CREW MAX: http://67-72chevytrucks.com/vboard/s....php?p=6957999 |
|
|

|
|
|
#54 |
|
Senior Member
 Join Date: Sep 2002
Location: Hampstead, NC
Posts: 8,190
|
Re: 46 pickemup in NJ "the Rebuild"
Paintman, I have a used nova tank I was going to install in my 46 but changed plans.
I only have $50 into it, if interested PM me. Build is looking good. Scott
__________________
1963 C10 swb fleetside 1966 GMC G1000 Handi-bus (future project) 1955 Chevy 2 dr. wagon Last edited by ScottH; 01-22-2013 at 10:50 AM. |
|
|

|
|
|
#55 |
|
Registered User
Join Date: Dec 2010
Location: washington NJ
Posts: 766
|
Re: 46 pickemup in NJ "the Rebuild"
Ok guys I need some advice... I'm ready to order some parts to connect my steering column to the rack. My question is where should I reduce down to 3/4 to hook into the splines on the rack.
Should I get a 1" DD x 3/4" DD reducer and hook that directly to the column, and then run 3/4" shaft down to the center joint with a heim ( for support), and then to the rack? Or should I go from the column with a 1" DD x 1"DD down to the center joint with a 1" shaft, and reduce there after the heim joint? Or should I go all the way with 1" shaft, still using a center joint with heim, and reduce down at the rack? I guess I trying to figure out if one is stronger than the other. I would think you would want to go as far as you can with a piece of 1" shaft since that"s the size coming out of the column. Or am I just over thinking this project? 
|
|
|

|
|
|
#56 |
|
Registered User
Join Date: Oct 2008
Location: oxnard ca
Posts: 2,201
|
Re: 46 pickemup in NJ "the Rebuild"
Stan Very easy here call us at the shop at (805)485-0382 and we have the parts you will need to hook up your steering on your column to your rack.
Justin 805 485-0382 |
|
|

|
|
|
#57 |
|
Registered User
Join Date: Dec 2010
Location: washington NJ
Posts: 766
|
Re: 46 pickemup in NJ "the Rebuild"
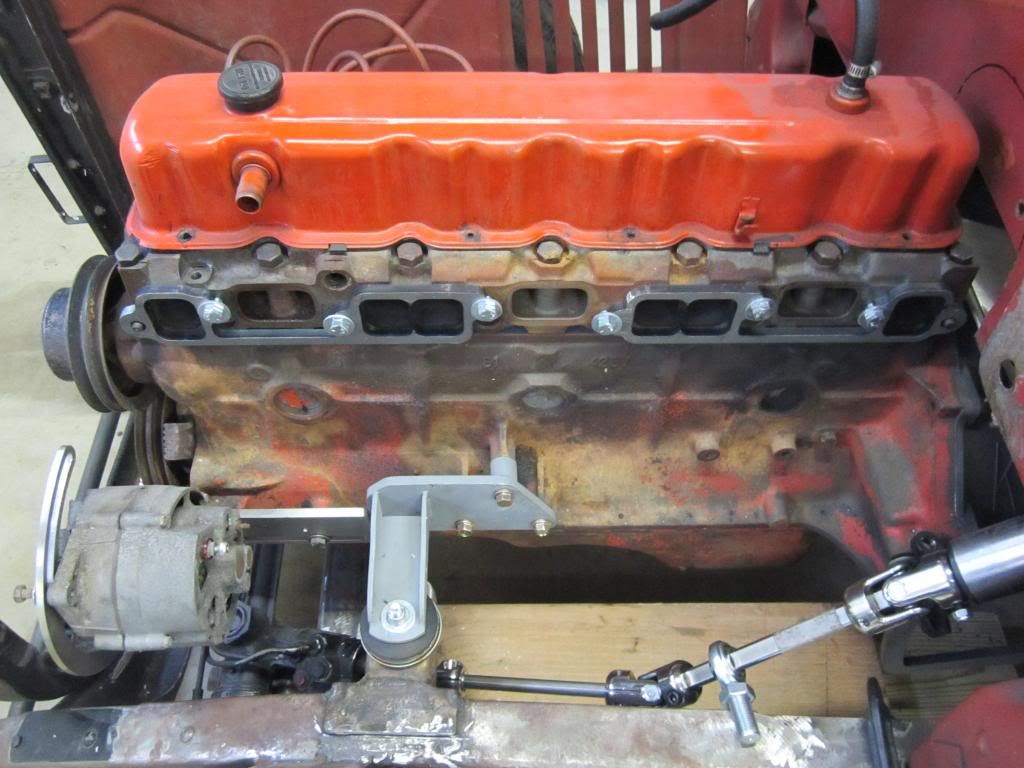
So as I was saying.......Got some steering parts from Justin at Scottshotrods.com this past week and finally had some time to get out into the garage and do some work. First i mocked up the linkages and loosely bolted it all together. It's amazing how many different ways you can do something when you only have 3 knuckles and 2 lengths of "DD" shaft. But for now this is what I went with. Wasn't sure just where resting place would be until I got the tubing for my new headers.
|
|
|

|
|
|
#58 |
|
Registered User
Join Date: Dec 2010
Location: washington NJ
Posts: 766
|
Re: 46 pickemup in NJ "the Rebuild"
So I'm sure a lot of you guys have seen some of my other posts elsewhere pertaining to my header situation, but to review here's the just of it. Because I am using the Clifford intake manifold, the firewall mounted brake booster and carb wants to occupy the same location.
Not being sure if an under the dash brake booster would work without all kinds of hassles, I decided to put in an under the cab brake booster mounted to the frame rail. Well that was all fine and dandy until I realized there would be no room for both exhaust tubes running under the drivers side of the cab if I used either Clifford or Langdon exhaust headers. I never liked the way Clifford and Langdon aimed the front set of headers straight back towards the cab, just didn't make sense to me.  I guess I could have run the tubes under the booster, but that would have left them lower then the frame rails,and that seemed to be just asking for trouble. Soooo I thought about having a set of headers made where I could run the front 3 ports under the oil pan to the passenger side of the cab. |
|
|

|
|
|
#59 |
|
Registered User
Join Date: Dec 2010
Location: washington NJ
Posts: 766
|
Re: 46 pickemup in NJ "the Rebuild"
Now I have to admit that this project has become waaaaayyyyy more involved then I ever wanted it to get. Not having all the high end fabrication equipment, and experience does pose it challenges. Plus the fact that my welding looks like it is put on with a sling shot, adds to the challenge.
So I had to find a way get a set of headers made the way I WANTED THEM. So after a lot of web surfing I found this place http://www.stainlessheaders.com/customheaders. They make headers in any shape you want. What they do is send you out a mock up kit consisting of all kinds of PVC fittings and these trick universal fittings that can bend in all kinds of different angles. Also included in the kit is a set of mock up header flanges, collectors, and some bungs for attachment. Heres what came in the box. 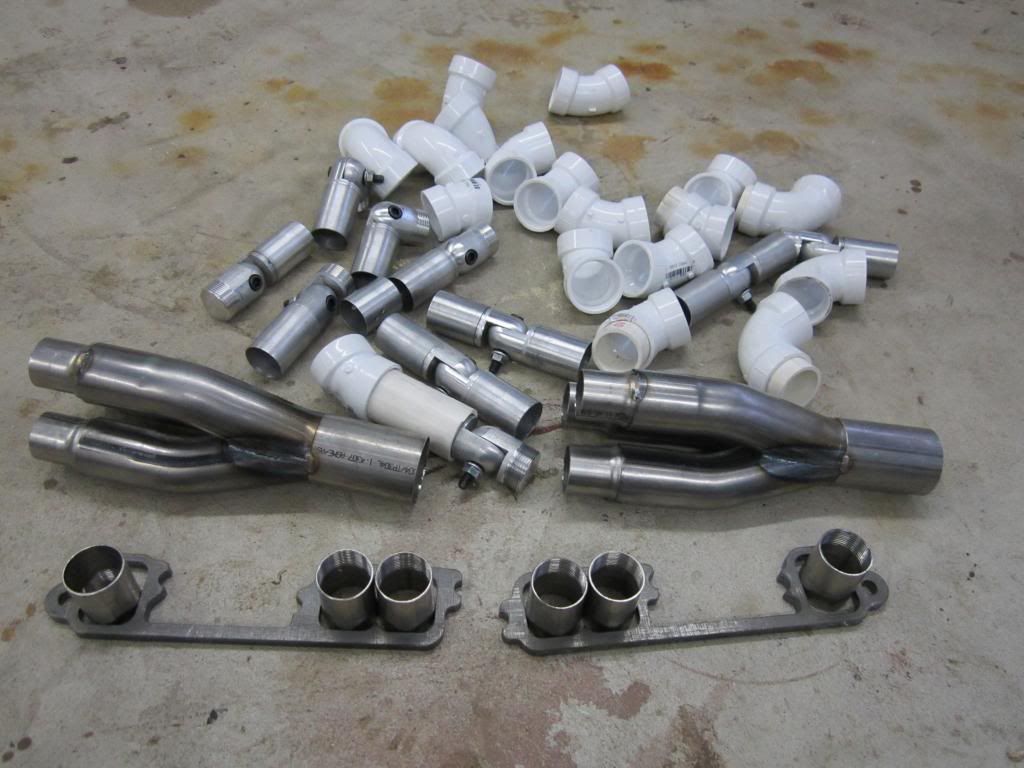
|
|
|

|
|
|
#60 |
|
Registered User
Join Date: Dec 2010
Location: washington NJ
Posts: 766
|
Re: 46 pickemup in NJ "the Rebuild"
The first thing you do is set your collectors at the desired finish height. For this I just took some old 6x6 timber I had laying around and drilled a 2 1/4 hole down into it to keep the collectors from moving around. Next you just start laying out where you want your tubes to go.
I thought this process would be easy because I had so much more room to work with due to the fact that I had a straight six. Wrong! The Clifford intake requires a very tight bend coming directly out of the ports. And the power steering bracket adds some complications. But after about 10 hours in the shop today this is where I am at. I tried to keep the tubes as close to the Clifford style exhaust as possible with the exception of pointing the collector straight down. 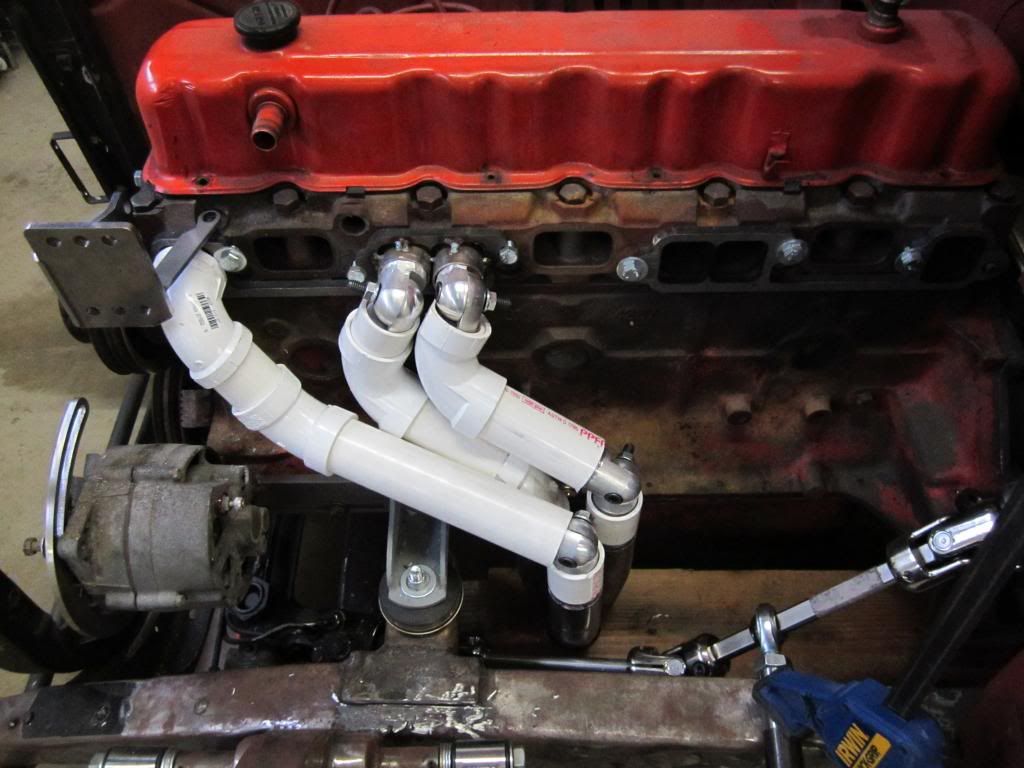  So here's is where I ran out of steam for today. I got the front 3 ports done and started on the back set. Once I am certain as to the configuration I want, I then have to go a screw pins into all the joints to keep everything from moving during transport. The one nice thing about a straight 6 is you don't have any clearance issues with the steering linkage!!!! 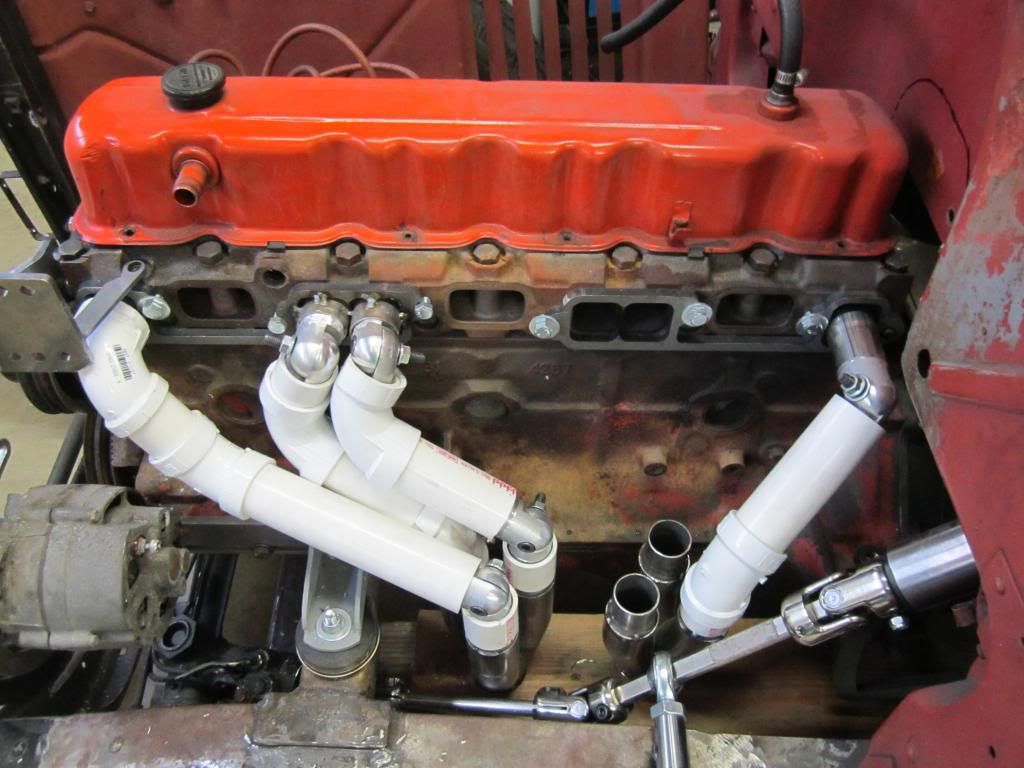 Once my mock up is complete, everything goes in a box and sent back to Stainless Inc. where they will build a fixture and do the final assembly in stainless! |
|
|

|
|
|
#61 |
|
Registered User
Join Date: Dec 2010
Location: washington NJ
Posts: 766
|
Re: 46 pickemup in NJ "the Rebuild"
Heres some cool youtube videos showing how Stainless Inc makes the final header!
|
|
|

|
|
|
#62 |
|
Registered User
Join Date: Dec 2010
Location: washington NJ
Posts: 766
|
Re: 46 pickemup in NJ "the Rebuild"
Well some progress, although small. Its amazing how many different combinations you can come up with when you have 6 ports, 100 different fittings and a lot of time on your hands. Biggest problem was getting my bends tight enough to clear the Clifford intake and power steering bracket. I also tried my best to keep all the primary tubes the same length, but the front most port is slightly longer than the rest because of its distance from the collector.
But, I finally got my headers mocked up the way I think I want them. Now that there all pinned in place, I can pack them up and send them off to be made! The headers will be made out of 304 stainless. 1 1/2" primary tubing down to a 2" merge collector, and then 2 1/4" exhaust pipe out the back. Before I do that, does anyone have any suggestions, or changes I should make. 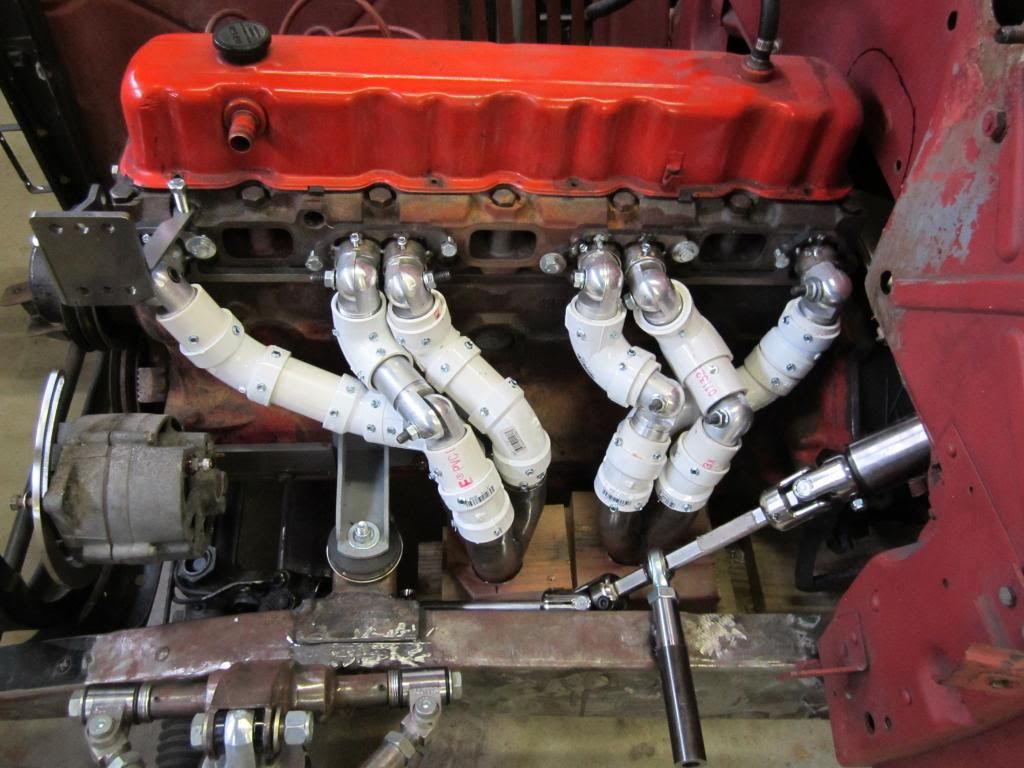 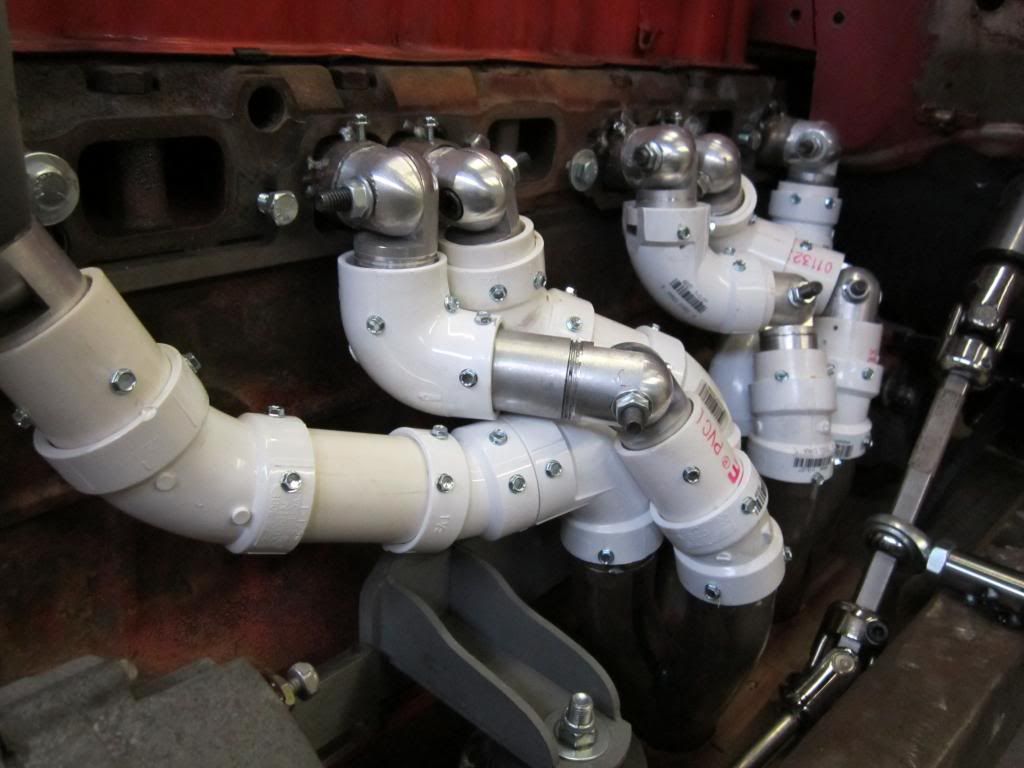 On a side note....I got another piece of the puzzle in the mail this week for the motor. A new custom harmonic damper from Walt Pearce! 
|
|
|

|
|
|
#63 |
|
SAVING ONE TRUCK AT A TIME
 Join Date: Feb 2010
Location: sherwood oregon
Posts: 1,141
|
Re: 46 pickemup in NJ "the Rebuild"
looks good.
__________________
53-suburban (99% done) 40-pick up (99.9% done) 12-cc lb dually D-max (dd) 61-crew cab D-max "PAY LESS FOR WHAT YOU NEED PAY MORE FOR WHAT YOU WANT" 53 BURBAN BARN FIND:http://67-72chevytrucks.com/vboard/s...d.php?t=404091 1940 PROJECT MOON SHINE:http://67-72chevytrucks.com/vboard/s...d.php?t=551088 1961 CREW MAX: http://67-72chevytrucks.com/vboard/s....php?p=6957999 |
|
|

|
|
|
#64 |
|
Registered User
Join Date: Dec 2010
Location: washington NJ
Posts: 766
|
Re: 46 pickemup in NJ "the Rebuild"
Final layout of steering shaft with a sexed up bracket to support the heim joint. I guess it will work.
So seeing as how I haven't had any feed back on the header design I guess I will ship it off. I have them set up in a way that will give me the option to either run them just like Clifford and Langdon's with both tubes going under the drivers side, or as my current plan, to shot the front header tube under the pan to the other side of the truck. 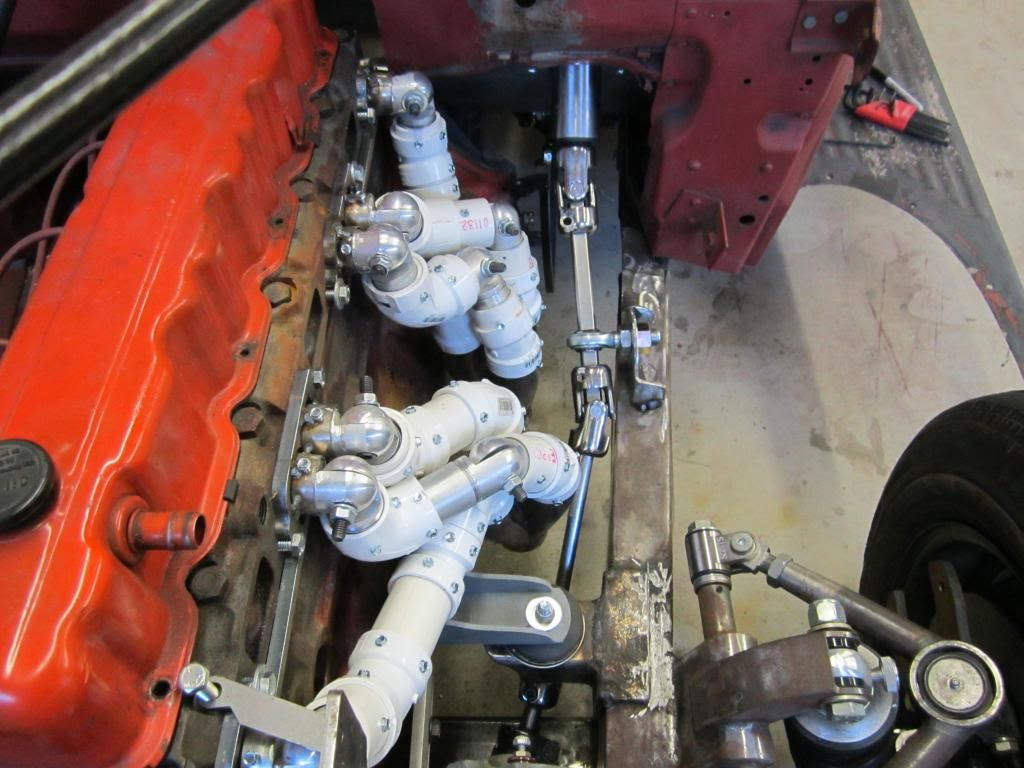 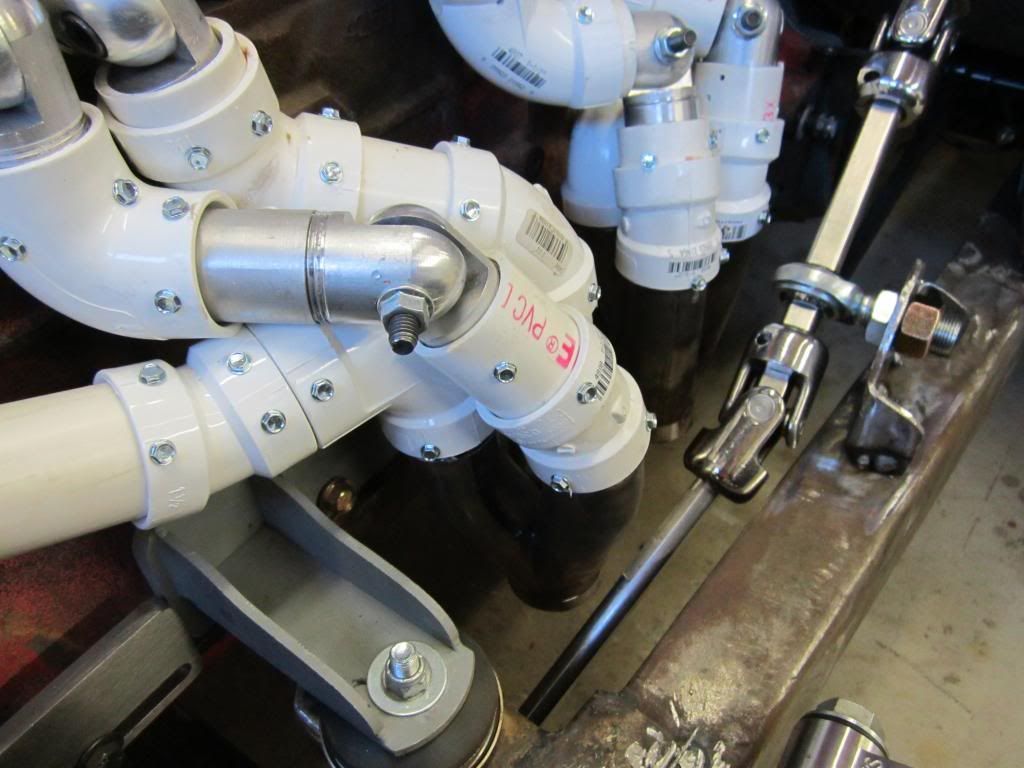
|
|
|

|
|
|
#65 |
|
SAVING ONE TRUCK AT A TIME
 Join Date: Feb 2010
Location: sherwood oregon
Posts: 1,141
|
Re: 46 pickemup in NJ "the Rebuild"
i think your mock up looks great.
__________________
53-suburban (99% done) 40-pick up (99.9% done) 12-cc lb dually D-max (dd) 61-crew cab D-max "PAY LESS FOR WHAT YOU NEED PAY MORE FOR WHAT YOU WANT" 53 BURBAN BARN FIND:http://67-72chevytrucks.com/vboard/s...d.php?t=404091 1940 PROJECT MOON SHINE:http://67-72chevytrucks.com/vboard/s...d.php?t=551088 1961 CREW MAX: http://67-72chevytrucks.com/vboard/s....php?p=6957999 |
|
|

|
|
|
#66 |
|
Registered User
Join Date: Dec 2010
Location: washington NJ
Posts: 766
|
Re: 46 pickemup in NJ "the Rebuild"
Soooo as I was sayin. On thursday we got about 6" of heavy wet snow here in NJ but come the weekend it was 60 degrees and sunny, so I decided to roll the ole girl out of the garage and let her get some fresh air.
 I figured since the truck was out in the driveway now would be a good time to work on the back of the cab where one of the PO's boogered a band aid onto the back, either because they were either to cheap, to lazy, or didn't know how to fix the cab the right way. So armed with nothing but a 4" angle grinder, some flap discs and sanding blocks, our hero set out to do a recon mission.  I tried to be as careful as possible when I was removing the bondo as I didn't want to take away any of the metal. So as soon as I got through the bondo and started hitting metal I stopped and took the rest down with the block sanders.  Here's what I found after about 2 hours of work. Defiantly some high and low spots, and what appears to be some kind of brazing in a couple of spots down at the bottom of the cab.  
|
|
|

|
|
|
#67 |
|
Registered User
Join Date: Dec 2010
Location: washington NJ
Posts: 766
|
Re: 46 pickemup in NJ "the Rebuild"
So it was onto the next step. Filling in the 40 or so holes that were left from where I removed the pop rivets that held the patch on the back of the cab. So I have to admit I have never done any kind of body work at all. Plus I have had limited experience with a welder. So it was a learn as you go type of project.
I wasn't sure if it would be better to try and fill the holes in or just cut the hole back of the cab out and stitch a new panel in. Especially since the area is also "oil canning" pretty bad. That option seemed to be WAAAAY beyond my ability. I figured I couldn't make it any worse then it already was. So I just decided to jump right on in feet first and see if I could fill the holes in with my Miller 110. First in order was some beer, Zepplin, and to send the wife and kinds off for the rest of the day. Once I played around with the heat and wire speed it seemed to go reasonably well. I just worked from one hole to another zapping one time at the edge of each hole. After awhile what seemed to work the best was zapping the top edge of each hole and letting gravity help the bead drop down to the bottom of the hole. Once I got 3 or 4 zaps on each hole I would go around and lightly hit the weld spots with the grinder to clean them up and then start the process over.   Getting closer  So am I doing it right????????? I have no idea but it certainly is better than what I had when i started. Fro the inside of the cab it looks as if the penetration is good. But what the hell do I know.  So buy around 2 o'clock I had 20 or so holes filled and roughly ground down and the rest of them about 75% filled in. But I was out of beer and tired of listening to Zepplin, and it was time to watch the first 50 laps of the NASCAR race before I will probably fall asleep.  Time to roll her back in for the night. 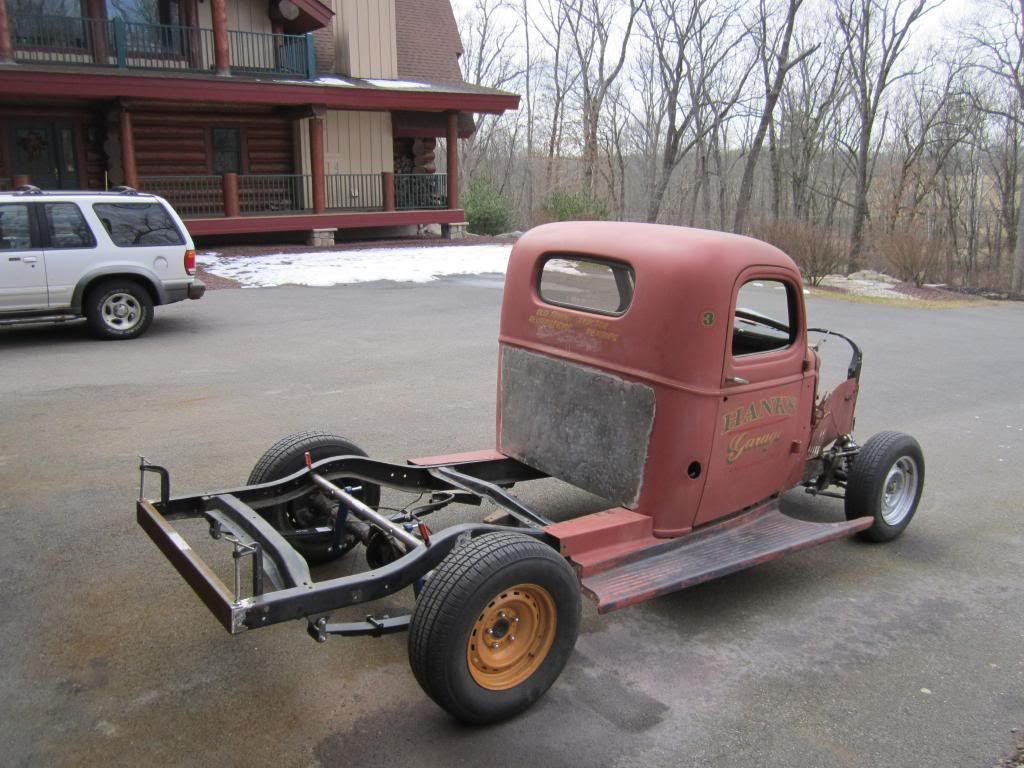
|
|
|

|
|
|
#68 |
|
SAVING ONE TRUCK AT A TIME
 Join Date: Feb 2010
Location: sherwood oregon
Posts: 1,141
|
Re: 46 pickemup in NJ "the Rebuild"
nice progress.
__________________
53-suburban (99% done) 40-pick up (99.9% done) 12-cc lb dually D-max (dd) 61-crew cab D-max "PAY LESS FOR WHAT YOU NEED PAY MORE FOR WHAT YOU WANT" 53 BURBAN BARN FIND:http://67-72chevytrucks.com/vboard/s...d.php?t=404091 1940 PROJECT MOON SHINE:http://67-72chevytrucks.com/vboard/s...d.php?t=551088 1961 CREW MAX: http://67-72chevytrucks.com/vboard/s....php?p=6957999 |
|
|

|
|
|
#69 |
|
Registered User
Join Date: Oct 2011
Location: Park Hills, MO
Posts: 67
|
Re: 46 pickemup in NJ "the Rebuild"
It's really looking great, and you are doing a very good job too! Lots of great ideas. Keep up the hard work, friend.
|
|
|

|
|
|
#70 |
|
Registered User
Join Date: Dec 2010
Location: washington NJ
Posts: 766
|
Re: 46 pickemup in NJ "the Rebuild"
Ok so I got off my butt and pulled the trigger on a fuel tank. I ended up going with a stainless 70's mustang tank with a bit of a twist. Not being sure if i am going with a traditional carb or one of the new EZ Fast TBI setups, I had a tank made with anti slosh baffles and also outlet and return bungs installed. This way if funds are short I can just throw the Holley that I have on for the time being. Then if I want later on down the road to switch over to TBI the tank is already set up for it. Only downside to this tank is the electric fuel pump would have to be mounted outside the tank.
 Damn thing fits pretty good inside the 46 frame rails. I guess that's why everybody uses the Pony tanks. I just have it sitting in the frame on some wood for now until I figure out how I want to mount it. Once I tear the frame apart for sandblasting I will remove the rest of the old crass member.  The one last thing I had to do with my header mock up was index and color code all the pipes before I shipped them out to Stainless Headers Inc. This way when they go to make up the jigs they can take the tubes apart and put them back together without any problems. My buddy walked into the garage the other day and asked me if I had decided switch over and "pitch for the other team" if you know what I mean. LOL! 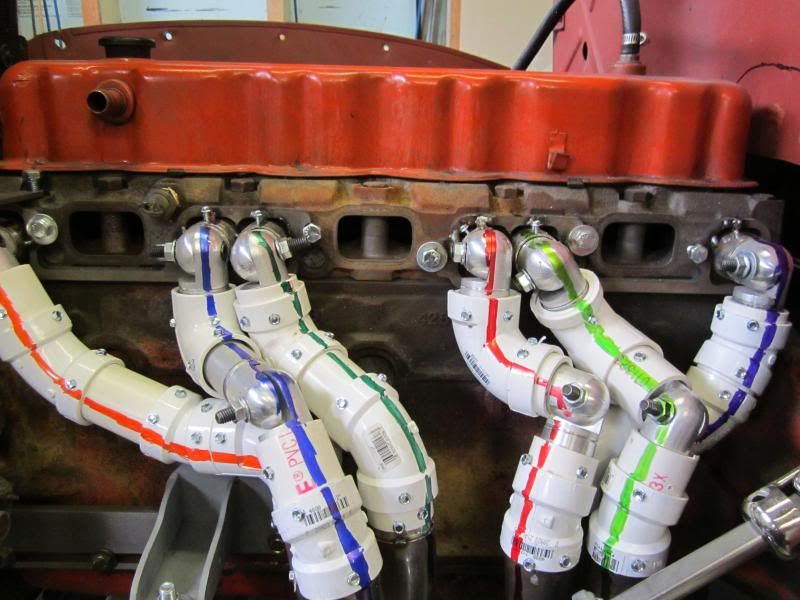 So everything got boxed up with about 50 pictures and some written instructions (Stainless requests this) and off the tubes went for fab. Seeing as how its the busy season with racing headers being made Stainless told me it would be about 4-6 weeks until I got my tubes back. |
|
|

|
|
|
#71 |
|
Registered User
Join Date: Dec 2010
Location: washington NJ
Posts: 766
|
Re: 46 pickemup in NJ "the Rebuild"
Ok so when we last left the paintman he was just about ready to pull the motor out send it off for a rebuild. Well.......................Sometimes when you take 1 step forward and then 2 steps back it works out better in the end
So as the story goes, when I originally decided to ditch the V8 and go with an inline 6, I had planned on a 292. After searching around for about 6 months I couldn't find anything locally, and didn't want to buy one from the other side of the planet because of the shipping cost involved. I decided to make one last attempt at finding a 292 by putting an add in the wanted section of the local racing publication. Well within the first day of the add running I had 2 calls. The first one was from a guy about 4 hours away in Northern NY with a 292 that was kind of old and nasty and had been sitting outside for the last 30 years or so. He said I could have it for $250. I told him I would pass on it because it would cost me $400 in gas to get up their and back. About an hour later a guy called from Reading Pa which is about an hour away from me. So here's where the story gets intriguing. Him and his father owned a towing and auto repair business together. They also own one of the best dirt modified teams here in the North East. He told me he has a 292 that he has had sitting around since his father died 4 years ago. This motor was rebuilt by the same motor shop that does all their big block motors for their race car. Apparently the father was planning on putting it in his street rod but had gotten into this big legal battle with the motor shop over the price he was quoted and what he was finally charged. As the story goes, the father was quoted 2K for the rebuild but when it was done the motor shop wanted 4K. From what I could gather this legal fight took nearly 2 years and cost him more than what the motor was worth. Finally after the 2 year battle the judge decided that $2,500 was a fair price for the father to pay. The son went on to tell me that after the father spent all this time and money on the motor he just lost all interest in his street rod and the motor has sat in the back corner of the shop for the last 2 years. Unfortunately the father passed away about 6 months ago and the son just wants to unload the business. The son told me that he knew for sure that the bottom end has been completely balanced and line bored, and new 30 over pistons had been installed. the head has also been rebuilt, although its just stock. So long story short, after handing the son $500, I came home with a completely rebuilt 292 still on the pallet and in the shrink wrap! And I already have a buyer for my 250. Now the only problem is as most of you know the 292 and 250 are slightly different so I will have to move the passenger side motor mount, but thats no biggy. check it!  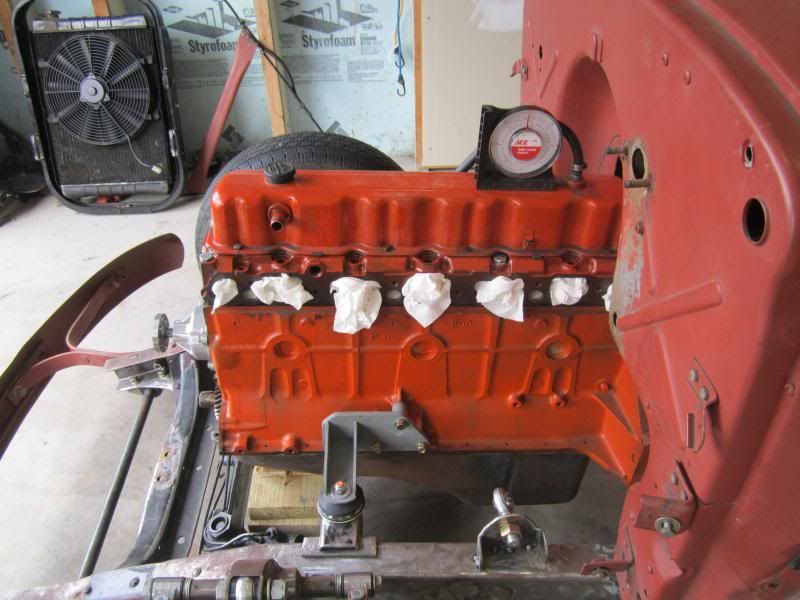  Yea I know there just stock cast dish pistons, but I don't think I should complain. 
|
|
|

|
|
|
#72 |
|
Registered User
Join Date: Dec 2010
Location: washington NJ
Posts: 766
|
Re: 46 pickemup in NJ "the Rebuild"
I forgot to mention, I go to the same track these guys race at and have some mutual friends so i was able to confirm this guys story.I did pull the pan and could see some work had been done on the crank to either lighten or balance it, and i could see assembly grease on all the journals, So I am pretty sure the story is legit.
|
|
|

|
|
|
#73 |
|
SAVING ONE TRUCK AT A TIME
 Join Date: Feb 2010
Location: sherwood oregon
Posts: 1,141
|
Re: 46 pickemup in NJ "the Rebuild"
great score.now get it in there and have some fun.
__________________
53-suburban (99% done) 40-pick up (99.9% done) 12-cc lb dually D-max (dd) 61-crew cab D-max "PAY LESS FOR WHAT YOU NEED PAY MORE FOR WHAT YOU WANT" 53 BURBAN BARN FIND:http://67-72chevytrucks.com/vboard/s...d.php?t=404091 1940 PROJECT MOON SHINE:http://67-72chevytrucks.com/vboard/s...d.php?t=551088 1961 CREW MAX: http://67-72chevytrucks.com/vboard/s....php?p=6957999 |
|
|

|
|
|
#74 |
|
Registered User
Join Date: Dec 2010
Location: washington NJ
Posts: 766
|
Re: 46 pickemup in NJ "the Rebuild"
|
|
|

|
|
|
#75 |
|
SAVING ONE TRUCK AT A TIME
 Join Date: Feb 2010
Location: sherwood oregon
Posts: 1,141
|
Re: 46 pickemup in NJ "the Rebuild"
i completely understand.i got a new house 2 years ago with 7 acres and it has been on going ever since.
__________________
53-suburban (99% done) 40-pick up (99.9% done) 12-cc lb dually D-max (dd) 61-crew cab D-max "PAY LESS FOR WHAT YOU NEED PAY MORE FOR WHAT YOU WANT" 53 BURBAN BARN FIND:http://67-72chevytrucks.com/vboard/s...d.php?t=404091 1940 PROJECT MOON SHINE:http://67-72chevytrucks.com/vboard/s...d.php?t=551088 1961 CREW MAX: http://67-72chevytrucks.com/vboard/s....php?p=6957999 |
|
|

|
 |
| Bookmarks |
|
|