
 |
Register or Log In To remove these advertisements. |
|
|
|
|||||||
 |
|
|
Thread Tools | Display Modes |
|
|
#1 |
|
Registered User
Join Date: Mar 2014
Location: Lecoma, MO
Posts: 21
|
'66 Custom Camper workhorse project
I was in need of a truck to haul off several tons of scrap iron. I toyed with the idea of buying some old junker to do the deed and then sell it, but I have always had a soft spot for '60 to '66 Chevy trucks. I have a 4bt Cummins that I got for another project that didn't work out as intended. I figured I would be less likely to run afoul of the emissions police if I put it in a pre-'67 truck, so I started looking. In my neck of the woods it seems these old trucks fall into three categories: super nice & modified, ratty & modified, Swiss cheese & wrinkles. I was in the market for an unmolested original. I didn't care if the paint was thin (in fact, that was my preference). I wanted a 3/4 ton, but would've settled for the right 1/2 ton. I looked at several candidates that were too rusty (holes rusted through over the windshield). Then I found a '66 Custom Camper 2.5 hours away. It was missing the engine and Turbo 400 transmission (he claimed it was a 283, but he also called the Eaton rear axle a 12 bolt so I suspect it was really a 327), had rust in the rockers and cab corners, but was otherwise complete and unmolested. I have a donor '70 C20 that will supply an SM465 and bellhousing and possibly other pieces. I also have a '61 C20 stepside (rough and rusty) that will donate a clutch pedal and possibly some other pieces as well.
My game plan is to put a later model front end under to get disc brakes and rubber control arm bushings and a later rear axle with lower (numerically) gears. I have located one with 3.21 gears at a salvage yard. That would make for an ideal cruising rpm with the 465, but I plan to keep my eyes open for a deal on an NV4500 5speed and 3.21 gears would be less than optimal for that. I have a hydroboost unit and matching gear driven p/s pump that came with my 4bt. I have some questions that some of you may be able to answer and save me some trial and error: 1. Will the rear manual crossmember from the '70 fit in the '66 frame? 2. If the answer to #1 is no, will one from the '61 work? I know there are significant differences bewtween '61 and '66 frames in other areas. 3. Will the '70 (manual floor shift) steering column fit? 4. Does the '61 C20 have the same vulcanized rear cab mounts? (it's not like it will be hard to look at that, but it is at my dad's farm and I won't be up there for a few days.) I plan to put a steel floor in the bed and replace the floorboards, rockers and cab corners, but I have no plans for further restoration for now. Once I have finished with the hauling project I will keep the old gal around for haulage duties and to drive on my 100 mile commute in inclement weather (I may install limited slip or a selectable locker??). I may grow tired of the patina and do a full blown cosmetic restoration at some point, but I doubt it. 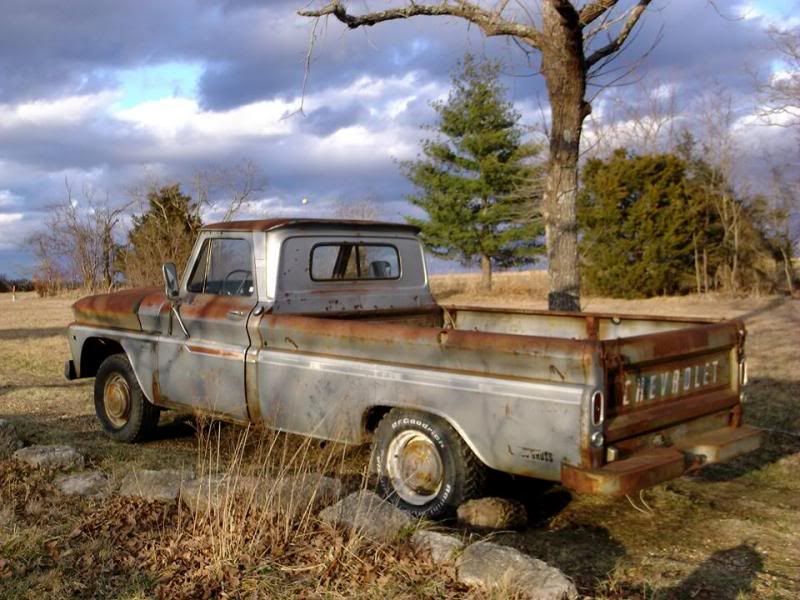 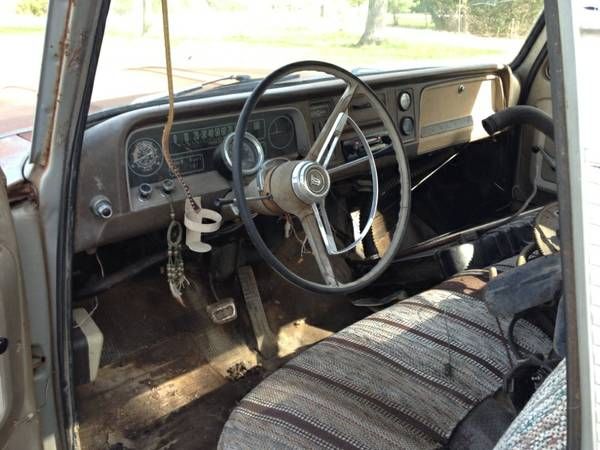 Any help is greatly appreciated!
__________________
'66 Custom Camper workhorse project. Plans: LT1/4L60E, disc brake front end, steel bed floor. |
|
|

|
|
|
#2 |
|
Registered User
Join Date: Sep 2011
Location: Tacoma, WA
Posts: 2,425
|
Re: '66 Custom Camper workhorse project
Great looking truck, Congrats !!
Sorry I am not ignoring your questions, but there are guys on this board who are far better qualified to answer them than I am!! I am basically a new guy here too, but with more tools and imagination than knowledge 
__________________
Michael McMurphy My 66 Stepside My 64 Tow Truck My 66 Tempest Table Of Contents Added to Page1 |
|
|

|
|
|
#3 |
|
Registered User
Join Date: Nov 2011
Location: fayetteville nc
Posts: 10,338
|
Re: '66 Custom Camper workhorse project
Nice find....very cool truck.
__________________
1963 Short bed step side SBW 427 big block and borg warner T-16 HD 3 speed manual http://67-72chevytrucks.com/vboard/s...d.php?t=519869 1963 Short bed fleetside BBW 348 1st gen big block w/Powerglide http://67-72chevytrucks.com/vboard/s...d.php?t=619024 1964 Short bed trailer |
|
|

|
|
|
#4 |
|
Registered User
Join Date: Sep 2012
Location: Midway, NC
Posts: 3,275
|
Re: '66 Custom Camper workhorse project
I'll be watching. Wish I had some info for ya. But there will be others to chime in.
__________________
http://67-72chevytrucks.com/vboard/s...d.php?t=581873 The low buck build threads. Check'em out! http://67-72chevytrucks.com/vboard/s...d.php?t=666022 My build thread Crossmembers CC |
|
|

|
|
|
#5 | |
|
Registered User
Join Date: Apr 2012
Location: Searcy, AR
Posts: 4,203
|
Re: '66 Custom Camper workhorse project
Quote:
 Welcome Aboard... 
__________________
DON Proverbs 27:17  US Air Force Retarded errr Retired My '65 Stepper Build:http://67-72chevytrucks.com/vboard/s...d.php?t=533920 My '60 Rusty Patina Build:http://67-72chevytrucks.com/vboard/s...66#post7402266 My '72 http://67-72chevytrucks.com/vboard/s...59#post7204359 SOLD |
|
|
|

|
|
|
#6 |
|
Registered User
Join Date: Mar 2014
Location: Lecoma, MO
Posts: 21
|
Re: '66 Custom Camper workhorse project
Well, I was cruising Craigslist looking for a '73-'87 donor truck for a front end when I stumbled across a bargain on an early NV4500 5 speed. I had plans to eventually put one in it but was going to use an SM465 for now. The SM465 would require a gearing change (different rear end) to get any economy at highway speeds. With this transmission I can avoid that (assuming that I have 4.11 gears rather than 4.56s). I
've read that Custom Campers all had limited slip differentials (another reason I'd like to keep this rearend). I haven't found a No-spin sticker in the cab anywhere and haven't gotten in the shop to jack up a rear wheel yet so I have my fingers crossed... So, if things go according to plan and this transmission pans out, I won't need an answer to the above crossmember question. I have been busy stripping parts off of the '70 donor truck and haven't touched the '66 yet aside from assessing which patch panels I will need. Thanks for the props everyone!
__________________
'66 Custom Camper workhorse project. Plans: LT1/4L60E, disc brake front end, steel bed floor. |
|
|

|
|
|
#7 |
|
Registered User
Join Date: Dec 2011
Location: Donaldsonville, La.
Posts: 1,024
|
Re: '66 Custom Camper workhorse project
Yea I'm along for the ride. Plan to put a 4BT in one like you some day.
|
|
|

|
|
|
#8 |
|
Registered User
Join Date: Mar 2014
Location: Lecoma, MO
Posts: 21
|
Re: '66 Custom Camper workhorse project
I got the NV 4500 today. After tons of searching and reading on 4btswaps.com I found several places where it was suggested that you can use an SM 465 bellhousing with an early NV4500 (the pre-'95 NV4500 transmissions used the same pilot diameter on the front bearing retainer as an SM465, later ones were larger there and had other differences as well) and just drill and tap the ears of the transmission to match the pattern of the bellhousing but, no one ever said that they had actually done this and there weren't any pictures posted either(at least that I found). I went to look at it with this in mind. I stuck the 465 bellhousing on the front of the transmission and can see absolutely no reason it wouldn't work. I may need to be careful with bolt length-especially if I try what I am about to suggest.
I've read a lot of discussion about the 10 degree lean and whether you should leave the engine leaning or lean the transmission etc. I would prefer to have my engine sitting upright in the engine bay if for no other reason than to avoid answering the question "why is it leaning?" every time someone looks under the hood. I am not crazy about leaning the transmission either, but would prefer that to a leaning engine and I don't believe that it would effect a manual transmission in any way. I am concerned about tunnel clearance though, but this may not be an issue at all. On the four hour drive home from picking up the transmission I mentally installed it two dozen times. The thought occurred to me that since I am drilling the front of the transmission anyway, why not rotate the pattern 10 degrees in the opposing direction and then I could have a vertical engine and a vertical transmission too. I did a little bit of back-of-the-envelope math* and it looks like the holes would only move about 7/8ths of an inch from where they would be if I were drilling the pattern to mount the bellhousing square to the transmission. It will likely be a while before I proceed with the drilling of the transmission. I have a ton of other things to do before I am to that point, but when I do I will document the process with pictures and post them here. Am I overlooking some obvious pitfall? I can't think of any reason not to do it this way, assuming that my some of the holes don't fall too close to the edge of an ear. I am pretty certain any of the holes would anywhere near breaking through into the transmission case, but that wouldn't be a deal breaker as long as I am careful with bolt length and thread sealant and there's thick enough material there. *assumes an approximate 5" radius of mounting hole from center of bellhousing hole-it is probably a little longer than that: 5xTan10=.88
__________________
'66 Custom Camper workhorse project. Plans: LT1/4L60E, disc brake front end, steel bed floor. |
|
|

|
|
|
#9 |
|
Registered User
Join Date: Mar 2014
Location: Lecoma, MO
Posts: 21
|
Re: '66 Custom Camper workhorse project
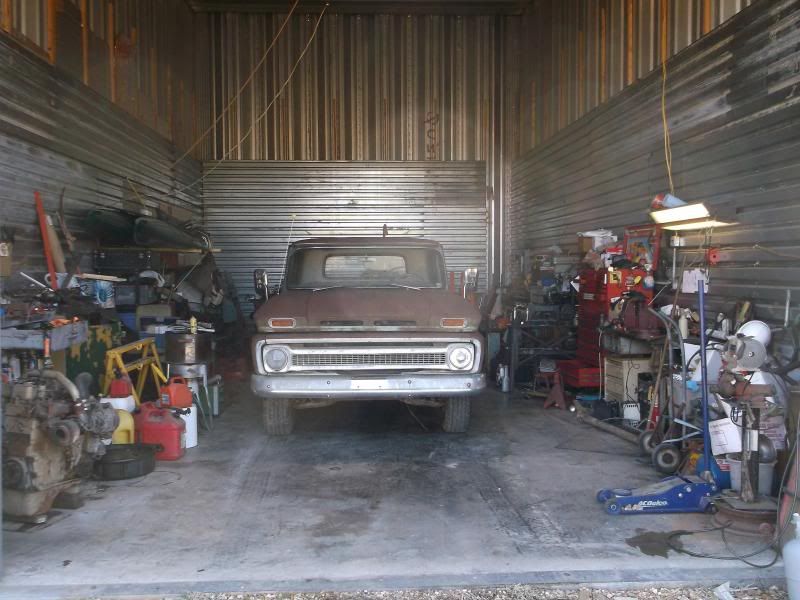
Got the old gal into the shop this weekend.
 Drove about 8 hours to get my transmission last weekend. 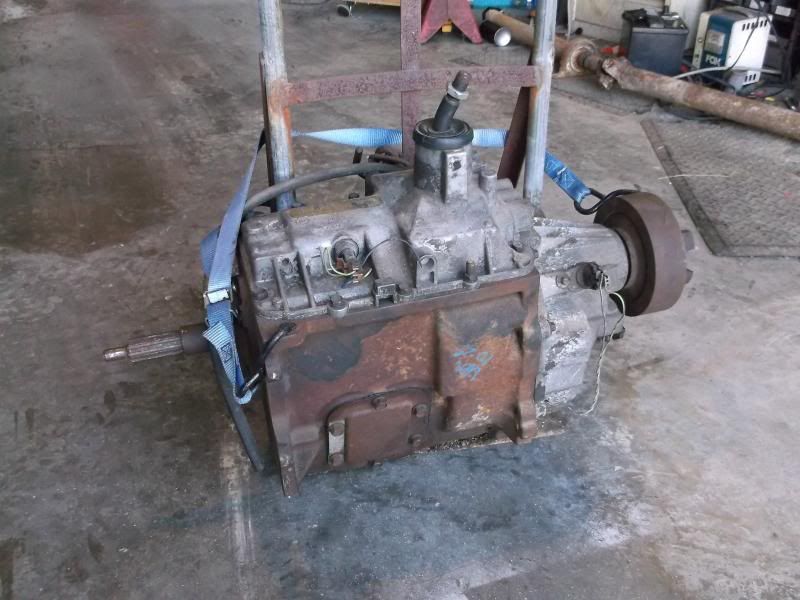 And scored some disc brake spindles and rotors at the junkyard today. I went in search of a complete front end, but they disassemble the front end as soon as the rigs arrive. Everything they had was missing the lower control arms, and only one rig had the spindles and rotors left. So, for now I'll use the original control arms with the late model spindles. I want the rubber control arm bushings of the later models, but will make do with what I have for now. Some day I'll find a whole truck for a reasonable price. Now, the fun begins. 
__________________
'66 Custom Camper workhorse project. Plans: LT1/4L60E, disc brake front end, steel bed floor. |
|
|

|
|
|
#10 |
|
Registered User
Join Date: Mar 2014
Location: Lecoma, MO
Posts: 21
|
Re: '66 Custom Camper workhorse project
I have finally gotten to the point where I can work on getting the bellhousing adapted to the transmission. I have my front clip off, the master cylinder/booster removed, the steering column removed (putting hydraboost and a floor-shift column in it), the low hump cut out and I have a bunch of new seals and stuff for the Cummins that should be here any day.
To rotate the bellhousing 10 degrees relative to the transmission will require welding on material for the lower passenger side hole. I don't want to go that route, so I rotated the bellhousing back until all of the holes were in the best position. This only gives me 3 degrees of rotation, but that's what I am going with. My transmission will lean 7 degrees, but that's better than 10. Here's a picture showing that hole. The angle finder doesn't look like it is on 10 degrees, but that's just the camera angle. 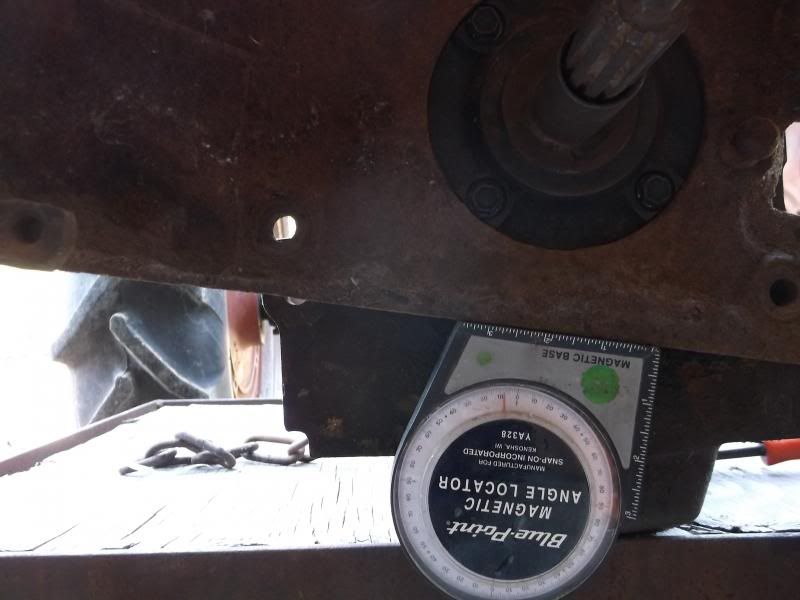
__________________
'66 Custom Camper workhorse project. Plans: LT1/4L60E, disc brake front end, steel bed floor. Last edited by pbbelly; 05-03-2014 at 06:20 PM. Reason: Added info |
|
|

|
|
|
#11 |
|
Registered User
 Join Date: Mar 2013
Location: Southern Oregon
Posts: 10,384
|
Re: '66 Custom Camper workhorse project
Nice truck! It'll be sweet with that 5 speed!

__________________
1966 Chevy C10 "Project Two Tone" http://67-72chevytrucks.com/vboard/s...d.php?t=596643 1964 GMC "Crustine" semi-build:http://67-72chevytrucks.com/vboard/s...d.php?t=665056 My youtube channel. Username "Military Chevy": https://www.youtube.com/channel/UC_h...fzpcUXyK_5-uiw |
|
|

|
|
|
#12 |
|
Registered User
Join Date: Mar 2014
Location: Lecoma, MO
Posts: 21
|
Re: '66 Custom Camper workhorse project
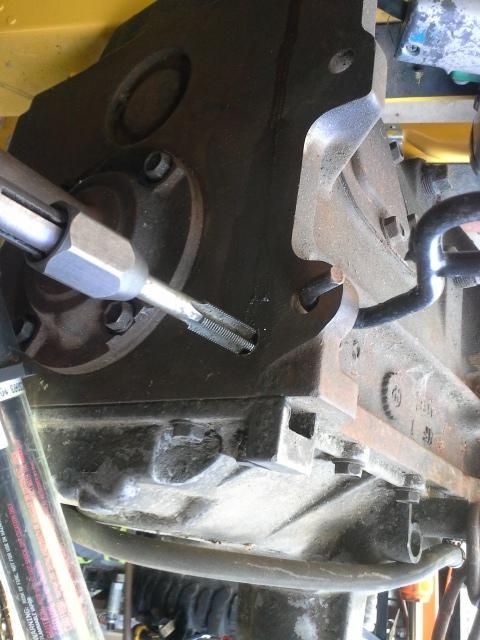
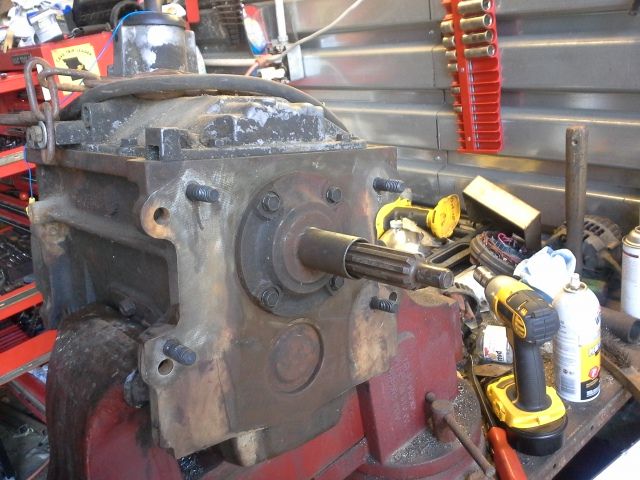
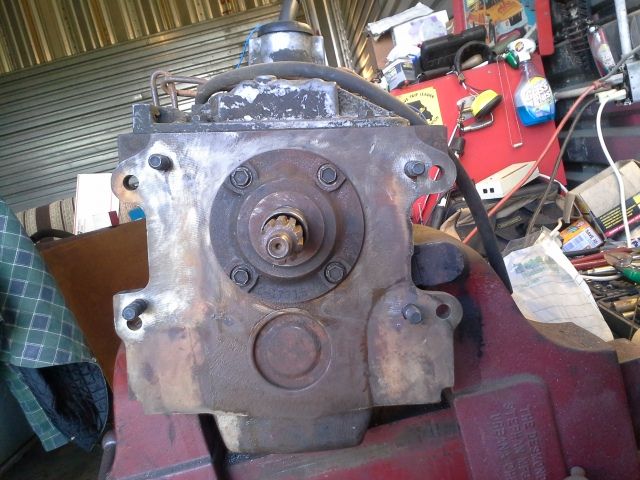
I had to take a hiatus on my truck for a remodeling project that is winding down. I have been able to work on my project a lot recently. Unfortunately there hasn't been much visible/photo worthy progress. While changing the crankshaft seals and taking care of the KDP* I decided to pull off the oil pan. i'm glad I did. I found the support bracket for the pickup tube was broken. I've got all of that back together and have the transmission adapted to the SM465 bellhousing. With the bellhousing clamped in the desired position, I used a drill guide from an ez-out kit on my pilot holes to ensure I was drilling straight and centered. I increased the hole by small increments in the hope that would give less of a chance for deviation. I was careful not to drill through into the transmission case and used a bottom tap to get the studs in as deep as possible. I slathered hem with the high-strength loctite. I am pleased with the results:
   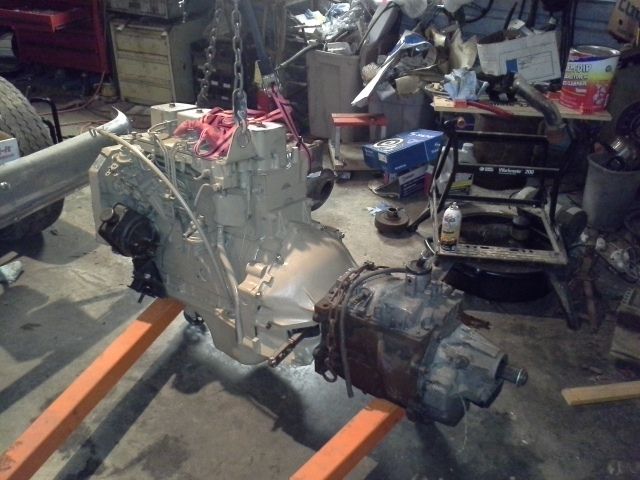 *Killer Dowel Pin, [google it]
__________________
'66 Custom Camper workhorse project. Plans: LT1/4L60E, disc brake front end, steel bed floor. |
|
|

|
|
|
#13 |
|
Registered User
Join Date: Apr 2011
Location: .
Posts: 3,104
|
Re: '66 Custom Camper workhorse project
Right On!!!
|
|
|

|
|
|
#14 |
|
60-66 Nut
  Join Date: Mar 2007
Location: Coeur d'Alene, Idaho
Posts: 23,252
|
Re: '66 Custom Camper workhorse project
I've not read anything about leaning an engine and/or trans 10 degrees. I'm curious as to what the reasoning is behind that.
That 4bt and NV4500 ought to be a sweet combo. The 4bt's are pretty scarce around here.
__________________
Power Steering Box Adapter Plates For Sale HERE Power Brake Booster Adapter Brackets For Sale '63-'66 HERE and '67-'72 HERE and '60-'62 HERE and "60-'62 with clutch HERE Rear Disc Brake Brackets For Sale. Impala SS calipers HERE Camaro Calipers HERE D52 Calipers HERE 6 Lug HERE Hydroboost Mounting Plates HERE |
|
|

|
|
|
#15 |
|
Registered User
Join Date: Mar 2014
Location: Lecoma, MO
Posts: 21
|
Re: '66 Custom Camper workhorse project
Apparently 99% of the 4bts for GM applications went in to the P-series step vans. There were clearance issues (I believe with the brake master cylinder/booster) that were easiest solved by leaning the engine 10 degrees toward the passenger side. This means that any Chevy 4bt adapter I''ve seen has the bellhousing rotated relative to the block. If I'd have used the stock bellhousing that came with my transmission and mounted the engine level (I am not going to have any clearance issues as I am using a hydroboost rather than a vacuum booster) my transmission would lean 10 degrees toward the drivers side. Not a big deal, but I had the bellhousing on hand that I used, and I couldn't redrill the transmission square to this bellhousing anyway, so it worked out well for my application. I wasn't able to compensate for the full ten degrees, but I got more than half of it back by placing the studs where I did.
__________________
'66 Custom Camper workhorse project. Plans: LT1/4L60E, disc brake front end, steel bed floor. |
|
|

|
|
|
#16 |
|
60-66 Nut
  Join Date: Mar 2007
Location: Coeur d'Alene, Idaho
Posts: 23,252
|
Re: '66 Custom Camper workhorse project
Thanks for the info.....I learned something new today
 Yeah, the stepvans is where I first saw the 4bt's. I used to help with service work on a couple of the local Frito Lay trucks. I just didn't remember any tilt to the engines. But of course that was 25 years ago too.
__________________
Power Steering Box Adapter Plates For Sale HERE Power Brake Booster Adapter Brackets For Sale '63-'66 HERE and '67-'72 HERE and '60-'62 HERE and "60-'62 with clutch HERE Rear Disc Brake Brackets For Sale. Impala SS calipers HERE Camaro Calipers HERE D52 Calipers HERE 6 Lug HERE Hydroboost Mounting Plates HERE |
|
|

|
|
|
#17 |
|
Registered User
Join Date: Mar 2014
Location: Lecoma, MO
Posts: 21
|
Re: '66 Custom Camper workhorse project
Here's a picture of a 4bt in a '62 that the builder left leaning. As you can see, 10 degrees isn't much lean as compared to a Mopar slant six.
https://www.flickr.com/photos/4-5-6c...57610632952376
__________________
'66 Custom Camper workhorse project. Plans: LT1/4L60E, disc brake front end, steel bed floor. |
|
|

|
|
|
#18 |
|
Registered User
Join Date: Mar 2014
Location: Lecoma, MO
Posts: 21
|
Hoarding pays
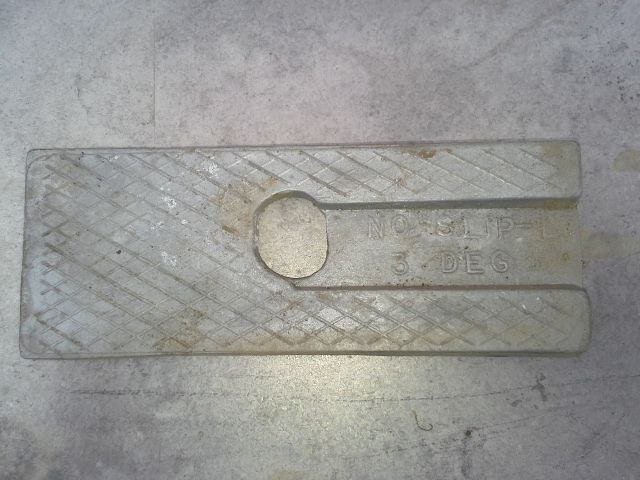
30 years ago I was a 20 year old kid and I built a '53 Chevy half ton from a pile of parts. When I got it going it didn't drive as well as I' would have liked. I bought some caster shims thinking that a little more caster would help, but I never got around to putting them in before I traded it for a Chevelle. Last night a sat my engine and transmission in place. I was able to moved the transmission crossmember forward to the holes used for manual transmissions, drill a new hole forward of and in between the two existing holes and everything went together perfectly. My engine was sitting exactly where I wanted it for-and-aft. I had expected I would have to drill new frame holes to get my position right. But, there was one issue that I hadn't anticipated. With my engine level left-to-right, my transmission mount did not sit squarely on the crossmember. It occurred to my that a wedge-shaped caster shim should fit perfectly. Then I recalled having some. I was able to walk to the barn and lay my hands on one (which is surprising. Usually in a situation like this I will dig for weeks before giving up and buying another one!). It fit perfectly! I love it when a plan comes together.
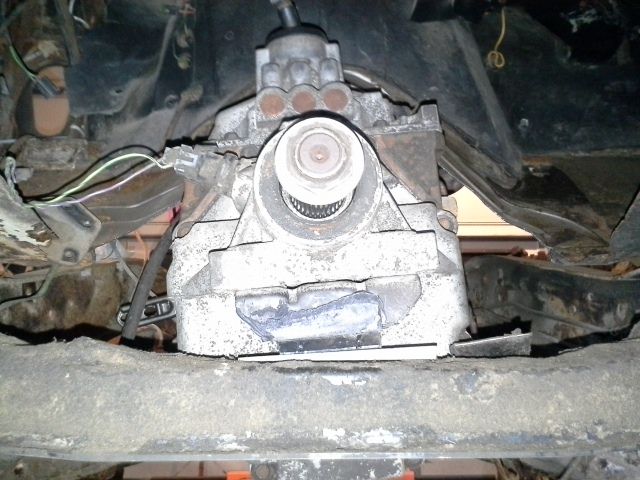
__________________
'66 Custom Camper workhorse project. Plans: LT1/4L60E, disc brake front end, steel bed floor. |
|
|

|
|
|
#19 |
|
60-66 Nut
  Join Date: Mar 2007
Location: Coeur d'Alene, Idaho
Posts: 23,252
|
Re: '66 Custom Camper workhorse project
I'm guessing that shim is 3*? Which would be the difference between the 7* you set the trans at and the 10* built into the adapter plate?
__________________
Power Steering Box Adapter Plates For Sale HERE Power Brake Booster Adapter Brackets For Sale '63-'66 HERE and '67-'72 HERE and '60-'62 HERE and "60-'62 with clutch HERE Rear Disc Brake Brackets For Sale. Impala SS calipers HERE Camaro Calipers HERE D52 Calipers HERE 6 Lug HERE Hydroboost Mounting Plates HERE |
|
|

|
|
|
#20 |
|
Registered User
Join Date: Jul 2010
Location: Hemet,Ca
Posts: 1,502
|
Re: '66 Custom Camper workhorse project
This is gonna be cool!
__________________
Stovebolt-It is painted |
|
|

|
|
|
#21 | |
|
Registered User
Join Date: Mar 2014
Location: Lecoma, MO
Posts: 21
|
Re: '66 Custom Camper workhorse project
Quote:
__________________
'66 Custom Camper workhorse project. Plans: LT1/4L60E, disc brake front end, steel bed floor. Last edited by pbbelly; 10-11-2014 at 01:07 PM. Reason: added photo |
|
|
|

|
|
|
#22 |
|
Registered User
Join Date: Mar 2014
Location: Lecoma, MO
Posts: 21
|
Re: '66 Custom Camper workhorse project
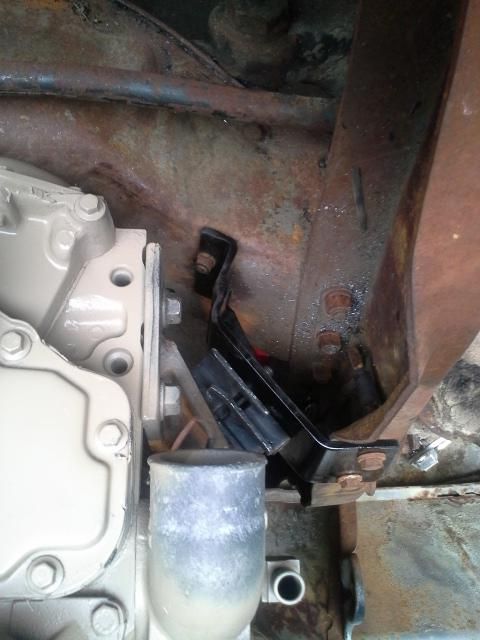
It's taken me a while, but I finally got my motor mounts done. I ended up moving the transmission crossmember back a couple of inches to give me some clearance between the oil drain plug and the front crossmember. Now that I have that time-consuming task out of the way, things are moving faster. I am working on the exhaust and putting the front disc brakes on now.
 I have three days of vacation that I need to use up and the weather forecast for next week looks as good as I could expect, so I am planning to work on it all next week.
__________________
'66 Custom Camper workhorse project. Plans: LT1/4L60E, disc brake front end, steel bed floor. |
|
|

|
|
|
#23 |
|
Registered User
Join Date: Sep 2014
Location: Valparaiso, IN
Posts: 300
|
Re: '66 Custom Camper workhorse project
Thanks for posting this build. I have often thought that these parts would make an awesome project. You are making good progress, hope you are driving soon. Keep us posted.
|
|
|

|
|
|
#24 |
|
Registered User
Join Date: Mar 2014
Location: Lecoma, MO
Posts: 21
|
Re: '66 Custom Camper workhorse project
I haven't done much that has been photogenic, but I have done a lot lately. I lucked out in that the driveshaft that I pulled from the '70 C20 that was originally supposed to donate its SM465 turned out to be nearly exactly perfect for the swap. I had to cut a couple of inches out of the front shaft (which happened to be dented at that point anyway) and fashion a mount for the two bolt carrier bearing, which proved super simple and elegant (no picture of that yet). even the straps and bolts for the front yoke fit the NV4500!
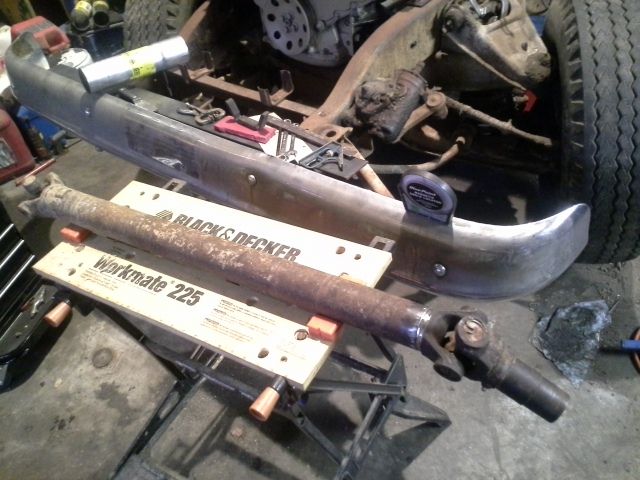 I also scavenged a clutch pedal and some electrical stuff from a '61 C20 that belonged to my great uncle. 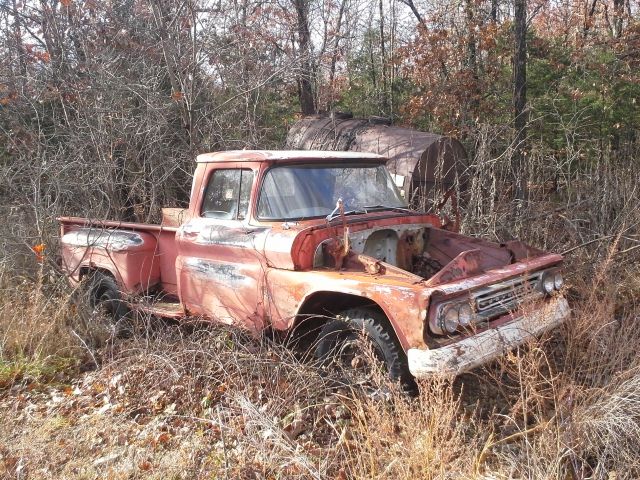 I forget how many clutches my dad put in that truck for him. I helped on a couple. Uncle Howard couldn't hear it thunder, and the 235 in the truck was very quiet (it still is, it has been in the family '53 sedan for about 13 years) and he couldn't judge how fast it was turning. His driving technique was to hold the foot-feed halfway to the floor and regulate his speed with the clutch pedal. He never got out on the road with the truck, he just used it to haul firewood and fence posts he cut from the woods where he lived. He needed a four speed to creep through the woods. First gear in the three speed just wasn't low enough. At least some pieces of Ol' Red will live on. Between the rust and Uncle Howard's tree-rubbing driving technique, the remainder of the truck is used up. The windshield looks pretty good still. There's some fogging around the edges, but if anyone needs one they are welcome to it if they want to come take it out before I haul the rest off for scrap.
__________________
'66 Custom Camper workhorse project. Plans: LT1/4L60E, disc brake front end, steel bed floor. |
|
|

|
|
|
#25 |
|
Registered User
Join Date: Mar 2014
Location: Lecoma, MO
Posts: 21
|
Re: '66 Custom Camper workhorse project
I slid under the truck and grabbed a couple of shots of my carrier bearing bracket that I made. It consists of a short piece of 1-1/2" square tubing that I drilled and tapped a couple of holes in to match the pattern of the old carrier bearing mount. Then I added a piece of 3" wide 3/16" thick strap across it that was drilled to fit the "70 carrier bearing. They are barely visible, but I also added a couple of gussets.
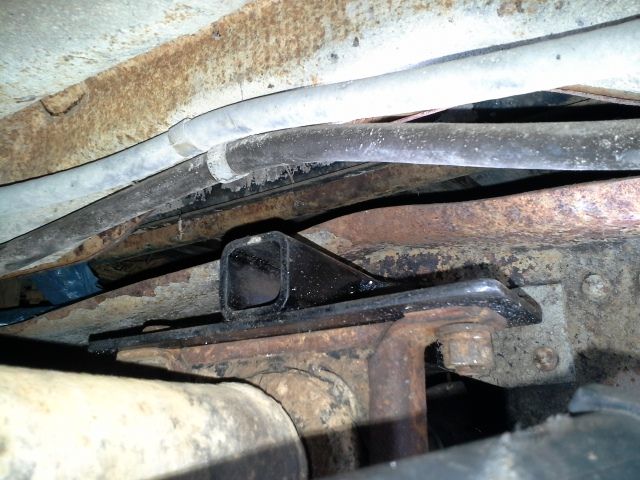 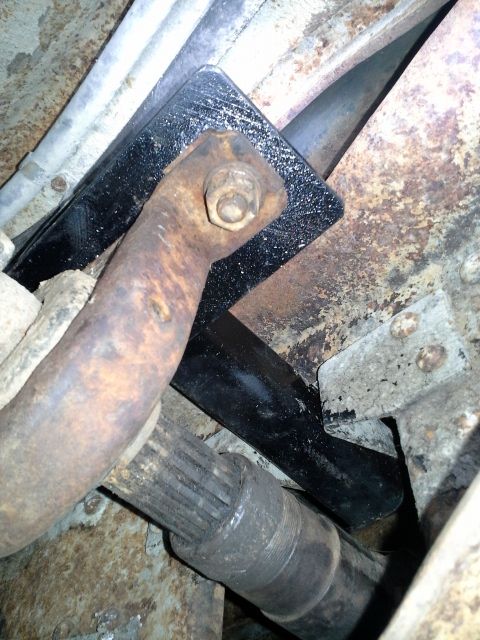 I didn't have any luck finding a donor of a complete front end. I finally found one salvage yard that had both spindles and rotors from an '86 3/4 ton Suburban with an 8,600 lb front end. they didn't have three of the control arms or the drag link. The one upper control arm that they did have had metal bushings just like my '66, not the rubber like I was expecting since the '73 up half-tons had rubber. I bought the spindles and rotors think I would just buy the tie rods, drag link and idler arm new. I couldn't find a source for a new drag link or the upper portion of the idler arm. I seriously considered reaming the taper in the spindles to fit the '66 tie rod ends. (Surprisingly, the taper end of the early TREs is larger than the later ones and the threaded portion is smaller.) I have the tapered reamer that I used when I put larger tie rods on my Jeep, but I wanted to retain off-the-shelf parts in case of a failure (I could just see having a wheel bearing failure that damaged a spindle) while far from home. I read several places about "adapter" tie rod sleeves that would allow me to retain all of the '66 steering linkage from the inner tie rods inward. After a lot of looking I never found any so I decided to make my own. I opted to move the outer '66 TREs to the inside because they have LH threads and the 5/8" LH tap was considerably cheaper than an 11/16" one that the later ones would require. I used 1" hot-rolled solid bar stock to make the custom sleeves, and drilled and tapped some grade 8 hardware store nuts for jam nuts. It took much longer than I had anticipated, mainly because I was pretty sick while I was doing it and didn't get in a hurry. The only parts that aren't off-the-shelf now are the sleeves which aren't likely to fail, and carrying a spare certainly wouldn't take up much room in the toolbox. 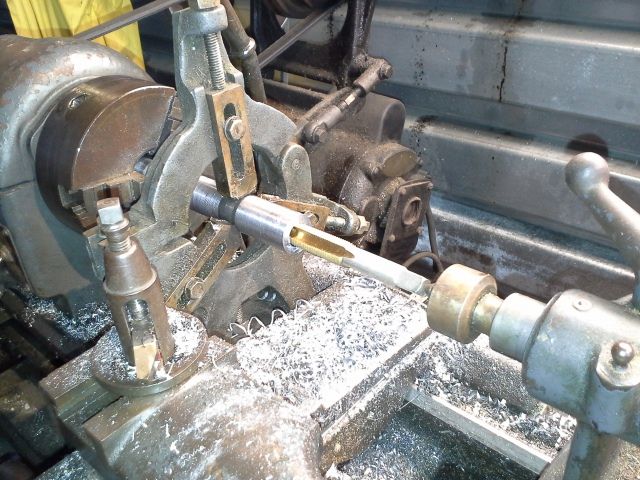 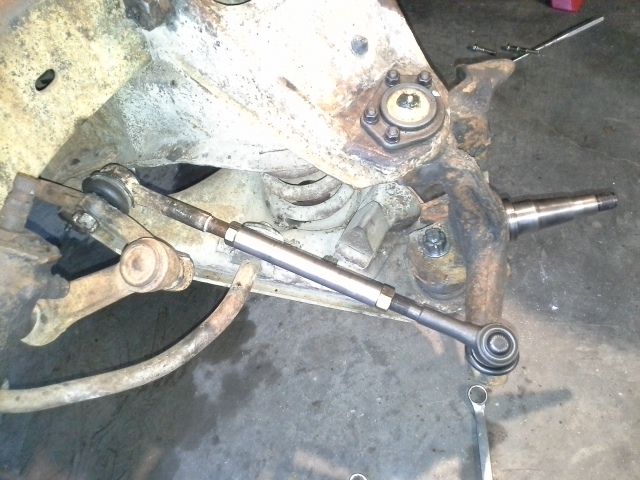 I am afraid I won't have many opportunities to work on it again until after Christmas...
__________________
'66 Custom Camper workhorse project. Plans: LT1/4L60E, disc brake front end, steel bed floor. |
|
|

|
 |
| Bookmarks |
| Tags |
| 4bt, c20, cummins, custom camper |
|
|