
 |
Register or Log In To remove these advertisements. |
|
|
|
|||||||
 |
|
|
Thread Tools | Display Modes |
|
|
#1 |
|
Registered User
 Join Date: May 2021
Location: Stony Plain Alberta Canada
Posts: 35
|
Lowest Suburban Possible with Factory Floor/X-Member
I purchased this Suburban back in 2010 and had planned to convert it to 4x4 and swap a bunch of parts from a lifted Blazer that had begun to rot out that I had, D60/14 Bolt with 5.13, 12 inch lift springs, 3 inch body lift, 44" Super Swampers and make a top notch beer drinking, coyote hunting machine, but after taking it for a few spins I just couldn't bring myself to tearing it apart so it sat parked in my shop for a few years.
   Jimmy before it was all rotted out that I was going to steal the drive train from.  -Dexter Last edited by Dexterb; 08-10-2021 at 11:16 AM. Reason: Adding more interest |
|
|

|
|
|
#2 |
|
Senior Member
 Join Date: Mar 2003
Location: Colfax-California
Posts: 8,659
|
Re: Blue Two Tone 1990 Suburban Build
Mmmm, Ok, so what cha' going to do??---drive it or sell it. I wish the paint on mine looked that good
|
|
|

|
|
|
#3 |
|
Registered User
 Join Date: May 2021
Location: Stony Plain Alberta Canada
Posts: 35
|
Re: Blue Two Tone 1990 Suburban Build
A few years later I had some 24's kicking around from a Chrysler 300 SRT8 that and decided to see if they would fit on to the Suburban, unfortunately they didn't but when I put the rims up to the burb it looked not too bad, so I went to Kijiji (Canadian Craigslist) and searched for some used 24's and found some for dirt cheap.
After tossing the 24's on, I daily drove the burb 120 km/day to work and back for the majority of spring/summer. The A/C in this thing is the coldest I have ever felt so summer driving was extra good, plus at the time I had a 2011 Ram 3500 Diesel, and I preferred to mile out the suburban over my truck. That summer it also proved to be a handy place to crash in for the night whenever my wife(gf at the time) went drinking at friends places where they lived out in the country no cabs went to, so we put an air mattress in the back and a few pillows and had somewhere to sleep without imposing upon our hosts when having a little weekend fun. Picture with the 24's i found on google street view.  
|
|
|

|
|
|
#4 |
|
Registered User
 Join Date: May 2021
Location: Stony Plain Alberta Canada
Posts: 35
|
Re: Blue Two Tone 1990 Suburban Build
Then in 2016, i was taking it for a rip and the front left brake locked up on it so I parked it with the intention of putting a big brake kit on it, but with shipping up to Canada and other things I wanted to spend money on, it just ended up sitting parked inside my shop instead.
Fast forward till now, and I sold off all my toys to finance having kids (fertility treatments) and this was the lone survivor.   This winter/spring I set out to buy a 67-69 camaro as I always wanted one and my mindset changed a little after Covid and figured why bother saving all my money for retirement when I could go enjoy some of it now , but with the inflated muscle car prices and closed border I gave up and decided it was time make the Suburban into a cool family ride, so I spent a few weeks reading threads on here, and came up with a recipe for the Suburban that should allow it to be a good family wagon and look pretty decent. I really wanted to slam it to the ground and go with a drop member and a step notch/4link but I have 2 kids now and wanted to keep it family friendly, so for now, the rear floor is staying intact and I'm going to get it as low as possible without cutting the floor and with factory crossmember. Ordered up F/R 14" Revelator Kit from Pro Performance. The brakes really sucked after going to 24's, I plan on going to a 22" rim/tire but still didn't like how poor the brakes were with the larger rim. Discovered after ordering the brakes, that part of the issue was likely caused by the RWAL Brakes. i might have been fine just ditching the ABS, but too late now. Front: 2.5" Drop Spindles, Porterbuilt 1" Narrowed/Forward Control arms, air bags, new steering components, ridetech hq shocks, going to yank the inner fenders for now and see how clearance is with the front ac, and either go with a mild slosh tub or will have to go to vintage air and a full slosh tub or trailer fender. Will decide later when rims get ordered and suspension cycled to see my clearances. Rear: Air Over Leaf, C-Notch, Flip Kit, 1 inch drop shackles, and will pull a few leaves out of the rear springs and if it isn't touching the bump on the c-notch, will either weld a spring perch saddle to the bottom or use a 1 inch zero rate spring to get it a little lower. (in the future I would like to 4 link it for ride quality but my welding skills need improvement and I don't want to pay someone to do it, so when I become more confident in my skills this will happen plus I would like to LS swap over the winter, so i'm sure the leaf springs will hold up with the stock 200 hp or whatever it is, but 400 hp might not be very enjoyable due to axle wrap with only a 2-3 leaf springs in place. Air Management - Airlift 3P with dual Viair compressors and 5 gallon tank As it sits right now, almost all parts are ordered, and i'm just waiting for them to get filled and shipped. Shipping from USA to Canada is pricey so I found a freight forwarder/courier that more economical, but it adds on even more time to the shipping. I'm hoping to have most of the parts by end of June or beginning of July. Until then I'm slowly working on a few things in preparation of the parts. Measurements I took before starting: Bottom of Fender to Ground Front Right 32 3/4" Front Left 32" Rear Right 31 3/8" Rear Left 31" Center Hub to Bottom Fender Front Right 19 3/8" Front Left 19" Rear Right 18 1/2" Rear Left 18 1/4" Axle Tube to Bottom of Frame 6 1/2" Approx. Bump stop and frame angles down over axle tube (Add 2 3/4" for C-notch, subtract 1/2" for bump stop) should have approx 9" of drop before axle tub hits c-notch) Top of Diff to Bottom Bed 9 3/8" (clamp/brake line "T" will have to be moved" Hitch to Ground 12" Front Crossmember to Ground 10 1/2" Front Air Dam to Ground 11 1/4" Tire Size @ 34 psi Front/Rear 28" 10" rear tire to top of rear fender tub. Transmission Crossmember to Ground 10" Rear Bumper to Ground 17" -Dexter |
|
|

|
|
|
#5 |
|
Registered User
 Join Date: May 2021
Location: Stony Plain Alberta Canada
Posts: 35
|
Re: Blue Two Tone 1990 Suburban Build
I got her in the garage and up on jack stands.
First thing I did was yank out the inner fender wells.   This suburban had the rear heater option, which no longer worked and is no longer needed, so I got to tearing out the valve, lines, rear fan and rear heater core.   Valve  Crusty old hoses running to the back. Will likely mount the air tank along here, and have the air compressors on the inside of the frame rails.  Running up into the bed. 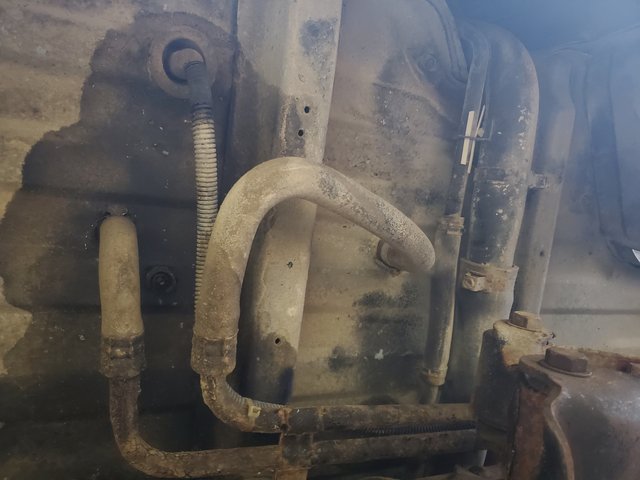 Have some holes to plug now. Ordered up some plugs from Amazon since the local parts store didn't have anything large enough, will likely weld something in at a later date.  No More Heater! Gonna toss the trim back in after the plugs arrive.  Here is all the junk that was removed.  Up front I used 2 Dorman heater hose connectors for now after pulling the valve, i figured no point in replacing the hoses with new ones, especially if I end up going with vintage air. -Dexter |
|
|

|
|
|
#6 |
|
Registered User
Join Date: Oct 2015
Location: PNW
Posts: 3,639
|
Re: Blue Two Tone 1990 Suburban Build
Glad the 'Burb got the nod for the coolness plan. Nice looking rig.
|
|
|

|
|
|
#7 | |
|
Registered User
 Join Date: May 2021
Location: Stony Plain Alberta Canada
Posts: 35
|
Re: Blue Two Tone 1990 Suburban Build
Quote:
So last night tore the front and rear brakes off. I've never disconnected the emergency brake cable before from a drum brake assembly, well not entirely true... with 4x4 stuff I just cut them right off with a zip cut behind the backing plate and didn't care about the e-brake. Ended up doing a little searching for tips/tricks after I couldn't get it using some vice grips and discovered the box end of a 1/2" wrench made simple work of it, just turned back and forth with the wrench and pulled on the back side of the cable and it popped right out. I also tried used a hose clamp but didn't have any luck using that method. When I was out the day before grabbing some supplies I noticed some flare nut wrenches on sale so I picked them up, and i think this is the first time I didn't partially or fully round off a tube nut when disconnecting brake lines. My 3 yr old son likes helping out, he usually pushes his way in to unscrew bolts and likes to drag any wrench i put down for a minute to the other side of the truck. lol Hopefully tonight/tomorrow I have time to pull the diff out and cut the backing plates off and start cleaning it up for paint in preparation for the rear disc brakes to arrive. I work a schedule that is 7 day on, 7 off, and i'm currently on day 2 of 7 working, so progress might be limited until next week as I get up at 4:30am and leave by 5am and get home at 7pm.  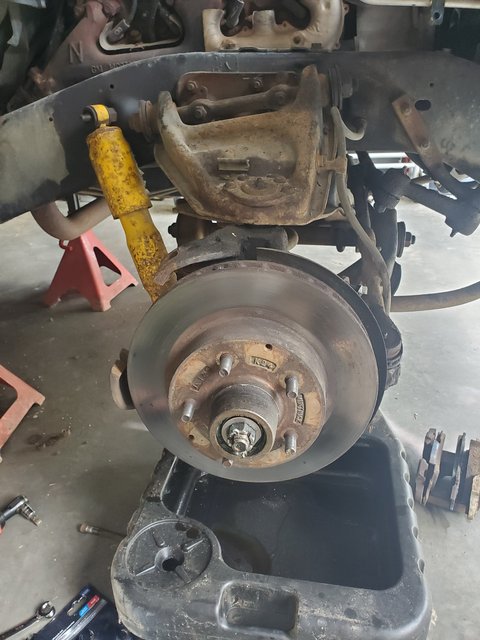 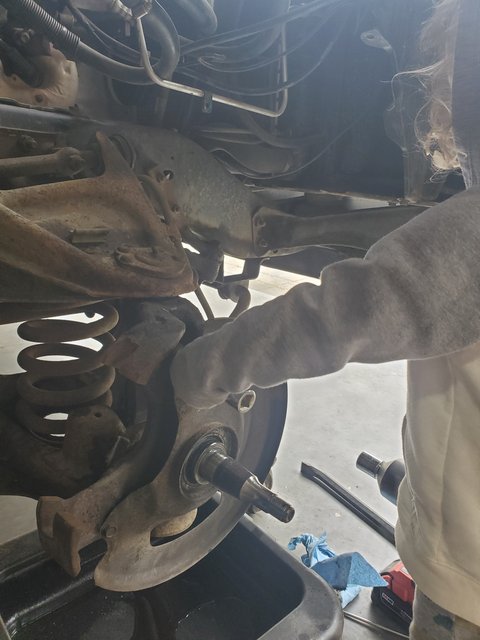    
|
|
|
|

|
|
|
#8 |
|
Registered User
 Join Date: May 2021
Location: Stony Plain Alberta Canada
Posts: 35
|
Re: Blue Two Tone 1990 Suburban Build
Didn't get around to pulling the rear diff last night. I tried to remove the U-Bolts with Rachet/Socket, but it was being a prick so I just soaked them in PB Blaster. I have an impact, but the kids were sleeping and wasn't about to risk waking them up by making a bunch of noise in the garage.
I picked up a C-Notch from Tin Works Fabrication. Super fast shipping, friendly service and it arrived with some stickers and a bag of candy which was fun.  Unfortunately it didn't come with a template so I took it to work with me today and made one here. I read the instructions from Bell Tech and they recommend drilling a 1/4" hole first in each corner of where the cuts will intersect to prevent stress cracks so I will follow this advice.   Also, coming from a 4x4 background where I went from running, 3/4 ton, to 1 ton stuff, and then to 2.5 ton and then watching friends go to 4 Ton diffs and bigger transfer cases, heims etc, because stuff kept breaking, it has become second nature to want beefier components, so once the suburban is together I will take it to a guy I know who has a fab shop and get him to box the frame in on the back side to add some extra strength. Here is a link to the C-notch if you are interested. https://tinworksfabrication.com/prod...body-suburban/ -Dexter |
|
|

|
|
|
#9 |
|
Registered User
 Join Date: May 2021
Location: Stony Plain Alberta Canada
Posts: 35
|
Re: Blue Two Tone 1990 Suburban Build
Not much progress the last few days as I have still been working.
Today is however my last day at work and then i'm off for a week so I should make some progress this next week. Pulled the rear diff, the tried to unbolt the u-bolts but that wasn't happening, so took the zip cut to them.   I've never pulled axles in an differential with C-Clips before, it's crazy to think this is how they stay together. D60, 14 Bolt and 2.5 Rockwells is what I have experience with. I'm curious to know if the axles won't fall out of the diff if a c-clip came out or axle broke once the rear disc brakes are installed... I would think the bracket the caliper bolts to on the axle housing will effectively keep the rotor in position thus not allowing the axle to leave the housing? When I pulled the axles they looked to be in decent shape where the axle bearing/axle is but I think I will yank them out again to measure the OD of the axles and order up new bearings and seals. Have a few packages in transit right now, but still waiting on all the big items, brakes, control arms etc, so this week off I will likely put the c-notch in, paint rear diff, pull the leaf springs and clean them up, pull the control/spindles, and just clean stuff up in preparation of parts. When i was pulling the body mount out where the C-notch goes the sleeve inside the mount was completely rusted so I also ordered up some new polyurethane body mounts from Energy Suspension and just waiting on those to arrive as well. Cheers, Dexter |
|
|

|
|
|
#10 |
|
Just here to tinker
 Join Date: Jun 2008
Location: Holland, MI
Posts: 3,697
|
Re: Blue Two Tone 1990 Suburban Build
Great rig buddy! Very clean. Love to see the kiddo helping out. I can't wait for my little girl to get a little older and out in the shop with me.
To confirm your fears, yes if you snap an axle shaft on c-clip type, out she comes!
__________________
78 C10 SWB Diesel #1 (wrecked)http://67-72chevytrucks.com/vboard/s...1978+silverado 78 C10 SWB Diesel #2 (sold)http://67-72chevytrucks.com/vboard/s...d.php?t=650751 60 GMC Suburban (sold)http://67-72chevytrucks.com/vboard/s...d.php?t=445526 60 GMC 1000 (sold)http://67-72chevytrucks.com/vboard/showthread.php?t=298235 67 GMC 1500 (sold) http://67-72chevytrucks.com/vboard/s...d.php?t=803695 73 Chevy C20(Daily)http://67-72chevytrucks.com/vboard/s...d.php?t=852767 86 Suburban(summer unit) http://67-72chevytrucks.com/vboard/s...d.php?t=810697 88 Suburban 4x4(sold) |
|
|

|
|
|
#11 |
|
Registered User
 Join Date: May 2021
Location: Stony Plain Alberta Canada
Posts: 35
|
Re: Blue Two Tone 1990 Suburban Build
A few more parts showed up, but still waiting on all of the important stuff.
Got the C-Notch Cut and fit on the one side, but ran into a problem when installing the new body mounts. The factory Sleeve/Washer needs to be reused with the Energy Suspension Polyurethane Body mounts, and mine is rusted to oblivion. Now just trying to source a replacement, and LMC is back ordered and Energy Suspension wasn't able to help when i contacted them. Likely just going to get some 3 inch washers and a few bushings for leaf springs from spring shop. Annoyed that this is holding me up, but I don't want to button everything up and then have to come back and deal with it later. 
|
|
|

|
|
|
#12 |
|
Registered User
 Join Date: May 2021
Location: Stony Plain Alberta Canada
Posts: 35
|
Re: Blue Two Tone 1990 Suburban Build
Thanks. I would think once I install the rear disc brakes, the calipers will keep the axles from falling out... i'm going to test the theory by pulling the c-clips after installing the brakes and tugging on the axles.
|
|
|

|
|
|
#13 |
|
Registered User
 Join Date: May 2021
Location: Stony Plain Alberta Canada
Posts: 35
|
Re: Blue Two Tone 1990 Suburban Build
Some parts arrrived!
 Front/Rear Disc Brakes, All Air Managment Stuff, Flip Kit, Shackles, and Steering Components. Still waiting on all the front suspension stuff from PB Fab yet. Hopefully it will arrive soon, guess you could say, saving the best for last. Got around to finally getting the Tinworks Fab C-Notch in. I found it much easier to remove the bolt for the body mount for installing/removing the C-notch. It probably would have been easier to cut the notch bigger instead of constantly shaving and test fitting. The kit came with grade 8, 1/2 bolts and nylok nuts, I did notice other kits from the big names use a flat washer on both sides so I went and got extra flat washers since this kit only came with 1 washer per bolt. I figured a washer on each side might make for better clamping force. There were no directions, but I recall seeing some other people in the forum mention to drill a 1/4 hole in the corner where the cuts intresect to prevent the metal from tearing under stress so I followed that advice and over all i'm pleased with the C-notch. The metal in these frames just eats drill bits, by the end it was a full on battle to get the last few holes drilled since the metal dulled the bits so much. Gave it a quick wire wheel, and scuff with red scotchbrike, then wiped it down with degreaser and sprayed some rust converter on and then painted with Krylon Colormaxx Satin Black. Ended up getting a universal body mount kit from Energy Suspension since it had a metal sleeve in it, and washers for top and bottom mounts. If I were to do it again, I would have found stock mounts and I would skip dealing with Energy Suspesnion. I reached out to them, and they were literally zero help. All they did was enter the details into their system, and looked at the result, which was "no hardware" for a 73-91 suburban for body mounts. I gave a few measurements of what I was after for the internal sleeve and washer size which I know they have, but I heard nothing back, and no effort was made by them to try and help a customer out, unfortunately I already ordered new leaf spring bushing from them otherwise I would have just got stockers put in by a leaf spring shop.     Now that the C-Notch is in, it's time to get the rear suspension in. The plan is to put in a flip kit, lowering shackles and pull some leaves out of the leaf springs. I messed around with the fuel filler neck and have enough clearance for 1 inch shackles to swing freely, but someone else mentioned a 2 inch will work with just zip tieing over the filler neck since the range of travel for the shackles will never allow it to rotate all the way forward and down. I'm going to try the 2 inch shackles, and if it interfence or rubs, I alos have a 1 inch zero rate spring from Offroad Design that I will use and swap back to the 1 inch shackles. In total i'm going to need a little over 9 inches of drop for the axle to hit the c-notch which is what I want. After I get the axle into the notch, I will use air bags to lift it a few inches to ride height. I'm hoping to avoid the zero rate springs just for the ease of installing the brackets for the air bags since they go on top of the leaf springs and woudl need to sandwich the bracket inbetween the top leaf and the zero rate if I have to use the zero rate spring. I suppose it would be best when testing fitting all of the suspension stuff to not torque the u-bolts down until i find the right combination to acheive the drop, everyone says to not reuse u-bolts and theroetically the threads would be stretched from the inital torque, so i think I will just make them snug enough to hold everthign in place while I add/remove leaf springs/leaf spring brackets etc. To get started I pulled the leaf springs out, only one of the bolts would come out, so out came the zip-cut and all the bolts were removed. It's been about 15 years since I last pulled out factory bushings and installed poly eurethane ones. This will be the last time I ever touch a leaf spring bushing. Broke 2 drill bits, almost broke my wrist and i'm still fighting with getting the outer sleeves cut out, i find that a sawzall doesnt work very well so switching to a hacksaw to cut the last 2 out. Next time, i'm taking them to get pressed out and replaced... this is just all around prick of a job that i dont enjoy. 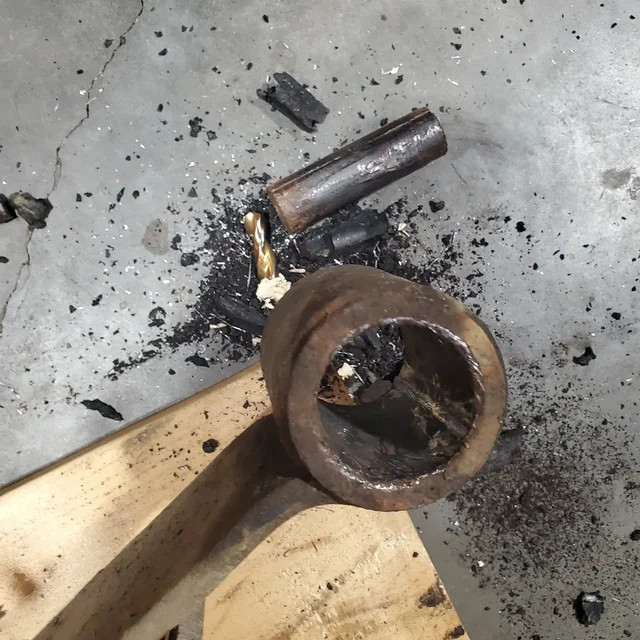  Overall, progress is a lot slower than I originally anticipated, but with 2 kids under 3, and 14 hr days by time i leave and get back home from work, i'm fairly happy with the balance i've found. Hopefully over the next week I can get the rear suspension in and go from there. I do know, i'm not looking forward to figuring out drive shaft angles afterwards. I've heard some guys say they move the tranny and carrier bearing both up, and shim up the pinion with some success, but ideally, the motor would be moved up too. When that time comes, I will grab a angle finder and read back up on drive shaft angles and phasing and get it figured out. I would be curious if a shop would build a 1 peice aluminum shaft or if it would be too long, this path would likely be a pain to since you would want a driveshaft hoop for safety as well which is just one more thing to do and im sure the cost would not be something to enjoy. |
|
|

|
|
|
#14 |
|
Registered User
 Join Date: May 2021
Location: Stony Plain Alberta Canada
Posts: 35
|
Re: Blue Two Tone 1990 Suburban Build
Made some progress over the last week. She is as low as it will go without cutting the rear floor.
Basically have the rear suspension finished up, with the exception of waiting on a rear upper bag mount. Depending on the bags height after getting the upper mount installed, I might have to run a 1" spacer from Pro Performance that they have for the F9000 bags.  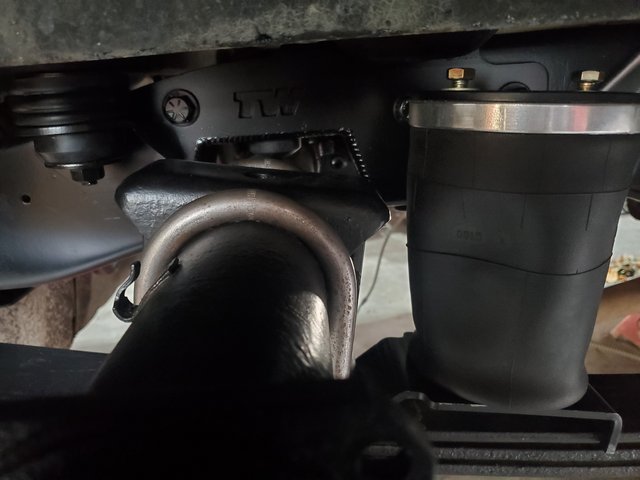  I lowered it with a flip kit, Belltech 6700 shackle (they say 1" but i say 1.5"), pulled overload and bottom leaf spring, and a 1" zero rate leaf spring from Offroad Design (1" block). I tried it without the 1" block, and the axle was about 3/4" away from the bump stop in the C-Notch. Encountered some issues with the flip kit. The saddles/axle locators did not have the offset holes in them and the axle moved forward when installed. The bottom plate did have the offset hole, so in the end I just drilled a new hole in the axle bracket to match the one in the bottom plate I reached out to the manufacturer and took pictures showing them the issue. They let me know, that they use the offset ones with trucks, but when they mocked up a blazer the axle stayed centered without using offset holes and assumed Suburban would be the same. Long story short, I ended up yanking the 1" block, putting the flip kit using the center holes, took pictures, then drilled new holes to offset, took pictures and sent to vendor. (They are sending me replacements after observing the axle not centered. Then installed 1" block, then found brackets for air bag alignment were off so had to pull apart leaf springs again to adjust them, since they need to be between the leaf springs and lift block, I took apart the leaf springs about half a dozen times and took flip kit on/off even more before finally getting it all figured out. *Disclaimer, I never torqued the U-Bolts all the way during any of the mock up... just to the point of starting to snug up, everyone always talks about how once you torque it stretches the threads under tension, and to not reuse u-bolts, so i figured I would hold off on torquing all the way until everything is ready to go and functioning. Since I went with the top 3 leaf springs, I had to find an alternative for the leaf springs clamps. Found 2.5" wide leaf springs clamps made by Pro Comp. They were quick and easy to install. The 1" zero rate springs from Offroad Design came with new pins as well, so that was handy.  I reached out to Tinworks Fabrication and asked if they would send me upper bag mounts they have for Firestone 9000 bags, but to send them without any holes drilled in the mounting portion of the bracket and Taylor agreed to help out. When I get the bracket, I will drill 3 holes to match the notch and share those holes after figuring out exact height and location of the bracket. I did have some upper bag mounts that came with the lower leaf spring bracket, but it would have required more holes to be drilled in the frame, and the width of it was a few inches wider than needed so decided to find a better solution and thankfully Tinworks Fab was able to help out. From the beginning my plan was to get the axle tube sitting in the c-notch and then use the bags to lift it up a few inches for ride height. The goal has been from the very beginning, to get it as low as possible without cutting the floor. In planning this out, I read multiple posts that were full of misinformation in regards to lowering a suburban, the most common saying the diff will hit the floor with a flip kit and this is just plain false for a 1/2 suburban. If you have a 2500 with a 14 bolt differential this would be the case, as it is much larger pumpkin than the standard 10 bolt, so always grab a tape measure and check it out for yourself instead of believing what you might read or hear on the web. I measured before starting and determined that I should have about 3/8 of an inch clearance between the diff and bed, it turned out to be 1/8" clearance. When i measured initially I didn't have c-notch installed so i'm pretty happy how close it turned out. The tire/rim combo is 275/30r24, which according to the internet is 30.5" tall. When I measure it myself, they sit closer to 30" tall. With jackstands under the axle there was about 1/4" of room between the the inner tub and top of tire. The wheel i used to mock up and measure was not fully inflated so when I went and pulled the jack stands and put it on the ground with fully inflated tires, the tires were contacting the rear inner fender tubs. For now, I'm going to use this wheel combo, but the plan will be to switch to a 22" combo that measures around 28.5" tall in the future, allowing for the necessary tire/tub clearance and to get a little lower overall. Here is a mock up picture of the leaf spring, I ended up moving he bag bracket closer to the block, and flipped the bolt over and the block as well, and used the offset holes in the block to match the 1 inch offset hole in the flip kit axle bracket. The zero rate springs from Offroad Design have 3 holes in them for centering or moving ahead/behind axle if you want. 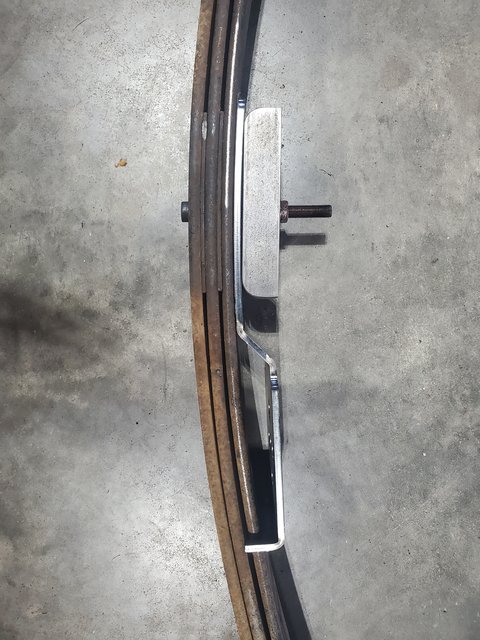 Here is my helper sorting out boxes of parts that need to be installed yet. 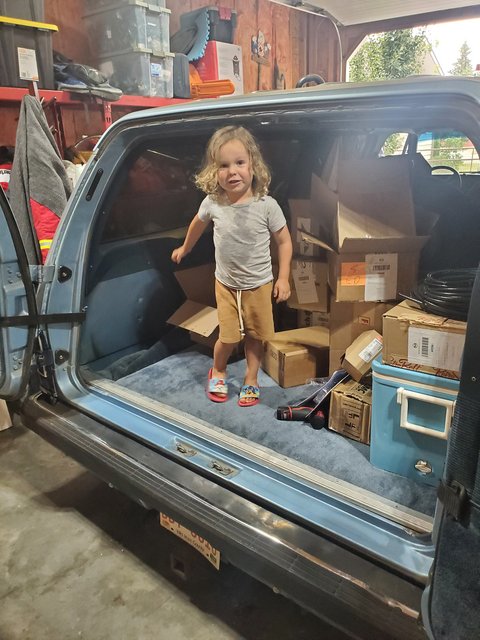 Clearance between the diff and the bed floor.  Will probably switch to a 25 gallon fuel tank. I have a few blazers that are parts vehicles parked out at my parents farm. Supposedly they are 25 gallon tanks vs the 40 gallon currently installed by factory.  Back on the ground for a few pictures. A 28.5" overall diameter tire will definitely looks better than this 30.5" combo. I do like the tuck though!!   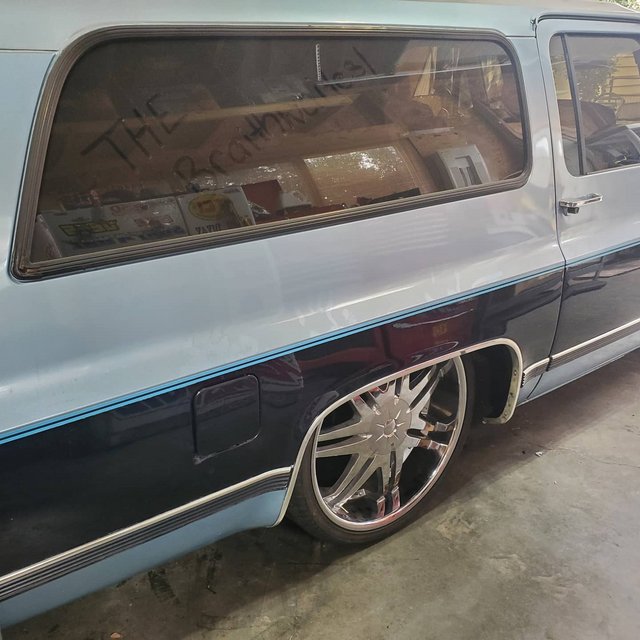
Last edited by Dexterb; 08-10-2021 at 01:20 PM. Reason: Fixing spelling mistake |
|
|

|
|
|
#15 |
|
Registered User
Join Date: May 2013
Location: Mississippi
Posts: 501
|
Re: Blue Two Tone 1990 Suburban Build
Awesome build!
I am following along.
__________________
 1987 R20 Suburban LQ4/4L80e swap: http://67-72chevytrucks.com/vboard/s...d.php?t=693824 |
|
|

|
|
|
#16 |
|
Registered User
 Join Date: May 2021
Location: Stony Plain Alberta Canada
Posts: 35
|
Re: Blue Two Tone 1990 Suburban Build
Thanks!
I read your LS Swap thread a while back and plan on using it as a reference down the road when I get to that point. Did you ever get your suburban lowered? If it is still stock height I would be curious to know the distance between the floor and top of diff with the 14 bolt if you don't mind measuring sometime. Cheers, Dexter |
|
|

|
|
|
#17 |
|
Registered User
 Join Date: May 2021
Location: Stony Plain Alberta Canada
Posts: 35
|
Re: Blue Two Tone 1990 Suburban Build
I should mention, that with the fuel filler tube/neck, the shackle would just barely rub the vent line with the Belltech Shackles. There is a hose clamp that attaches to the filler neck that attaches to the bottom of small bracket on the bed to position/support the fuel filler beck. I took off this hose clamp and zip tied the the filler and vent hose together, pulling over the vent hose, and then zip tied the filler hose to a gap under the bed support and pulled the hoses away from the shackle. I plan on finding a better solution, but spoke with someone that said they did this for years and had no issues and they had 2" shackles. I'm pretty sure it only touches under full droop and moves towards the back, away from the fuel vent lines under compression. I will try to remember and confirm.
I know a few people mentioned having a muffler shop fix it, and i wasn't sure if they were just getting them to bend it with a tubing bender or if they were cutting it off and welding a new piece in with a bend. I didn't want to waste money trying to figure out the best way while sitting at the muffler shop until i can verify and see a picture of someones muffler shop fix. |
|
|

|
|
|
#18 | |
|
Registered User
Join Date: May 2013
Location: Mississippi
Posts: 501
|
Re: Blue Two Tone 1990 Suburban Build
Quote:
My truck is still Stock height. It may be this weekend, but yes I would be happy to measure the distance between the rear axle and the floor. Keep in mind though, my truck is a 3/4 ton so the axle may be a bit larger.
__________________
 1987 R20 Suburban LQ4/4L80e swap: http://67-72chevytrucks.com/vboard/s...d.php?t=693824 |
|
|
|

|
|
|
#19 | |
|
Registered User
 Join Date: May 2021
Location: Stony Plain Alberta Canada
Posts: 35
|
Re: Blue Two Tone 1990 Suburban Build
Quote:
|
|
|
|

|
|
|
#20 |
|
Registered User
 Join Date: May 2021
Location: Stony Plain Alberta Canada
Posts: 35
|
Re: Blue Two Tone 1990 Suburban Build
Worked on the rear brakes and installed most of the Rear Pro Performance Revelator Kit.
The rear is a 13" rotor if I recall correctly. Installation was very straight forward, and when looking back at some of their earlier kits install instructions, this latest version is very simple and straight forward to install. All of the components came packaged in one box and were neatly organized and easy to identify. I believe the rear uses Mustang calipers, not sure which year or model though.   I did have one hiccup along the way, due to my own fault. After pulling the axles to install the main bracket that attaches to the ends of the axle housing, I didn't tap it on to ensure it was seated flat against the surface and only lined up the 4 bolt holes, as a result the bracket caught partially and bent on the small lip and shown in the picture below and I didn't notice it after installing and torqueing everything up. This caused the caliper to not be centered over the rotor and to drag when rotated. After scratching my head for quite a while trying to figure it out I left it for the night and resumed the next day with fresh eyes, I eventually laid down and looked from underneath noticed a slight gap between on two different sides of the bracket. The bracket had bowed out as a result of catching on the lip and caused everything to no longer be centered. The fix was easy enough, pulled everything off, (unfortunately I had just sealed up the diff cover with fresh gasket the night before and had to yank the axles again to get bracket off), pulled off the brackets, marked which side bowed out, straightened them out in the vice and then reinstalled flipped over, thinking that even though the metal is straightened out, it might have a tendency to bend back in the direction it was bent already, so why not flip it preventing that from happening... I have no idea if this matters and ultimately it was reinstalled flat and seat properly so it shouldn’t matter, but my brain said to do this. After getting everything back together everything rotated freely as it should, and all is good.  Getting the rotor installed onto the axle took some effort and persuasion with a sand filled dead blow hammer. After initially not making much progress trying to get the rotor on, I yanked it, and cleaned all the paint off of the axle register and took a file and cleaned up the surface a little more after the paint was removed and put a little bit of grease on the register to help out with sliding the rotor over the register. Then I put 3 lug nuts on, and snugged them up, and then would hit around the lug nuts with the dead blow hammer, re-snugging the lug nuts after every blow. Eventually it worked its way evenly all the way on the axle. The kit allows you to clock your caliper however you feel, can be to the rear, or front or just upp a little from either way, just make sure the bleeder is up. I ended up moving the caliper one bolt hole up on the bracket after this picture was taken, so now the caliper sits at 10 o-clock vs 9 o-clock in the picture. 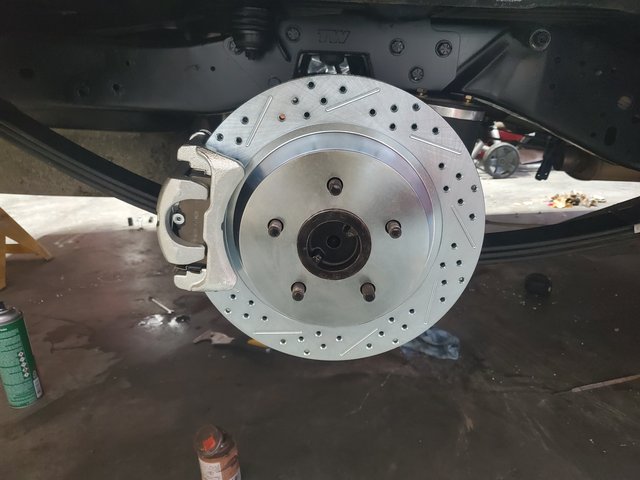 I still need to plumb the lines and hook up the emergency brake cables, hopefully I will get around to this later in the week and I think I might make new brake lines for the rear. Next up after that, install new Master Cylinder and Proportioning Valve. -Dexter |
|
|

|
|
|
#21 |
|
Registered User
 Join Date: May 2021
Location: Stony Plain Alberta Canada
Posts: 35
|
Re: Blue Two Tone 1990 Suburban Build
Made a little bit of progress this week.
Sealed up the rear diff cover and filled back up with fluid, now that I didn’t plan on pulling the axles anymore. Picked up some nickel copper brake line to replumb the rear lines but couldn’t find any gravel guard for it so I just re-bent the stock lines and cut and re-flared the one side. The lines were completely different since I had to move the mounting point for the rear “T” fitting off to the side, otherwise when aired out, the brake lines would have hit the floor since it mounted on top of the diff. My plan is to order up some gravel guard for the lines and put new ones in still sometime this winter. I wasted my money buying a decent hand tubing bender and discovered a few different sized sockets and a vice is all that I needed. (first time I’ve used my ¾ drive sockets in a while lol) The Eastwood Brake flaring tool worked great and would recommend it.  Got the new master cylinder and prop valve in. Picked up a Baer Brakes Remaster Master Cylinder with a 1 inch bore. This was a discounted one from Pro Performance since it had a few blemishes on it. Also opted for the prop valve with lines included. The fittings were all 3/16”, but he rear lines are ½”, so it wasn’t a direct plug and play, but pretty close. I was able to find a ½ to 3/16 reducer at a brake shop. I do not love the looks of the reducer, and was battling a little with it leaking initially(scared to over torque these small fittings), so come this winter I would like to change everything over to ¼ line, front and rear. This is definitely a much simpler set up, compared against the RWAL and should make a noticeable difference with all that junk removed in feel since the old system was spongy and you were scared to pump the brakes too hard or too often which is a common complaint with the RWAL system. I completely forgot to test if the brake light stays illuminated now when the truck is started up. Tomorrow I will try to remember to test this (one forum said it will go off as long as you disconnect everything but, you might not get the proper sequence on start up with the light coming on for “x” number of seconds, indicating a proper functioning system. Guess we will soon see.     Ran into some issues with the rear e-brake cables. The end portion of the cable is much too long to operate the e-brakes on the calipers. I’m not sure what the best method would be to shorten and install a new cable stop, so I opted for the easy way out and purchased a new e-brake cable kit specifically for this brake package from Pro Performance. I would have bought it initially, but on their website, it only shows 67-72 as an option for the add one, so unfortunately my goal of getting the rear brakes completely finished never happened this week. I also came to the realization that this thing won’t be on the road this year. Still waiting on front suspension. Apparently, the wait was on shocks for the front which added almost 2 months onto the order. I phoned and checked and they were on their way to the distributor, and then I might have dicked myself cause a day later I phoned and ordered up rear shocks to save on shipping, after measuring/cycling the suspension and this might have caused another delay, but I was told they were in stock with the manufacturer, so hopefully everything ships soon and I will phone and pester if not. What was supposed to take 5-6 weeks to ship unfortunately is much longer and currently this is week 15. With the additional shipping times associated with using a freight forwarded to save on shipping up to Canada, I doubt I will have everything installed before snow flies in my neck of the woods. I’m a little disappointed, but it is what it is. Because of this, I’m going to toss the old front rotors on and move it out of the garage sometime soon, as my next goal is to insulate and drywall the garage and get a gas heater installed. I had considered finishing with tin, but I plan on moving in 5 years or so, which makes drywall the more economical choice, so I’ve gotta get it out and move some stuff out of the garage so I can start putting up drywall and then fire tape it, and dig a trench for the gas line before frost hits. To Do List Remaining to get on road -Upper/Lower Control Arms – 1” Forward/Narrowed – PB Fab -Sway Bar – PB Fab -Front Air Bags – Dominator 2600 -New Inner Tie Rods, Idler Arm, Pitman Arm – Ridetech -Moog Outer tie rods for a Jeep Scout – Shorter to accommodate for narrowed control arms and CPP modular spindles narrow track width too -QA1 shortened tie rod sleeves -Shocks Front/Back – Ridetech HQ -Drop Spindles – CPP Modular -Front Brake Upgrades – Revelator from Pro Performance -Rear Upper Air Bag mount – Tinworks Fab -Front Shock Mounts – PB Fab -Air Management - Airlift 3P -E-Brake Cable – Pro Performance -Shim pinion/add spacers to carrier bearing (possibly shorten driveshaft 1”) -Smaller Coolant overflow -Wheel Alignment -Tail Pipe - Exhaust Work on during the winter -Stereo – Retrosound Head Unit and replacement speakers -Some kind of front inner fender – not sure yet what path I will go here -22” wheel/tire combo -probably a bunch of other small things. -Dexter |
|
|

|
|
|
#22 |
|
Registered User
 Join Date: May 2021
Location: Stony Plain Alberta Canada
Posts: 35
|
Re: Blue Two Tone 1990 Suburban Build
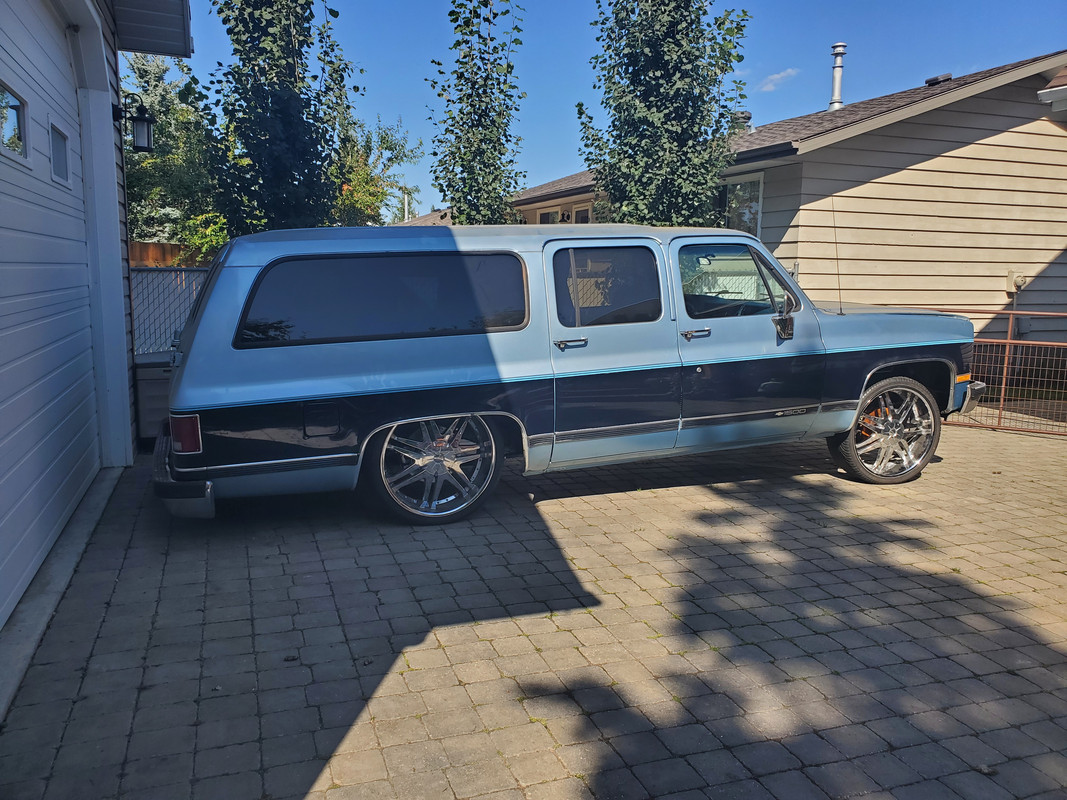
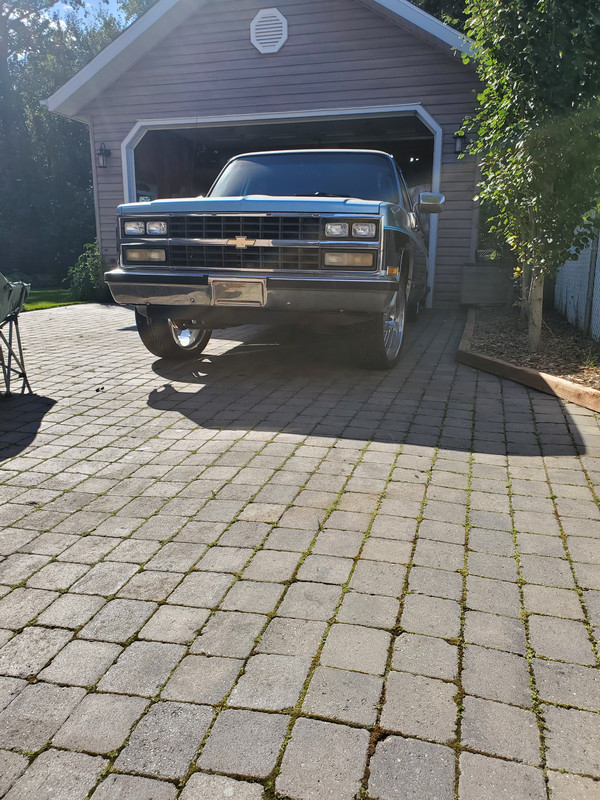
I'm working night shifts this week so when I got up today I decided to get wheels back on the suburban and move it out of the garage so I can start working on insulating/dry walling. Threw the old front rotors on without calipers, and quickly bled the rear brakes. I tossed a roll of electrical tape underneath each bump stop in the rear to make sure the tires wouldn't be rubbing the inner fenders in the back and drove it out.
  Maybe I should just leave it like this, haha. After getting it moved out I got an email notification that 5 packages were shipping from Porterbuilt! I also checked to see if the brake light in the dash would remain on after being started and it did not, so that's a bonus that I won't have to pull a bulb out of the dash. -Dexter |
|
|

|
|
|
#23 |
|
Senior Member
 Join Date: Mar 2013
Location: Ann Arbor, MI
Posts: 1,030
|
Re: Blue Two Tone 1990 Suburban Build
Nice build! Following along for ideas as I’d like to add some adjustability to my static lowered Jimmy.
|
|
|

|
 |
| Bookmarks |
|
|